Android Studio入門

ConstraintLayout 入門【 画像を並べる 】 1~4

ConstraintLayout 画像を並べる 768

サイズの違う画像を並べて表示します。
少々ややこしいので4回に分けて解説したいと思います。

画像を並べる ①
画像を並べる ②
画像を並べる ③
画像を並べる ④

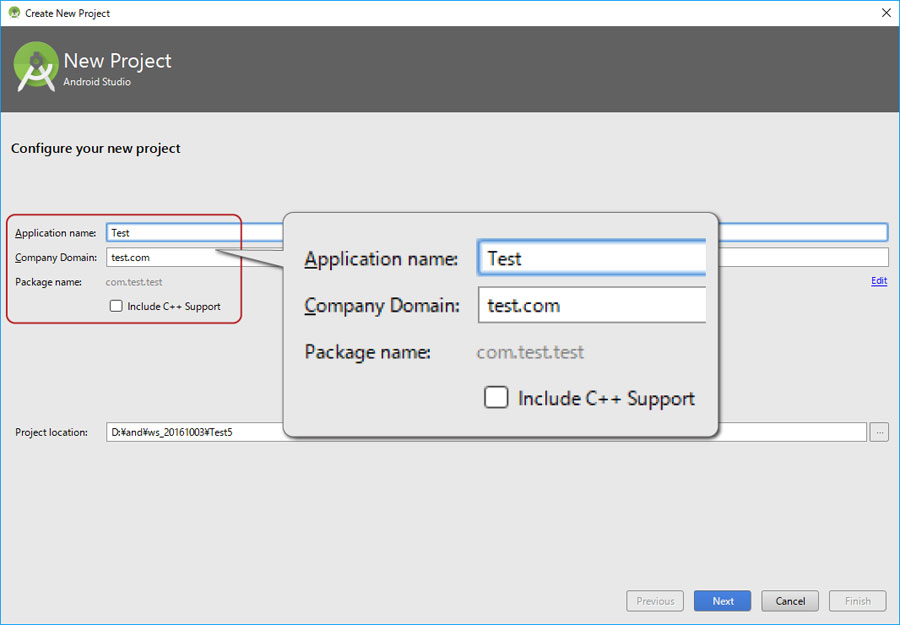
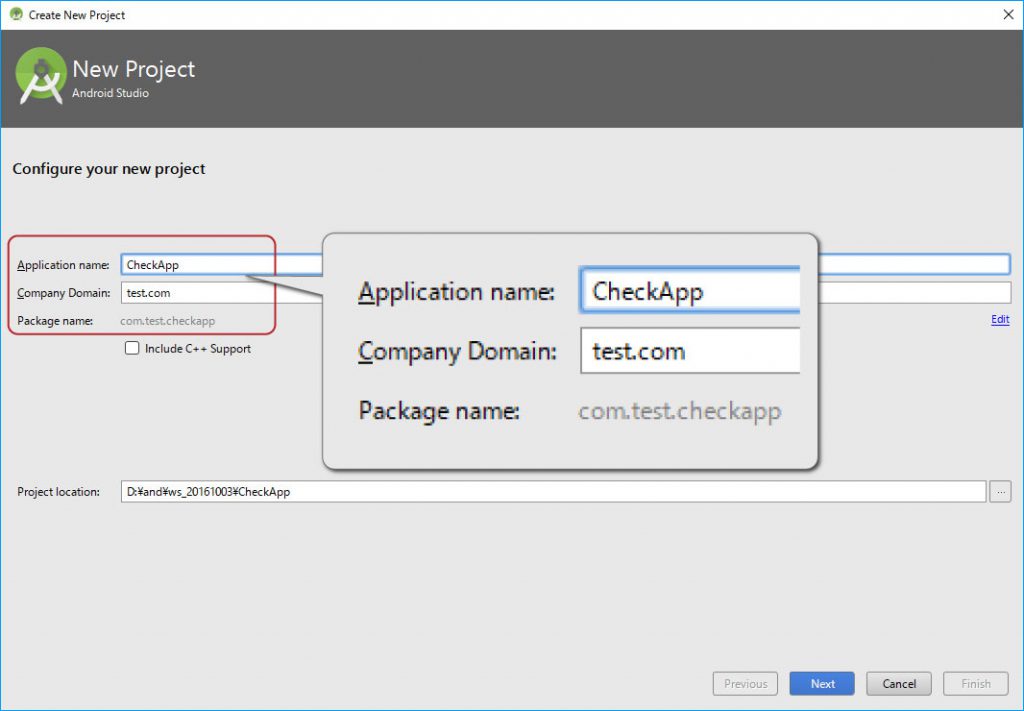
プロジェクト、カンパニードメイン、パッケージネームを同じにするとコピペエラーが減ります。

Application name My Application
Company Domain test.com
Package name com.test.myapplication

* 注意 *
・画像をご自身で要するにはファイル名やファイルサイズ、拡張子に注意する必要があります。
・ファイル名は半角小文字の英数(a~z 0~9)とアンダーバー( _ )のみで、最初の1文字目は半角英字( a ~ z)のみです。
・慣れてない方はサンプル画像の使用をオススメします。

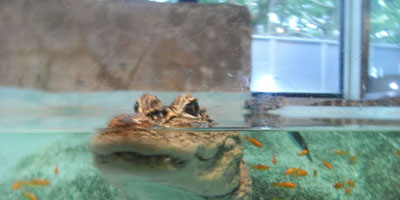
crocodile
foot

sky

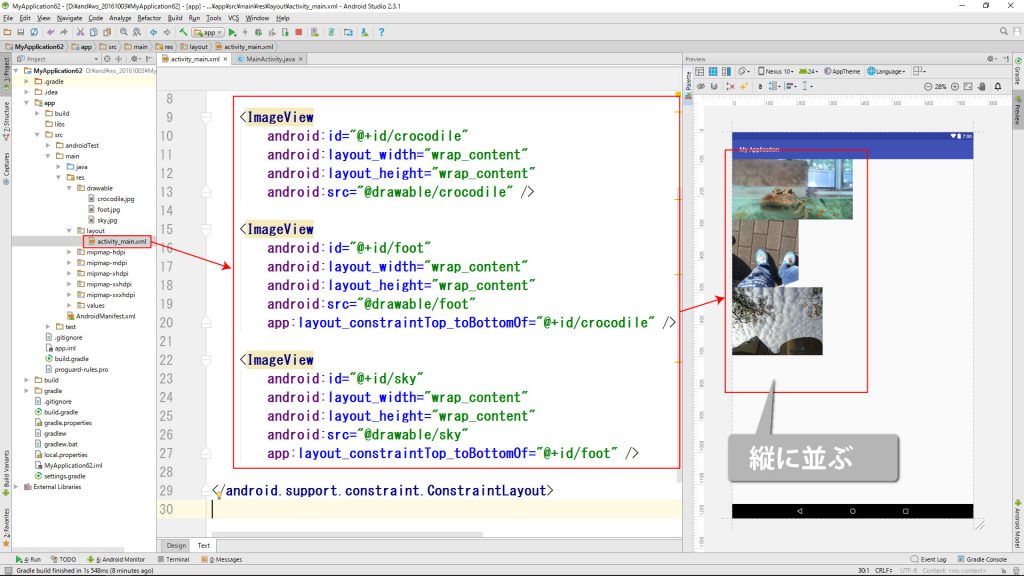
ConstraintLayout 縦に並べる

<?xml version="1.0" encoding="utf-8"?>
<android.support.constraint.ConstraintLayout xmlns:android="http://schemas.android.com/apk/res/android"
    xmlns:app="http://schemas.android.com/apk/res-auto"
    xmlns:tools="http://schemas.android.com/tools"
    android:layout_width="match_parent"
    android:layout_height="match_parent"
    tools:context="com.test.myapplication.MainActivity">

    <ImageView
        android:id="@+id/crocodile"
        android:layout_width="wrap_content"
        android:layout_height="wrap_content"
        android:src="@drawable/crocodile" />

    <ImageView
        android:id="@+id/foot"
        android:layout_width="wrap_content"
        android:layout_height="wrap_content"
        android:src="@drawable/foot"
        app:layout_constraintTop_toBottomOf="@+id/crocodile" />

    <ImageView
        android:id="@+id/sky"
        android:layout_width="wrap_content"
        android:layout_height="wrap_content"
        android:src="@drawable/sky"
        app:layout_constraintTop_toBottomOf="@+id/foot" />

</android.support.constraint.ConstraintLayout>

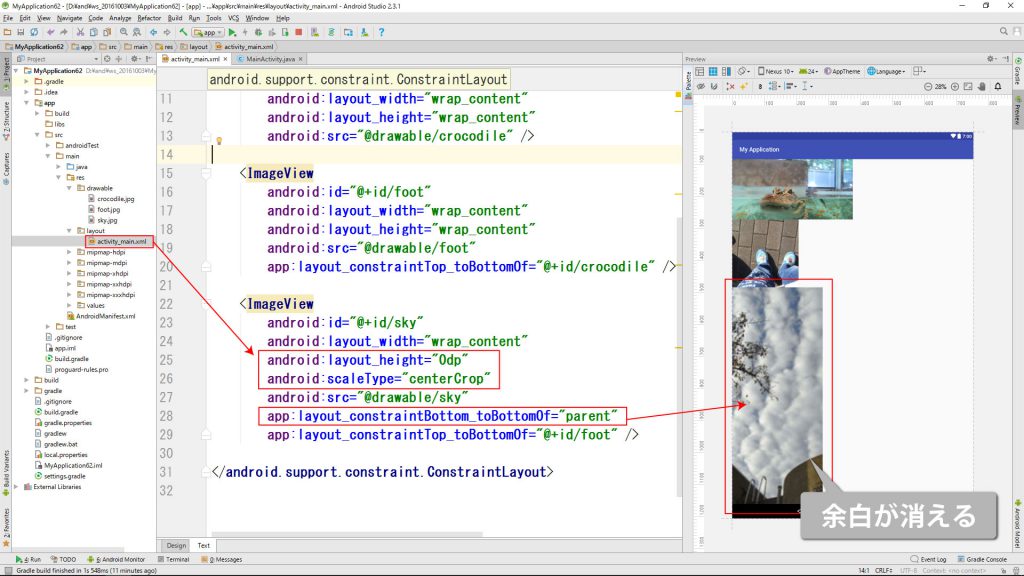
ConstraintLayout②余白を消す

<?xml version="1.0" encoding="utf-8"?>
<android.support.constraint.ConstraintLayout xmlns:android="http://schemas.android.com/apk/res/android"
    xmlns:app="http://schemas.android.com/apk/res-auto"
    xmlns:tools="http://schemas.android.com/tools"
    android:layout_width="match_parent"
    android:layout_height="match_parent"
    tools:context="com.test.myapplication.MainActivity">

    <ImageView
        android:id="@+id/crocodile"
        android:layout_width="wrap_content"
        android:layout_height="wrap_content"
        android:src="@drawable/crocodile" />

    <ImageView
        android:id="@+id/foot"
        android:layout_width="wrap_content"
        android:layout_height="wrap_content"
        android:src="@drawable/foot"
        app:layout_constraintTop_toBottomOf="@+id/crocodile" />

    <ImageView
        android:id="@+id/sky"
        android:layout_width="wrap_content"
        android:layout_height="0dp"
        android:scaleType="centerCrop"
        android:src="@drawable/sky"
        app:layout_constraintBottom_toBottomOf="parent"
        app:layout_constraintTop_toBottomOf="@+id/foot" />

</android.support.constraint.ConstraintLayout>

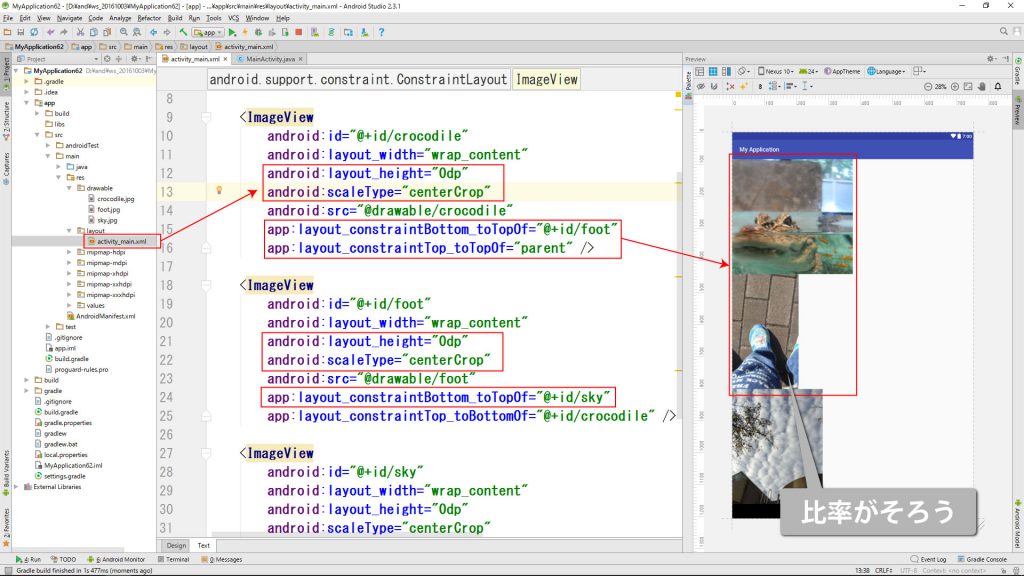
ConstraintLayout③比率をそろえる

<?xml version="1.0" encoding="utf-8"?>
<android.support.constraint.ConstraintLayout xmlns:android="http://schemas.android.com/apk/res/android"
    xmlns:app="http://schemas.android.com/apk/res-auto"
    xmlns:tools="http://schemas.android.com/tools"
    android:layout_width="match_parent"
    android:layout_height="match_parent"
    tools:context="com.test.myapplication.MainActivity">

    <ImageView
        android:id="@+id/crocodile"
        android:layout_width="wrap_content"
        android:layout_height="0dp"
        android:scaleType="centerCrop"
        android:src="@drawable/crocodile"
        app:layout_constraintBottom_toTopOf="@+id/foot"
        app:layout_constraintTop_toTopOf="parent" />

    <ImageView
        android:id="@+id/foot"
        android:layout_width="wrap_content"
        android:layout_height="0dp"
        android:scaleType="centerCrop"
        android:src="@drawable/foot"
        app:layout_constraintBottom_toTopOf="@+id/sky"
        app:layout_constraintTop_toBottomOf="@+id/crocodile" />

    <ImageView
        android:id="@+id/sky"
        android:layout_width="wrap_content"
        android:layout_height="0dp"
        android:scaleType="centerCrop"
        android:src="@drawable/sky"
        app:layout_constraintBottom_toBottomOf="parent"
        app:layout_constraintTop_toBottomOf="@+id/foot" />

</android.support.constraint.ConstraintLayout>

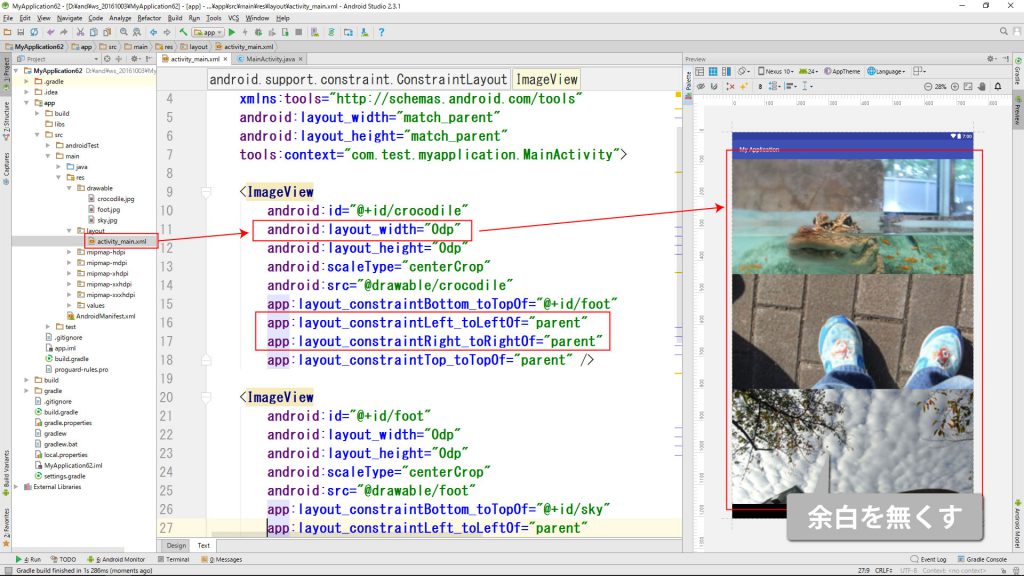
ConstraintLayout④余白を無くす

<?xml version="1.0" encoding="utf-8"?>
<android.support.constraint.ConstraintLayout xmlns:android="http://schemas.android.com/apk/res/android"
    xmlns:app="http://schemas.android.com/apk/res-auto"
    xmlns:tools="http://schemas.android.com/tools"
    android:layout_width="match_parent"
    android:layout_height="match_parent"
    tools:context="com.test.myapplication.MainActivity">

    <ImageView
        android:id="@+id/crocodile"
        android:layout_width="0dp"
        android:layout_height="0dp"
        android:scaleType="centerCrop"
        android:src="@drawable/crocodile"
        app:layout_constraintBottom_toTopOf="@+id/foot"
        app:layout_constraintLeft_toLeftOf="parent"
        app:layout_constraintRight_toRightOf="parent"
        app:layout_constraintTop_toTopOf="parent" />

    <ImageView
        android:id="@+id/foot"
        android:layout_width="0dp"
        android:layout_height="0dp"
        android:scaleType="centerCrop"
        android:src="@drawable/foot"
        app:layout_constraintBottom_toTopOf="@+id/sky"
        app:layout_constraintLeft_toLeftOf="parent"
        app:layout_constraintRight_toRightOf="parent"
        app:layout_constraintTop_toBottomOf="@+id/crocodile" />

    <ImageView
        android:id="@+id/sky"
        android:layout_width="0dp"
        android:layout_height="0dp"
        android:scaleType="centerCrop"
        android:src="@drawable/sky"
        app:layout_constraintBottom_toBottomOf="parent"
        app:layout_constraintLeft_toLeftOf="parent"
        app:layout_constraintRight_toRightOf="parent"
        app:layout_constraintTop_toBottomOf="@+id/foot" />

</android.support.constraint.ConstraintLayout>

Android プログラミング【 育児アプリ 】 ~ シンプル版 ~

育児アプリ 768

できる限り簡単な「育児アプリ」を作成します。
内容はアニメーション、効果音等の復習が中心ですが、絵本アプリなどに発展させたいです。

プロジェクト、カンパニードメイン、パッケージネームを同じにするとコピペエラーが減ります。

Application name Education
Company Domain test.com
Package name com.test.education

* 注意 *
・画像や効果音をご自身で要するにはファイル名やファイルサイズ、拡張子に注意する必要があります。
・慣れてない方はサンプル使用をオススメします。

一括DL

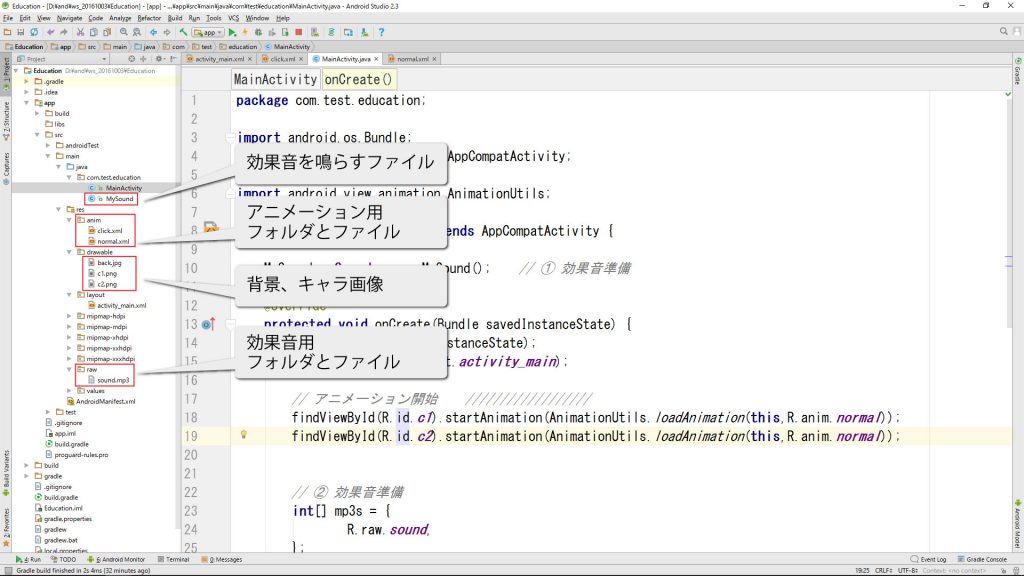
育児アプリ-ファイル構成2

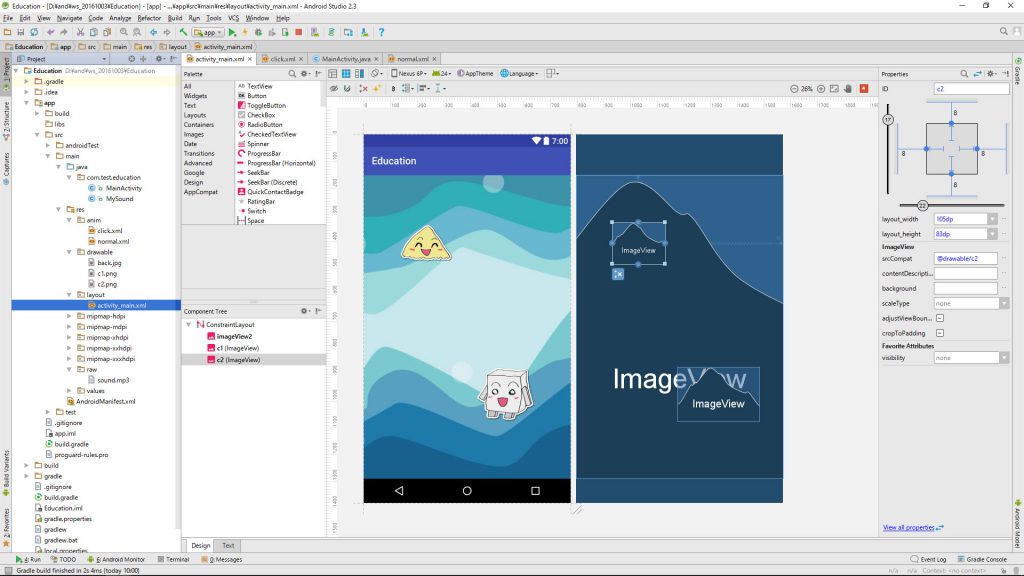
育児アプリ-画面レイアウト

<?xml version="1.0" encoding="utf-8"?>
<android.support.constraint.ConstraintLayout xmlns:android="http://schemas.android.com/apk/res/android"
    xmlns:app="http://schemas.android.com/apk/res-auto"
    xmlns:tools="http://schemas.android.com/tools"
    android:layout_width="match_parent"
    android:layout_height="match_parent"
    tools:context="com.test.education.MainActivity">

    <ImageView
        android:id="@+id/imageView2"
        android:layout_width="0dp"
        android:layout_height="0dp"
        android:scaleType="centerCrop"
        android:src="@drawable/back"
        app:layout_constraintBottom_toBottomOf="parent"
        app:layout_constraintLeft_toLeftOf="parent"
        app:layout_constraintRight_toRightOf="parent"
        app:layout_constraintTop_toTopOf="parent" />

    <ImageView
        android:id="@+id/c1"
        android:layout_width="163dp"
        android:layout_height="108dp"
        android:layout_marginBottom="8dp"
        android:layout_marginEnd="8dp"
        android:layout_marginLeft="8dp"
        android:layout_marginRight="8dp"
        android:layout_marginStart="8dp"
        android:layout_marginTop="8dp"
        android:onClick="onImg"
        app:layout_constraintBottom_toBottomOf="parent"
        app:layout_constraintHorizontal_bias="0.83"
        app:layout_constraintLeft_toLeftOf="parent"
        app:layout_constraintRight_toRightOf="parent"
        app:layout_constraintTop_toTopOf="@+id/imageView2"
        app:layout_constraintVertical_bias="0.78"
        app:srcCompat="@drawable/c1"
        tools:layout_editor_absoluteX="135dp"
        tools:layout_editor_absoluteY="245dp" />

    <ImageView
        android:id="@+id/c2"
        android:layout_width="105dp"
        android:layout_height="83dp"
        android:layout_marginBottom="8dp"
        android:layout_marginLeft="8dp"
        android:layout_marginRight="8dp"
        android:layout_marginTop="8dp"
        android:onClick="onImg"
        app:layout_constraintBottom_toBottomOf="parent"
        app:layout_constraintHorizontal_bias="0.22"
        app:layout_constraintLeft_toLeftOf="parent"
        app:layout_constraintRight_toRightOf="parent"
        app:layout_constraintTop_toTopOf="parent"
        app:layout_constraintVertical_bias="0.17000002"
        app:srcCompat="@drawable/c2" />

</android.support.constraint.ConstraintLayout>

package com.test.education;

import android.os.Bundle;
import android.support.v7.app.AppCompatActivity;
import android.view.View;
import android.view.animation.AnimationUtils;

public class MainActivity extends AppCompatActivity {

    MySound mySound = new MySound();    // ① 効果音準備

    @Override
    protected void onCreate(Bundle savedInstanceState) {
        super.onCreate(savedInstanceState);
        setContentView(R.layout.activity_main);

        // アニメーション開始    //////////////////
        findViewById(R.id.c1).startAnimation(AnimationUtils.loadAnimation(this,R.anim.normal));
        findViewById(R.id.c2).startAnimation(AnimationUtils.loadAnimation(this,R.anim.normal));


        // ② 効果音準備
        int[] mp3s = {
                R.raw.sound,
        };
        mySound.onCreate(this,mp3s); // ③ 効果音初期化
    }


    // クリック処理  /////////////////////////////
    public void onImg(View v){
        mySound.onPlay(0);  // ④ 効果音再生
        v.startAnimation(AnimationUtils.loadAnimation(this,R.anim.click));
    }


    // 終了処理 ///////////////////////////////////
    @Override
    protected void onDestroy() {
        super.onDestroy();
        mySound.onDestroy();    // ⑤ 効果音終了
    }
}

Android Studio入門

Android プログラミング【 漢字クイズ 】 ~ シンプル版 ~

漢字クイズ ~シンプル版~ 768

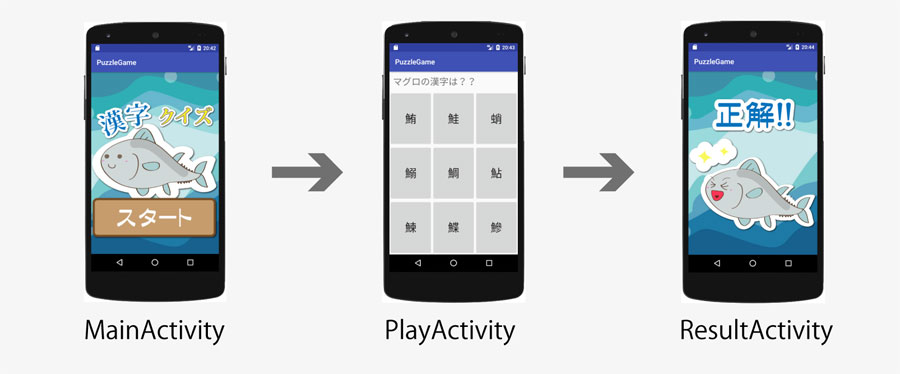
シンプルな漢字クイズを作る動画です。

非常に長くなるので丁寧な解説はしていません。
ソースを読む、アレンジするなどの学習にご使用ください。

アレンジすると本格的なクイズも可能ですので試行錯誤してみてください。

プロジェクト、カンパニードメイン、パッケージネームを同じにするとコピペエラーが減ります。

Application name PuzzleGame
Company Domain test.com
Package name com.test.puzzlegame
* 注意 *
・画像をご自身で要するにはファイル名やファイルサイズ、拡張子に注意する必要があります。
・ファイル名は半角小文字の英数(a~z 0~9)とアンダーバー( _ )のみで、最初の1文字目は半角英字( a ~ z)のみです。
・慣れてない方はサンプル画像の使用をオススメします。

正解
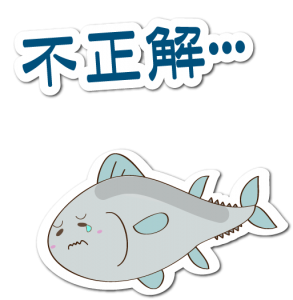
不正解
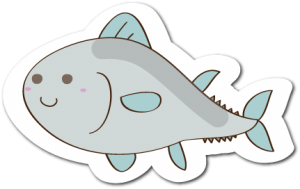
マグロ
背景
ボタン
タイトル

漢字クイズ Activity

<?xml version="1.0" encoding="utf-8"?>
<android.support.constraint.ConstraintLayout xmlns:android="http://schemas.android.com/apk/res/android"
    xmlns:app="http://schemas.android.com/apk/res-auto"
    xmlns:tools="http://schemas.android.com/tools"
    android:layout_width="match_parent"
    android:layout_height="match_parent"
    tools:context="com.test.puzzlegame.MainActivity">

    <ImageView
        android:layout_width="0dp"
        android:layout_height="0dp"
        android:scaleType="centerCrop"
        android:src="@drawable/puzzlegame_back"
        app:layout_constraintBottom_toBottomOf="parent"
        app:layout_constraintLeft_toLeftOf="parent"
        app:layout_constraintRight_toRightOf="parent"
        app:layout_constraintTop_toTopOf="parent" />

    <ImageView
        android:layout_width="wrap_content"
        android:layout_height="wrap_content"
        android:src="@drawable/tuna"
        app:layout_constraintBottom_toBottomOf="parent"
        app:layout_constraintLeft_toLeftOf="parent"
        app:layout_constraintRight_toRightOf="parent"
        app:layout_constraintTop_toTopOf="parent" />

    <ImageView
        android:layout_width="wrap_content"
        android:layout_height="wrap_content"
        android:src="@drawable/title"
        app:layout_constraintBottom_toBottomOf="parent"
        app:layout_constraintLeft_toLeftOf="parent"
        app:layout_constraintRight_toRightOf="parent"
        app:layout_constraintTop_toTopOf="parent"
        app:layout_constraintVertical_bias="0.1" />


    <ImageView
        android:layout_width="wrap_content"
        android:layout_height="wrap_content"
        android:onClick="onStart"
        android:src="@drawable/start_button"
        app:layout_constraintBottom_toBottomOf="parent"
        app:layout_constraintLeft_toLeftOf="parent"
        app:layout_constraintRight_toRightOf="parent"
        app:layout_constraintTop_toTopOf="parent"
        app:layout_constraintVertical_bias="0.9" />

</android.support.constraint.ConstraintLayout>
<?xml version="1.0" encoding="utf-8"?>
<LinearLayout xmlns:android="http://schemas.android.com/apk/res/android"
    xmlns:tools="http://schemas.android.com/tools"
    android:layout_width="match_parent"
    android:layout_height="match_parent"
    android:orientation="vertical"
    tools:context="com.test.puzzlegame.PlayActivity">

    <TextView
        android:padding="10sp"
        android:textSize="26sp"
        android:text="マグロの漢字は??"
        android:layout_width="match_parent"
        android:layout_height="wrap_content" />

    <LinearLayout
        android:layout_width="match_parent"
        android:layout_height="match_parent"
        android:layout_weight="1">

        <Button
            android:textSize="32sp"
            android:id="@+id/b0"
            android:layout_width="match_parent"
            android:layout_height="match_parent"
            android:layout_weight="1"
            android:onClick="onButton" />

        <Button
            android:textSize="32sp"
            android:id="@+id/b1"
            android:layout_width="match_parent"
            android:layout_height="match_parent"
            android:layout_weight="1"
            android:onClick="onButton" />

        <Button
            android:textSize="32sp"
            android:id="@+id/b2"
            android:layout_width="match_parent"
            android:layout_height="match_parent"
            android:layout_weight="1"
            android:onClick="onButton" />

    </LinearLayout>

    <LinearLayout
        android:layout_width="match_parent"
        android:layout_height="match_parent"
        android:layout_weight="1">

        <Button
            android:textSize="32sp"
            android:id="@+id/b3"
            android:layout_width="match_parent"
            android:layout_height="match_parent"
            android:layout_weight="1"
            android:onClick="onButton" />

        <Button
            android:textSize="32sp"
            android:id="@+id/b4"
            android:layout_width="match_parent"
            android:layout_height="match_parent"
            android:layout_weight="1"
            android:onClick="onButton" />

        <Button
            android:textSize="32sp"
            android:id="@+id/b5"
            android:layout_width="match_parent"
            android:layout_height="match_parent"
            android:layout_weight="1"
            android:onClick="onButton" />

    </LinearLayout>

    <LinearLayout
        android:layout_width="match_parent"
        android:layout_height="match_parent"
        android:layout_weight="1">

        <Button
            android:textSize="32sp"
            android:id="@+id/b6"
            android:layout_width="match_parent"
            android:layout_height="match_parent"
            android:layout_weight="1"
            android:onClick="onButton" />

        <Button
            android:textSize="32sp"
            android:id="@+id/b7"
            android:layout_width="match_parent"
            android:layout_height="match_parent"
            android:layout_weight="1"
            android:onClick="onButton" />

        <Button
            android:textSize="32sp"
            android:id="@+id/b8"
            android:layout_width="match_parent"
            android:layout_height="match_parent"
            android:layout_weight="1"
            android:onClick="onButton" />

    </LinearLayout>

</LinearLayout>
<?xml version="1.0" encoding="utf-8"?>
<android.support.constraint.ConstraintLayout xmlns:android="http://schemas.android.com/apk/res/android"
    xmlns:app="http://schemas.android.com/apk/res-auto"
    xmlns:tools="http://schemas.android.com/tools"
    android:layout_width="match_parent"
    android:layout_height="match_parent"
    tools:context="com.test.puzzlegame.ResultActivity">

    <ImageView
        android:layout_width="0dp"
        android:layout_height="0dp"
        android:scaleType="centerCrop"
        android:src="@drawable/puzzlegame_back"
        app:layout_constraintBottom_toBottomOf="parent"
        app:layout_constraintLeft_toLeftOf="parent"
        app:layout_constraintRight_toRightOf="parent"
        app:layout_constraintTop_toTopOf="parent" />

    <ImageView
        android:id="@+id/ivResult"
        android:layout_width="0dp"
        android:layout_height="0dp"
        android:src="@drawable/result_a"
        app:layout_constraintBottom_toBottomOf="parent"
        app:layout_constraintLeft_toLeftOf="parent"
        app:layout_constraintRight_toRightOf="parent"
        app:layout_constraintTop_toTopOf="parent" />

</android.support.constraint.ConstraintLayout>
package com.test.puzzlegame;

import android.content.Intent;
import android.os.Bundle;
import android.support.v7.app.AppCompatActivity;
import android.view.View;

public class MainActivity extends AppCompatActivity {

    @Override
    protected void onCreate(Bundle savedInstanceState) {
        super.onCreate(savedInstanceState);
        setContentView(R.layout.activity_main);
    }

    //////////////////////////////////////////////
    // プレイ画面表示
    public void onStart(View v) {
        Intent intent = new Intent(this,PlayActivity.class);
        startActivity(intent);
    }
}
package com.test.puzzlegame;

import android.os.Bundle;
import android.support.v7.app.AppCompatActivity;
import android.widget.Button;

public class PlayActivity extends AppCompatActivity {

    // 問題データ    ///////////////////////////////////
    String[] ans = {"鮪", "鮭", "蛸", "鰯", "鯛", "鮎", "鰊", "鰈", "鰺", "鯖"};

    @Override
    protected void onCreate(Bundle savedInstanceState) {
        super.onCreate(savedInstanceState);
        setContentView(R.layout.activity_play);

        /////////////////////////////////////////////
        // クイズのセット(仮)  ////////////////////
        ((Button) findViewById(R.id.b0)).setText(ans[0]);
        ((Button) findViewById(R.id.b1)).setText(ans[1]);
        ((Button) findViewById(R.id.b2)).setText(ans[2]);
        ((Button) findViewById(R.id.b3)).setText(ans[3]);
        ((Button) findViewById(R.id.b4)).setText(ans[4]);
        ((Button) findViewById(R.id.b5)).setText(ans[5]);
        ((Button) findViewById(R.id.b6)).setText(ans[6]);
        ((Button) findViewById(R.id.b7)).setText(ans[7]);
        ((Button) findViewById(R.id.b8)).setText(ans[8]);
    }
}

puzzlegame_配列図解

package com.test.puzzlegame;

import android.support.v7.app.AppCompatActivity;
import android.os.Bundle;
import android.widget.Button;

import java.util.Arrays;
import java.util.Collections;
import java.util.List;

public class PlayActivity extends AppCompatActivity {

    // 問題データ    ///////////////////////////////////
    String[] ans = {"鮪", "鮭", "蛸", "鰯", "鯛", "鮎", "鰊", "鰈", "鰺", "鯖"};

    @Override
    protected void onCreate(Bundle savedInstanceState) {
        super.onCreate(savedInstanceState);
        setContentView(R.layout.activity_play);

        /////////////////////////////////////////////
        // クイズのセット  //////////////////////////
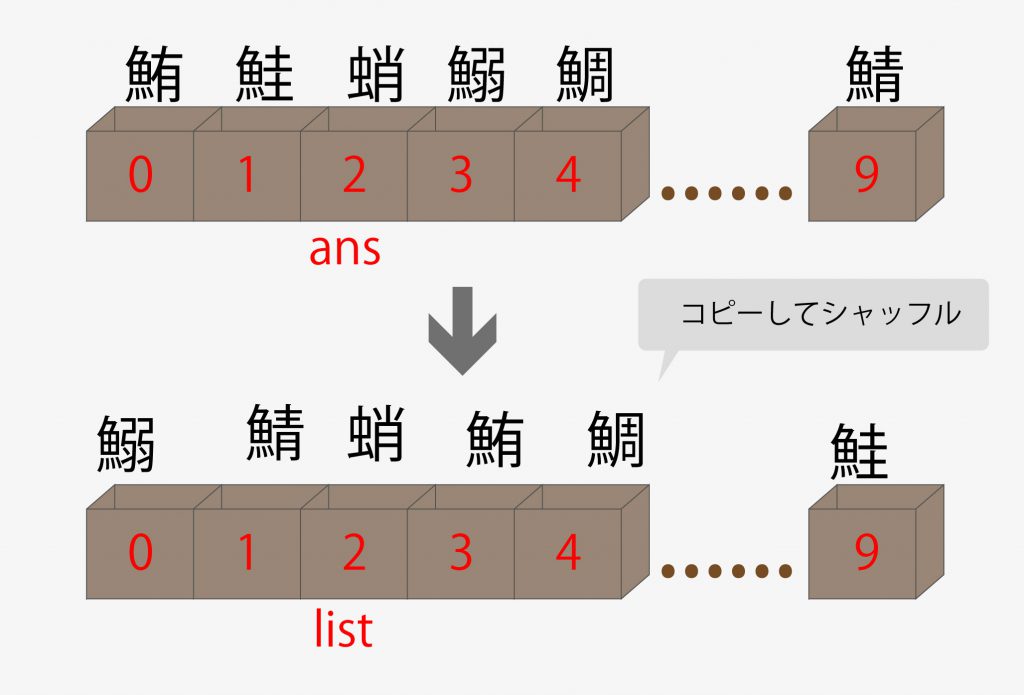
        List list = Arrays.asList(ans.clone());
        Collections.shuffle(list);

        ((Button) findViewById(R.id.b0)).setText(list.get(0).toString());
        ((Button) findViewById(R.id.b1)).setText(list.get(1).toString());
        ((Button) findViewById(R.id.b2)).setText(list.get(2).toString());
        ((Button) findViewById(R.id.b3)).setText(list.get(3).toString());
        ((Button) findViewById(R.id.b4)).setText(list.get(4).toString());
        ((Button) findViewById(R.id.b5)).setText(list.get(5).toString());
        ((Button) findViewById(R.id.b6)).setText(list.get(6).toString());
        ((Button) findViewById(R.id.b7)).setText(list.get(7).toString());
        ((Button) findViewById(R.id.b8)).setText(list.get(8).toString());
    }
}
puzzlegame_シャッフル図解

package com.test.puzzlegame;

import android.os.Bundle;
import android.support.v7.app.AppCompatActivity;
import android.view.View;
import android.widget.Button;
import android.widget.Toast;

import java.util.Arrays;
import java.util.Collections;
import java.util.List;

public class PlayActivity extends AppCompatActivity {

    // 問題データ    ///////////////////////////////////
    String[] ans = {"鮪", "鮭", "蛸", "鰯", "鯛", "鮎", "鰊", "鰈", "鰺", "鯖"};

    @Override
    protected void onCreate(Bundle savedInstanceState) {
        super.onCreate(savedInstanceState);
        setContentView(R.layout.activity_play);

        /////////////////////////////////////////////
        // クイズのセット  //////////////////////////
        List list = Arrays.asList(ans.clone());
        Collections.shuffle(list);

        ((Button) findViewById(R.id.b0)).setText(list.get(0).toString());
        ((Button) findViewById(R.id.b1)).setText(list.get(1).toString());
        ((Button) findViewById(R.id.b2)).setText(list.get(2).toString());
        ((Button) findViewById(R.id.b3)).setText(list.get(3).toString());
        ((Button) findViewById(R.id.b4)).setText(list.get(4).toString());
        ((Button) findViewById(R.id.b5)).setText(list.get(5).toString());
        ((Button) findViewById(R.id.b6)).setText(list.get(6).toString());
        ((Button) findViewById(R.id.b7)).setText(list.get(7).toString());
        ((Button) findViewById(R.id.b8)).setText(list.get(8).toString());
        
    }

    /////////////////////////////////////////////
    // 正解判定  ////////////////////////////////
    public void onButton(View v) {

        // 文字の取得
        String buttonText = ((Button) v).getText().toString();
        // 正解判定
        if (buttonText.equals(ans[0])) {
            Toast.makeText(this,buttonText + "は正解!", Toast.LENGTH_SHORT).show();
        } else {
            Toast.makeText(this,buttonText + "は不正解・・・", Toast.LENGTH_SHORT).show();
        }
    }
}
package com.test.puzzlegame;

import android.content.Intent;
import android.os.Bundle;
import android.support.v7.app.AppCompatActivity;
import android.view.View;
import android.widget.Button;

import java.util.Arrays;
import java.util.Collections;
import java.util.List;

public class PlayActivity extends AppCompatActivity {

    // 問題データ    ///////////////////////////////////
    String[] ans = {"鮪", "鮭", "蛸", "鰯", "鯛", "鮎", "鰊", "鰈", "鰺", "鯖"};

    @Override
    protected void onCreate(Bundle savedInstanceState) {
        super.onCreate(savedInstanceState);
        setContentView(R.layout.activity_play);

        /////////////////////////////////////////////
        // クイズのセット  //////////////////////////
        List list = Arrays.asList(ans.clone());
        Collections.shuffle(list);

        ((Button) findViewById(R.id.b0)).setText(list.get(0).toString());
        ((Button) findViewById(R.id.b1)).setText(list.get(1).toString());
        ((Button) findViewById(R.id.b2)).setText(list.get(2).toString());
        ((Button) findViewById(R.id.b3)).setText(list.get(3).toString());
        ((Button) findViewById(R.id.b4)).setText(list.get(4).toString());
        ((Button) findViewById(R.id.b5)).setText(list.get(5).toString());
        ((Button) findViewById(R.id.b6)).setText(list.get(6).toString());
        ((Button) findViewById(R.id.b7)).setText(list.get(7).toString());
        ((Button) findViewById(R.id.b8)).setText(list.get(8).toString());
        
    }

    /////////////////////////////////////////////
    // 正解判定  ////////////////////////////////
    public void onButton(View v) {
        // 画面切り替え準備
        Intent intent = new Intent(this, ResultActivity.class);
        // 文字の取得
        String buttonText = ((Button) v).getText().toString();
        // 正解判定
        if (buttonText.equals(ans[0])) {
            intent.putExtra("result",true);
        } else {
            intent.putExtra("result",false);
        }
        // 画面切り替え
        startActivity(intent);
        finish();
    }

}
package com.test.puzzlegame;

import android.content.Intent;
import android.os.Bundle;
import android.support.v7.app.AppCompatActivity;
import android.widget.ImageView;

public class ResultActivity extends AppCompatActivity {

    @Override
    protected void onCreate(Bundle savedInstanceState) {
        super.onCreate(savedInstanceState);
        setContentView(R.layout.activity_result);

        // 結果を取得    /////////////////////
        Intent intent = getIntent();
        boolean result = intent.getBooleanExtra("result" ,false);

        // 結果に合わせて表示切り替え ////////
        if(! result)
            ((ImageView)findViewById(R.id.ivResult)).setImageResource(R.drawable.result_b);
        
    }
}
ConstraintLayout 入門 【 画像の表示② 】~ キャラっぽい画像 ~

ConstraintLayout 入門 【 画像の表示② 】~ キャラっぽい画像 ~ 768

Android Studio 入門動画です。
「ConstraintLayoutレイアウトでキャラクター画像を表示してみよう!」って内容です。

あくまでも画像表示の練習です。
キャラクター画像として完璧に利用できる訳ではありません。

プロジェクト、カンパニードメイン、パッケージネームを同じにするとコピペエラーが減ります。

Application name Test
Company Domain test.com
Package name com.test.test

* 注意 *
・画像をご自身で要するにはファイル名やファイルサイズ、拡張子に注意する必要があります。
・ファイル名は半角小文字の英数(a~z 0~9)とアンダーバー( _ )のみで、最初の1文字目は半角英字( a ~ z)のみです。
・慣れてない方はサンプル画像の使用をオススメします。

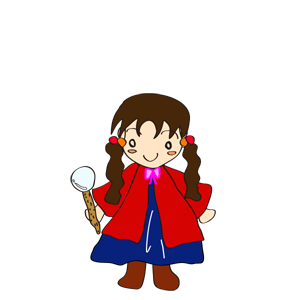
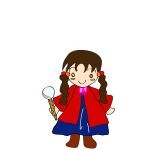
キャラクター画像
キャラクター画像
<?xml version="1.0" encoding="utf-8"?>
<android.support.constraint.ConstraintLayout xmlns:android="http://schemas.android.com/apk/res/android"
    xmlns:app="http://schemas.android.com/apk/res-auto"
    xmlns:tools="http://schemas.android.com/tools"
    android:layout_width="match_parent"
    android:layout_height="match_parent"
    tools:context="com.test.test.MainActivity">

    <ImageView
        android:layout_width="0dp"
        android:layout_height="0dp"
        android:scaleType="centerCrop"
        android:src="@drawable/back"
        app:layout_constraintBottom_toBottomOf="parent"
        app:layout_constraintLeft_toLeftOf="parent"
        app:layout_constraintRight_toRightOf="parent"
        app:layout_constraintTop_toTopOf="parent" />


    <ImageView
        android:layout_width="wrap_content"
        android:layout_height="wrap_content"
        android:src="@drawable/character"
        app:layout_constraintBottom_toBottomOf="parent"
        app:layout_constraintLeft_toLeftOf="parent"
        app:layout_constraintRight_toRightOf="parent" />

</android.support.constraint.ConstraintLayout>

Android Studio入門

ConstraintLayout 入門 【 画像の表示① 】~ 背景っぽい画像 ~

ConstraintLayout 入門 【 画像の表示① 】~ 背景っぽい画像 ~ 768

Android Studio 入門動画です。
「ConstraintLayoutで背景画像を表示してみよう!」って内容です。

あくまでも画像表示の練習です。
背景画像として完璧に利用できる訳ではありません。

プロジェクト、カンパニードメイン、パッケージネームを同じにするとコピペエラーが減ります。

Application name Test
Company Domain test.com
Package name com.test.test

* 注意 *
・画像をご自身で要するにはファイル名やファイルサイズ、拡張子に注意する必要があります。
・ファイル名は半角小文字の英数(a~z 0~9)とアンダーバー( _ )のみで、最初の1文字目は半角英字( a ~ z)のみです。
・慣れてない方はサンプル画像の使用をオススメします。

背景画像
背景画像
<?xml version="1.0" encoding="utf-8"?>
<android.support.constraint.ConstraintLayout xmlns:android="http://schemas.android.com/apk/res/android"
    xmlns:app="http://schemas.android.com/apk/res-auto"
    xmlns:tools="http://schemas.android.com/tools"
    android:layout_width="match_parent"
    android:layout_height="match_parent"
    tools:context="com.test.test.MainActivity">

    <ImageView
        android:layout_width="0dp"
        android:layout_height="0dp"
        android:scaleType="centerCrop"
        android:src="@drawable/back"
        app:layout_constraintBottom_toBottomOf="parent"
        app:layout_constraintLeft_toLeftOf="parent"
        app:layout_constraintRight_toRightOf="parent"
        app:layout_constraintTop_toTopOf="parent" />
    
</android.support.constraint.ConstraintLayout>
Android Studio入門

Android プログラミング【効果音の追加】 ~オブジェクト指向・予習編~

効果音の追加 768

アプリ作成

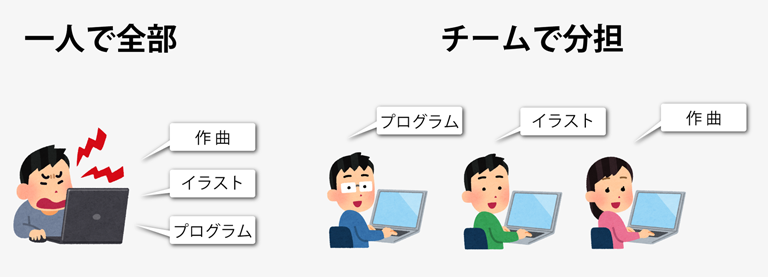
プログラムも分担

バックミュージック-指示通りに記載

プロジェクト、カンパニードメイン、パッケージネームを同じにするとコピペエラーが減ります。

Application name Test
Company Domain test.com
Package name com.test.test

オブジェクト指向 新規プロジェクト

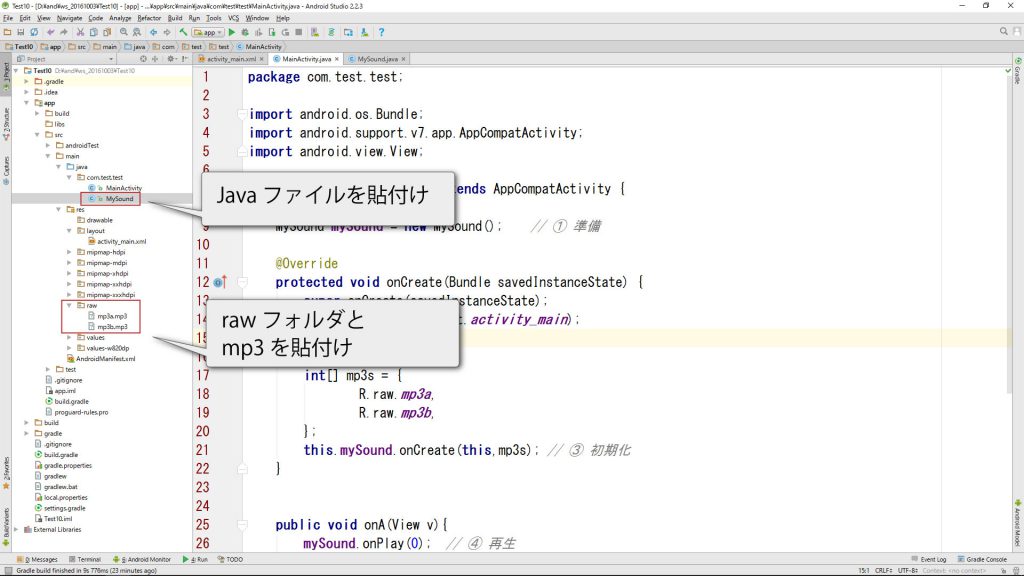
  1. mp3ファイルの準備
  2. javaファイルの準備
  3. activity_main.xmlの編集
  4. MainActivity.javaの編集

以下のファイルとmp3を用意して、指定の場所に保存してください。
※ 慣れてない方はファイル名、フォルダ名を同じにしてください。

声素材
JavaファイルのDL

効果音-ファイル構成

<?xml version="1.0" encoding="utf-8"?>
<LinearLayout xmlns:android="http://schemas.android.com/apk/res/android"
    xmlns:tools="http://schemas.android.com/tools"
    android:id="@+id/activity_main"
    android:layout_width="match_parent"
    android:layout_height="match_parent"
    android:orientation="vertical"
    android:padding="24dp"
    tools:context="com.test.test.MainActivity">

    <Button
        android:layout_width="wrap_content"
        android:layout_height="wrap_content"
        android:onClick="onA"
        android:text="a" />

    <Button
        android:layout_width="wrap_content"
        android:layout_height="wrap_content"
        android:onClick="onB"
        android:text="b" />
    
</LinearLayout>
package com.test.test;

import android.os.Bundle;
import android.support.v7.app.AppCompatActivity;
import android.view.View;

public class MainActivity extends AppCompatActivity {

    MySound mySound = new MySound();    // ① 準備

    @Override
    protected void onCreate(Bundle savedInstanceState) {
        super.onCreate(savedInstanceState);
        setContentView(R.layout.activity_main);

        // ② 効果音の準備
        int[] mp3s = {
                R.raw.mp3a,
                R.raw.mp3b,
        };
        mySound.onCreate(this,mp3s); // ③ 初期化
    }


    public void onA(View v){
        mySound.onPlay(0);  // ④ 再生
    }

    public void onB(View v){
        mySound.onPlay(1);  // ④ 再生
    }

    @Override
    protected void onDestroy() {
        super.onDestroy();
        mySound.onDestroy();    // ⑤ 終了
    }

}

バックミュージック-ポイント

Android Studio入門

Android プログラミング【 診断アプリ 】 ~ シンプル版 ~

診断アプリ 768

少々長い動画になります。
過去の動画をほぼご覧になって「理解済み」の方用の動画です。

専門用語 「 変数・配列・アクティビティ・インテント・クリック処理 」と言われて分からない方は参考程度にご覧ください。

プロジェクト、カンパニードメイン、パッケージネームを同じにするとコピペエラーが減ります。

Application name CheckApp
Company Domain test.com
Package name com.test.checkapp

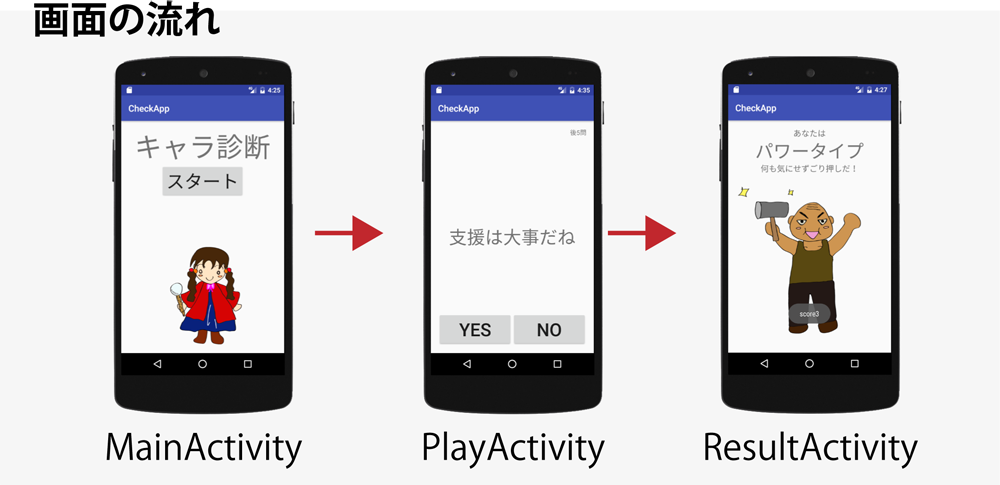
診断アプリ_新規作成

* 注意 *
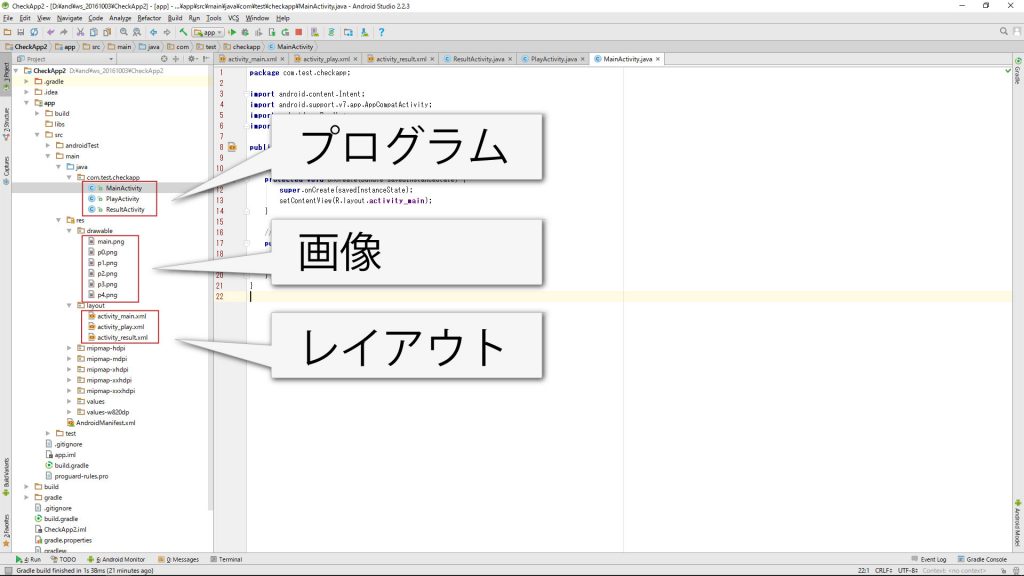
・画像をご自身で要するにはファイル名やファイルサイズ、拡張子に注意する必要があります。
・ファイル名は半角小文字の英数(a~z 0~9)とアンダーバー( _ )のみで、最初の1文字目は半角英字( a ~ z)のみです。
・慣れてない方はサンプル画像の使用をオススメします。

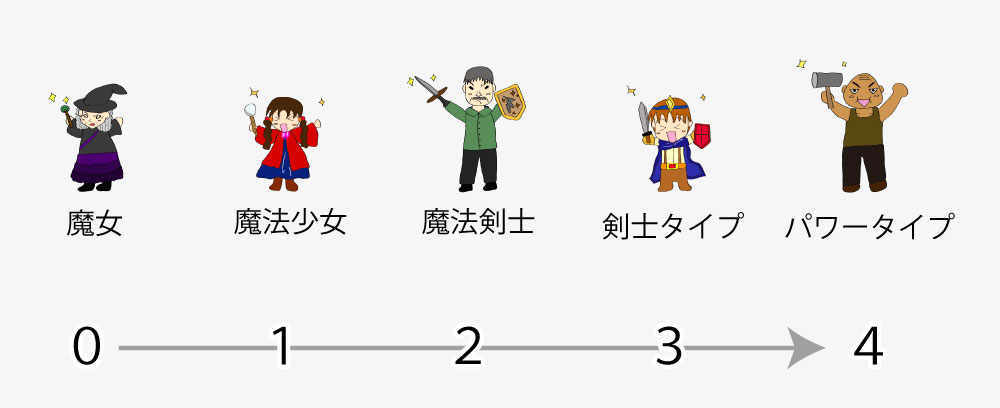
main
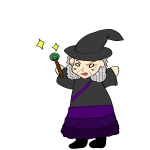
魔女
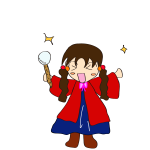
魔法少女
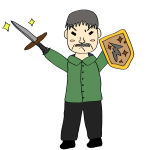
魔法剣士
剣士タイプ
パワータイプ

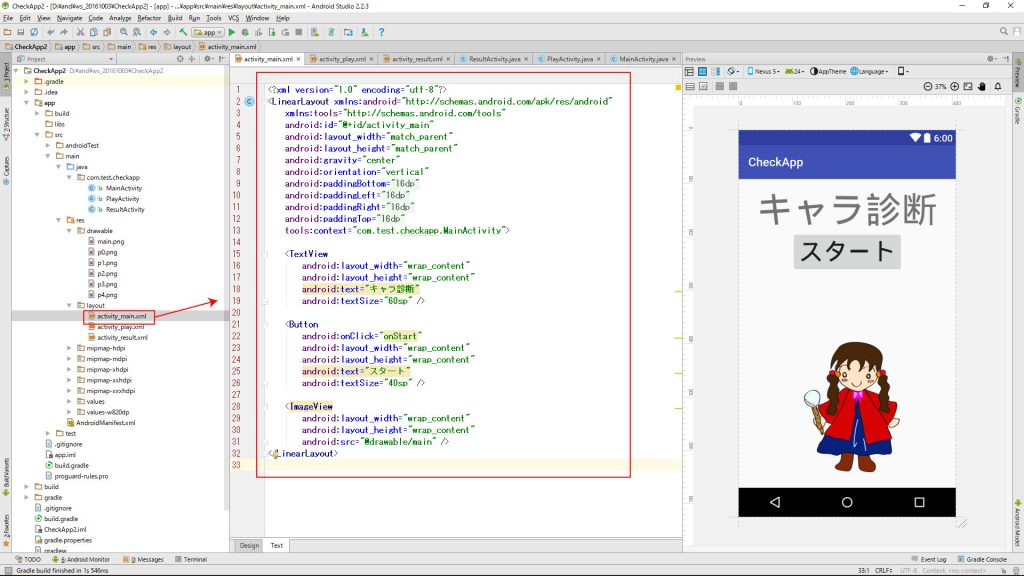
activity_main

<?xml version="1.0" encoding="utf-8"?>
<LinearLayout xmlns:android="http://schemas.android.com/apk/res/android"
    xmlns:tools="http://schemas.android.com/tools"
    android:id="@+id/activity_main"
    android:layout_width="match_parent"
    android:layout_height="match_parent"
    android:gravity="center"
    android:orientation="vertical"
    android:paddingBottom="@dimen/activity_vertical_margin"
    android:paddingLeft="@dimen/activity_horizontal_margin"
    android:paddingRight="@dimen/activity_horizontal_margin"
    android:paddingTop="@dimen/activity_vertical_margin"
    tools:context="com.test.checkapp.MainActivity">

    <TextView
        android:layout_width="wrap_content"
        android:layout_height="wrap_content"
        android:text="キャラ診断"
        android:textSize="60sp" />

    <Button
        android:onClick="onStart"
        android:layout_width="wrap_content"
        android:layout_height="wrap_content"
        android:text="スタート"
        android:textSize="40sp" />

    <ImageView
        android:layout_width="wrap_content"
        android:layout_height="wrap_content"
        android:src="@drawable/main" />
</LinearLayout>

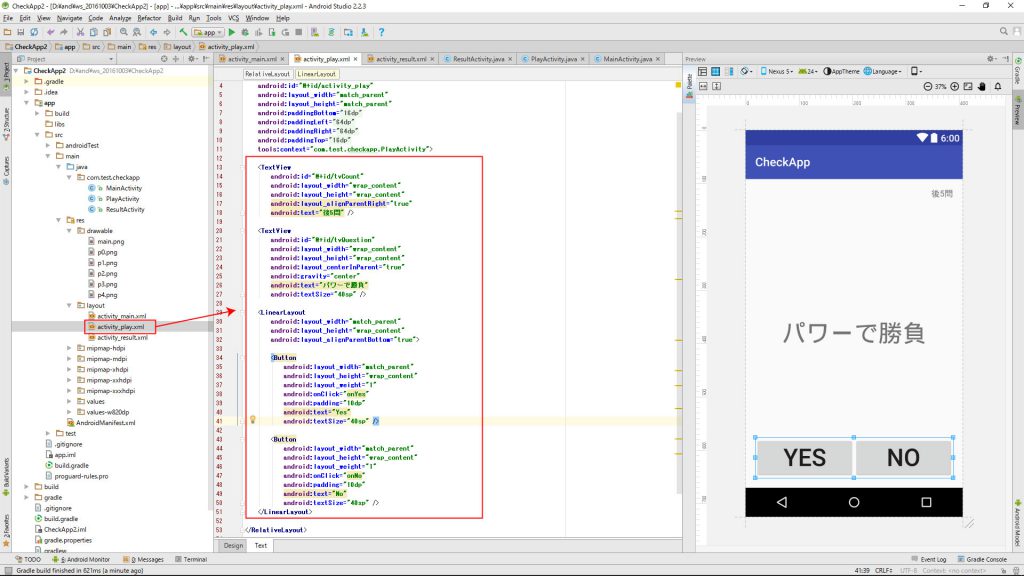
activity_play

<?xml version="1.0" encoding="utf-8"?>
<RelativeLayout xmlns:android="http://schemas.android.com/apk/res/android"
    xmlns:tools="http://schemas.android.com/tools"
    android:id="@+id/activity_play"
    android:layout_width="match_parent"
    android:layout_height="match_parent"
    android:paddingBottom="@dimen/activity_vertical_margin"
    android:paddingLeft="@dimen/activity_horizontal_margin"
    android:paddingRight="@dimen/activity_horizontal_margin"
    android:paddingTop="@dimen/activity_vertical_margin"
    tools:context="com.test.checkapp.PlayActivity">

    <TextView
        android:id="@+id/tvCount"
        android:layout_width="wrap_content"
        android:layout_height="wrap_content"
        android:layout_alignParentRight="true"
        android:text="後5問" />

    <TextView
        android:gravity="center"
        android:id="@+id/tvQuestion"
        android:layout_width="wrap_content"
        android:layout_height="wrap_content"
        android:layout_centerInParent="true"
        android:text="パワーで勝負"
        android:textSize="40sp" />

    <LinearLayout

        android:layout_width="match_parent"
        android:layout_height="wrap_content"
        android:layout_alignParentBottom="true">

        <Button
            android:padding="10dp"
            android:onClick="onYes"
            android:layout_width="match_parent"
            android:layout_height="wrap_content"
            android:layout_weight="1"
            android:text="Yes"
            android:textSize="40sp" />

        <Button
            android:padding="10dp"
            android:onClick="onNo"
            android:layout_width="match_parent"
            android:layout_height="wrap_content"
            android:layout_weight="1"
            android:text="No"
            android:textSize="40sp" />
    </LinearLayout>

</RelativeLayout>

activity_result

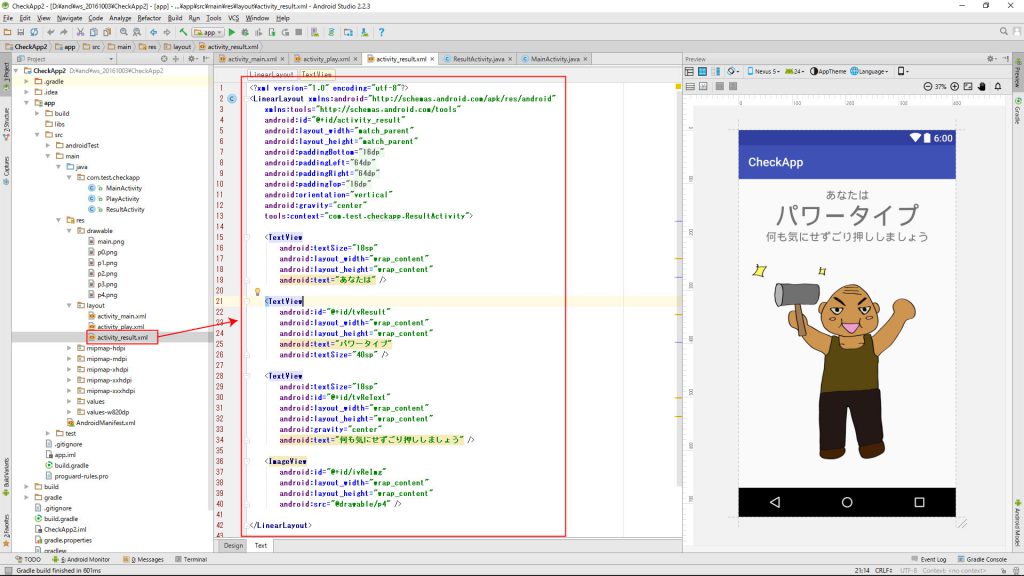
<?xml version="1.0" encoding="utf-8"?>
<LinearLayout xmlns:android="http://schemas.android.com/apk/res/android"
    xmlns:tools="http://schemas.android.com/tools"
    android:id="@+id/activity_result"
    android:layout_width="match_parent"
    android:layout_height="match_parent"
    android:gravity="center"
    android:orientation="vertical"
    android:paddingBottom="@dimen/activity_vertical_margin"
    android:paddingLeft="@dimen/activity_horizontal_margin"
    android:paddingRight="@dimen/activity_horizontal_margin"
    android:paddingTop="@dimen/activity_vertical_margin"
    tools:context="com.test.checkapp.ResultActivity">

    <TextView
        android:layout_width="wrap_content"
        android:layout_height="wrap_content"
        android:text="あなたは"
        android:textSize="18sp" />

    <TextView
        android:id="@+id/tvResult"
        android:layout_width="wrap_content"
        android:layout_height="wrap_content"
        android:text="パワータイプ"
        android:textSize="40sp" />

    <TextView
        android:id="@+id/tvReText"
        android:layout_width="wrap_content"
        android:layout_height="wrap_content"
        android:gravity="center"
        android:text="何も気にせずごり押ししましょう"
        android:textSize="18sp" />

    <ImageView
        android:id="@+id/ivReImg"
        android:layout_width="wrap_content"
        android:layout_height="wrap_content"
        android:src="@drawable/p4" />

</LinearLayout>

package com.test.checkapp;

import android.content.Intent;
import android.support.v7.app.AppCompatActivity;
import android.os.Bundle;
import android.view.View;

public class MainActivity extends AppCompatActivity {

    @Override
    protected void onCreate(Bundle savedInstanceState) {
        super.onCreate(savedInstanceState);
        setContentView(R.layout.activity_main);
    }

    // 画面切り替え   /////////////////////////////////////
    public void onStart(View v){
        Intent intent = new Intent(this,PlayActivity.class);
        startActivity(intent);
    }
}
package com.test.checkapp;

import android.content.Intent;
import android.os.Bundle;
import android.support.v7.app.AppCompatActivity;
import android.view.View;
import android.widget.TextView;

public class PlayActivity extends AppCompatActivity {

    int count = 5;  // 問題数

    @Override
    protected void onCreate(Bundle savedInstanceState) {
        super.onCreate(savedInstanceState);
        setContentView(R.layout.activity_play);
    }

    // Yesボタン   /////////////////////////////////////
    public void onYes(View v) {
        count--;
        if (count > 0) {
            ((TextView) findViewById(R.id.tvCount)).setText("後" + count + "問");
        } else {
            Intent intent = new Intent(this, ResultActivity.class);
            startActivity(intent);
            finish();
        }
    }

    // Noボタン   /////////////////////////////////////
    public void onNo(View v) {
        count--;
        if (count > 0) {
            ((TextView) findViewById(R.id.tvCount)).setText("後" + count + "問");
        } else {
            Intent intent = new Intent(this, ResultActivity.class);
            startActivity(intent);
            finish();
        }
    }
}
package com.test.checkapp;

import android.content.Intent;
import android.os.Bundle;
import android.support.v7.app.AppCompatActivity;
import android.view.View;
import android.widget.TextView;

import java.util.Random;

public class PlayActivity extends AppCompatActivity {

    // 問題データ    ////////////////////////
    String[] question = {
            "ガンガン行こうぜ!",
            "慎重に!!",
            "支援は大事だね",
            "元気があれば何でも出来る!",
    };

    int r = 0;  // 乱数の保管
    int count = 5;  // 問題数

    @Override
    protected void onCreate(Bundle savedInstanceState) {
        super.onCreate(savedInstanceState);
        setContentView(R.layout.activity_play);

        // 出題   /////////////////////////////
        r = new Random().nextInt(question.length);
        ((TextView) findViewById(R.id.tvQuestion)).setText(question[r]);
    }
    // Yesボタン   /////////////////////////////////////
    public void onYes(View v) {
        count--;
        if (count > 0) {
            ((TextView) findViewById(R.id.tvCount)).setText("後" + count + "問");
            // 出題   /////////////////////////////
            r = new Random().nextInt(question.length);
            ((TextView) findViewById(R.id.tvQuestion)).setText(question[r]);
        } else {
            Intent intent = new Intent(this, ResultActivity.class);
            startActivity(intent);
            finish();
        }
    }


    // Noボタン   /////////////////////////////////////
    public void onNo(View v) {
        count--;
        if (count > 0) {
            ((TextView) findViewById(R.id.tvCount)).setText("後" + count + "問");
            // 出題   /////////////////////////////
            r = new Random().nextInt(question.length);
            ((TextView) findViewById(R.id.tvQuestion)).setText(question[r]);
        } else {
            Intent intent = new Intent(this, ResultActivity.class);
            startActivity(intent);
            finish();
        }
    }
}

スコアとタイプ

package com.test.checkapp;

import android.content.Intent;
import android.os.Bundle;
import android.support.v7.app.AppCompatActivity;
import android.view.View;
import android.widget.TextView;

import java.util.Random;

public class PlayActivity extends AppCompatActivity {

    // 問題データ    ////////////////////////
    String[] question = {
            "ガンガン行こうぜ!",
            "慎重に!!",
            "支援は大事だね",
            "元気があれば何でも出来る!",
    };

    // YES選択時のスコア(評価点)
    int[] yes = {1, -1, -1, 1};

    int r = 0;  // 乱数の保管
    int count = 5;  // 問題数
    int score = 0;   // スコアの合計(評価点)

    @Override
    protected void onCreate(Bundle savedInstanceState) {
        super.onCreate(savedInstanceState);
        setContentView(R.layout.activity_play);

        // 出題   /////////////////////////////
        r = new Random().nextInt(question.length);
        ((TextView) findViewById(R.id.tvQuestion)).setText(question[r]);
    }

    // Yesボタン   /////////////////////////////////////
    public void onYes(View v) {
        count--;
        score += yes[r]; // スコアの加算
        if (count > 0) {
            ((TextView) findViewById(R.id.tvCount)).setText("後" + count + "問");
            // 出題   /////////////////////////////
            r = new Random().nextInt(question.length);
            ((TextView) findViewById(R.id.tvQuestion)).setText(question[r]);
        } else {
            Intent intent = new Intent(this, ResultActivity.class);
            intent.putExtra("score" , score);
            startActivity(intent);
            finish();
        }
    }


    // Noボタン   /////////////////////////////////////
    public void onNo(View v) {
        count--;
        score -= yes[r]; // スコアの減算
        if (count > 0) {
            ((TextView) findViewById(R.id.tvCount)).setText("後" + count + "問");
            // 出題   /////////////////////////////
            r = new Random().nextInt(question.length);
            ((TextView) findViewById(R.id.tvQuestion)).setText(question[r]);
        } else {
            Intent intent = new Intent(this, ResultActivity.class);
            intent.putExtra("score" , score);
            startActivity(intent);
            finish();
        }
    }
}

package com.test.checkapp;

import android.support.v7.app.AppCompatActivity;
import android.os.Bundle;
import android.widget.ImageView;
import android.widget.TextView;

public class ResultActivity extends AppCompatActivity {

    String[] result = {
            "魔女タイプ",
            "魔法少女",
            "魔法剣士",
            "剣士タイプ",
            "パワータイプ",
    };

    String[] reTest = {
            "とっても神秘的!!",
            "後方支援が得意です",
            "オールマイティ!!",
            "スタンダードに攻撃だ!",
            "何も気にせずごり押しだ!",
    };

    int[] reImg = {
            R.drawable.p0,
            R.drawable.p1,
            R.drawable.p2,
            R.drawable.p3,
            R.drawable.p4,
    };


    @Override
    protected void onCreate(Bundle savedInstanceState) {
        super.onCreate(savedInstanceState);
        setContentView(R.layout.activity_result);

        // インテントからスコアを取得    /////////////////////
        int score = getIntent().getIntExtra("score" , 0);
        if( score < 0) score = 0;
        if( score >= result.length) score = result.length -1;

        // テキストと画像をセット  //////////////////////////
        ((TextView)findViewById(R.id.tvResult)).setText(result[score]);
        ((TextView)findViewById(R.id.tvReText)).setText(reTest[score]);
        ((ImageView)findViewById(R.id.ivReImg)).setImageResource(reImg[score]);
    }
}

Android Studio入門

Android プログラミング【 ToggleButton 】 ~ 画像変更 ~

Android プログラミング【 ToggleButton 】 ~ 画像変更 ~ 768

設定画面をイメージし、ToggleButtonを学習します。
もちろん画像を変える以外に色々できます。

プロジェクト、カンパニードメイン、パッケージネームを同じにするとコピペエラーが減ります。

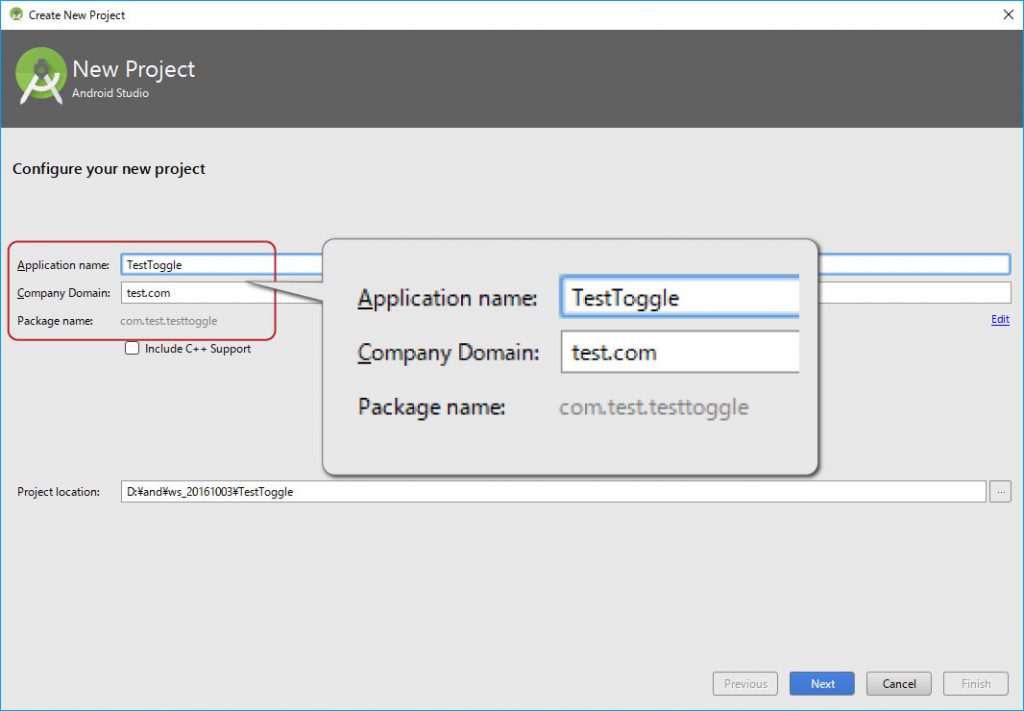
Application name TestToggle
Company Domain test.com
Package name com.test.testtoggle

Android-プログラミング【-ToggleButton-】新規プロジェクト

* 注意 *
・画像をご自身で要するにはファイル名やファイルサイズ、拡張子に注意する必要があります。
・ファイル名は半角小文字の英数(a~z 0~9)とアンダーバー( _ )のみで、最初の1文字目は半角英字( a ~ z)のみです。
・慣れてない方はサンプル画像の使用をオススメします。

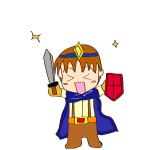
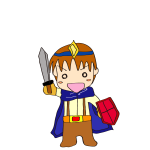
boy
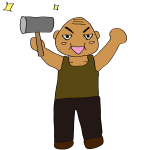
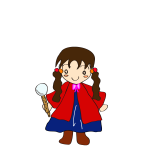
girl

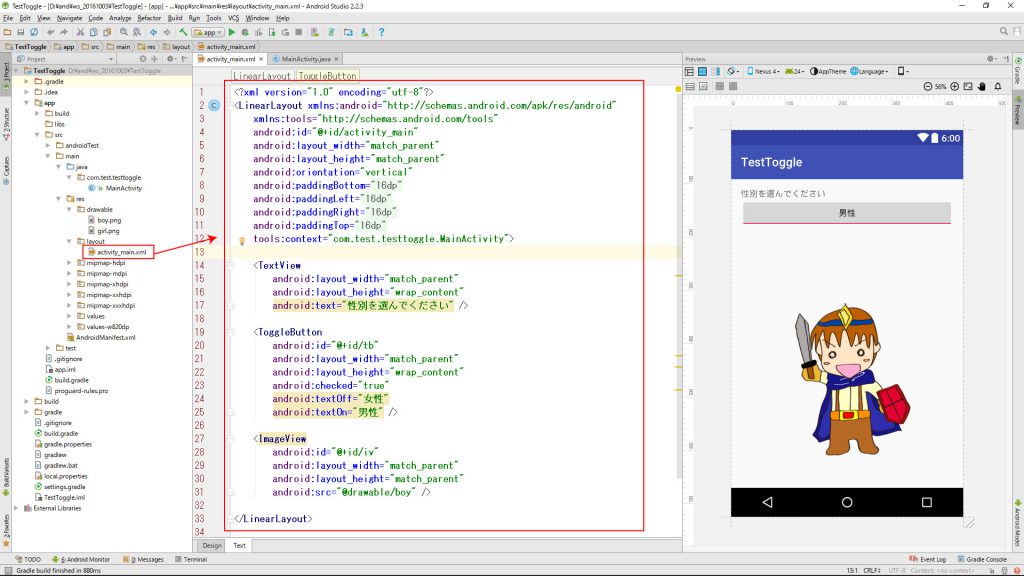
ToggleButton_activity_main_xml

<?xml version="1.0" encoding="utf-8"?>
<LinearLayout xmlns:android="http://schemas.android.com/apk/res/android"
    xmlns:tools="http://schemas.android.com/tools"
    android:id="@+id/activity_main"
    android:layout_width="match_parent"
    android:layout_height="match_parent"
    android:orientation="vertical"
    android:paddingBottom="@dimen/activity_vertical_margin"
    android:paddingLeft="@dimen/activity_horizontal_margin"
    android:paddingRight="@dimen/activity_horizontal_margin"
    android:paddingTop="@dimen/activity_vertical_margin"
    tools:context="com.test.testtoggle.MainActivity">

    <TextView
        android:layout_width="match_parent"
        android:layout_height="wrap_content"
        android:text="性別を選んでください" />

    <ToggleButton
        android:id="@+id/tb"
        android:layout_width="match_parent"
        android:layout_height="wrap_content"
        android:checked="true"
        android:textOff="女性"
        android:textOn="男性" />

    <ImageView
        android:id="@+id/iv"
        android:layout_width="match_parent"
        android:layout_height="match_parent"
        android:src="@drawable/boy" />

</LinearLayout>

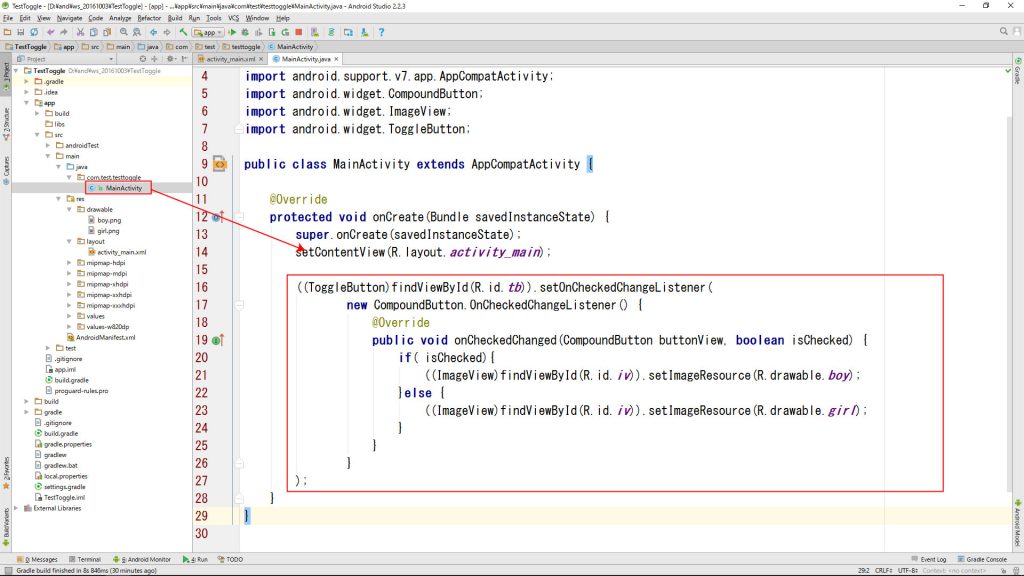
ToggleButton_MainActivity_java

package com.test.testtoggle;

import android.os.Bundle;
import android.support.v7.app.AppCompatActivity;
import android.widget.CompoundButton;
import android.widget.ImageView;
import android.widget.ToggleButton;

public class MainActivity extends AppCompatActivity {

    @Override
    protected void onCreate(Bundle savedInstanceState) {
        super.onCreate(savedInstanceState);
        setContentView(R.layout.activity_main);

        ((ToggleButton)findViewById(R.id.tb)).setOnCheckedChangeListener(
                new CompoundButton.OnCheckedChangeListener() {
                    @Override
                    public void onCheckedChanged(CompoundButton buttonView, boolean isChecked) {
                        if( isChecked){
                            ((ImageView)findViewById(R.id.iv)).setImageResource(R.drawable.boy);
                        }else {
                            ((ImageView)findViewById(R.id.iv)).setImageResource(R.drawable.girl);
                        }
                    }
                }
        );
    }
}

Android Studio入門

Android プログラミング【 ListView ⑤ 】 ~ クリック処理 ~

ListViewクリック処理 768

クリック処理に対応させます。
ほとんど決まり文句で済み、多言語にも対応できます。

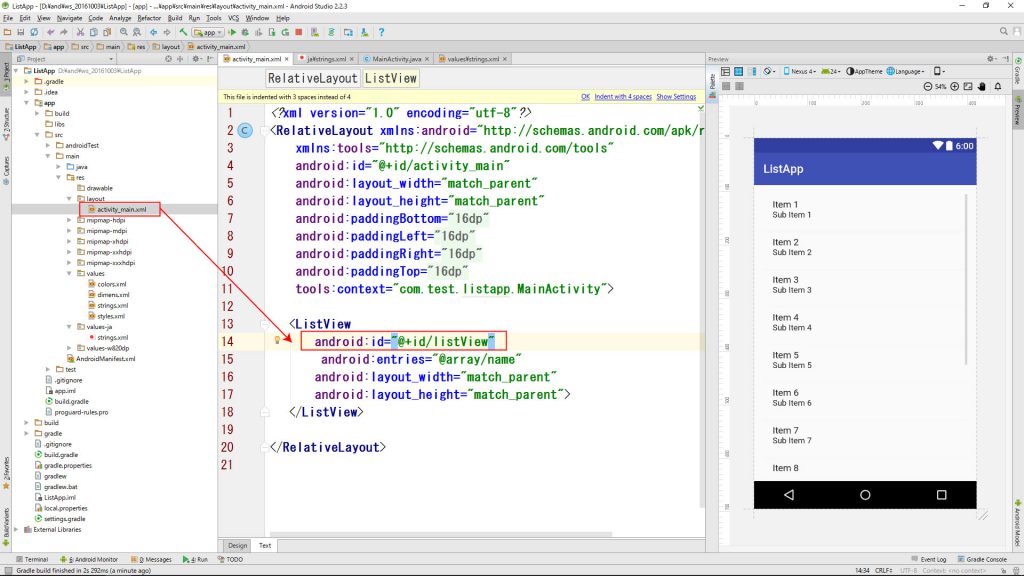
ListViewクリック処理_activity_main_xml

<?xml version="1.0" encoding="utf-8"?>
<RelativeLayout xmlns:android="http://schemas.android.com/apk/res/android"
    xmlns:tools="http://schemas.android.com/tools"
    android:id="@+id/activity_main"
    android:layout_width="match_parent"
    android:layout_height="match_parent"
    android:paddingBottom="@dimen/activity_vertical_margin"
    android:paddingLeft="@dimen/activity_horizontal_margin"
    android:paddingRight="@dimen/activity_horizontal_margin"
    android:paddingTop="@dimen/activity_vertical_margin"
    tools:context="com.test.listapp.MainActivity">

   <ListView
       android:id="@+id/listView"
        android:entries="@array/name"
       android:layout_width="match_parent"
       android:layout_height="match_parent">
   </ListView>

</RelativeLayout>

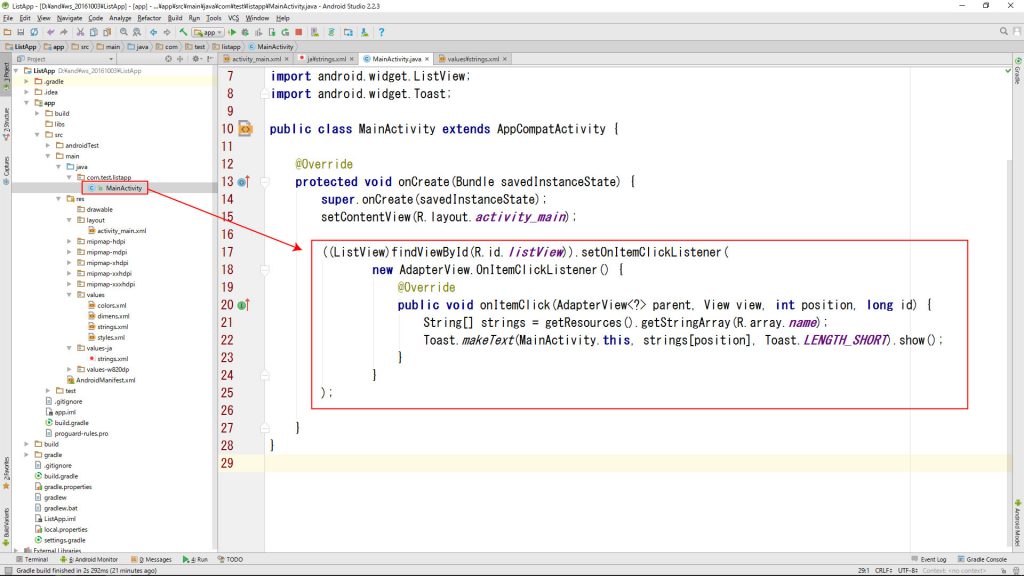
ListView_MainActivity

package com.test.listapp;

import android.support.v7.app.AppCompatActivity;
import android.os.Bundle;
import android.view.View;
import android.widget.AdapterView;
import android.widget.ListView;
import android.widget.Toast;

public class MainActivity extends AppCompatActivity {

    @Override
    protected void onCreate(Bundle savedInstanceState) {
        super.onCreate(savedInstanceState);
        setContentView(R.layout.activity_main);

        ((ListView)findViewById(R.id.listView)).setOnItemClickListener(
                new AdapterView.OnItemClickListener() {
                    @Override
                    public void onItemClick(AdapterView parent, View view, int position, long id) {
                        String[] strings = getResources().getStringArray(R.array.name);
                        Toast.makeText(MainActivity.this, strings[position], Toast.LENGTH_SHORT).show();
                    }
                }
        );

    }
}

Android Studio入門

Android プログラミング【 ListView ④ 】 ~英語と日本語~

ListView ~英語と日本語利用~

strings.xml( 文字列管理用のファイル )を利用して英語と日本語に対応させます。

簡単に外国語に対応できるので、得意な人は是非利用してください。

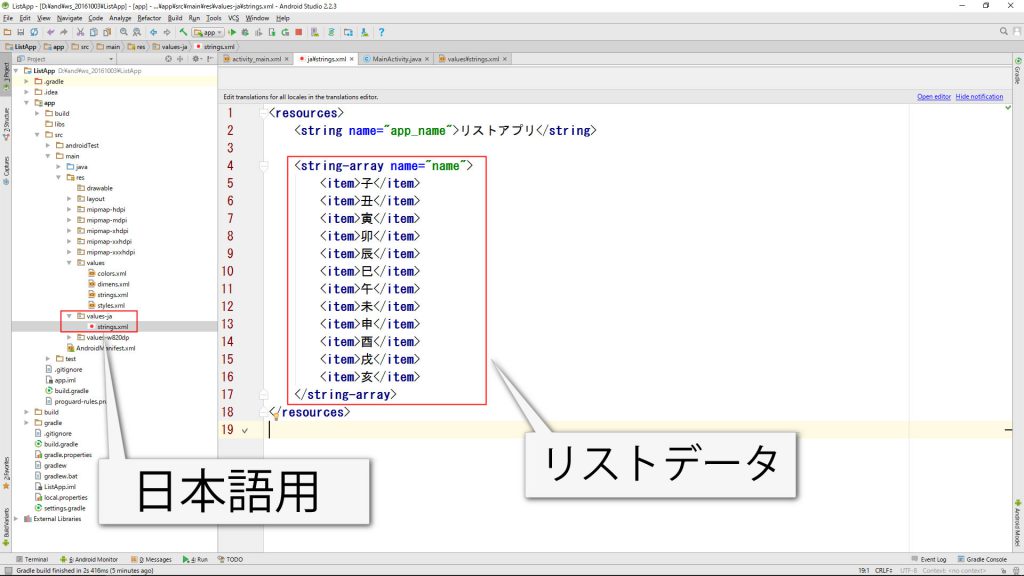
string日本語対応

<resources>
    <string name="app_name">リストアプリ</string>

    <string-array name="name">
        <item>子</item>
        <item>丑</item>
        <item>寅</item>
        <item>卯</item>
        <item>辰</item>
        <item>巳</item>
        <item>午</item>
        <item>未</item>
        <item>申</item>
        <item>酉</item>
        <item>戌</item>
        <item>亥</item>
    </string-array>
</resources>