Android プログラミング【 カウントダウンタイマー④ 】~ 改正版 ~

Android プログラミング【 カウントダウンタイマー④ 】~ 改正版 ~768
カウントダウンタイマーを利用した「アプリサンプル」です。
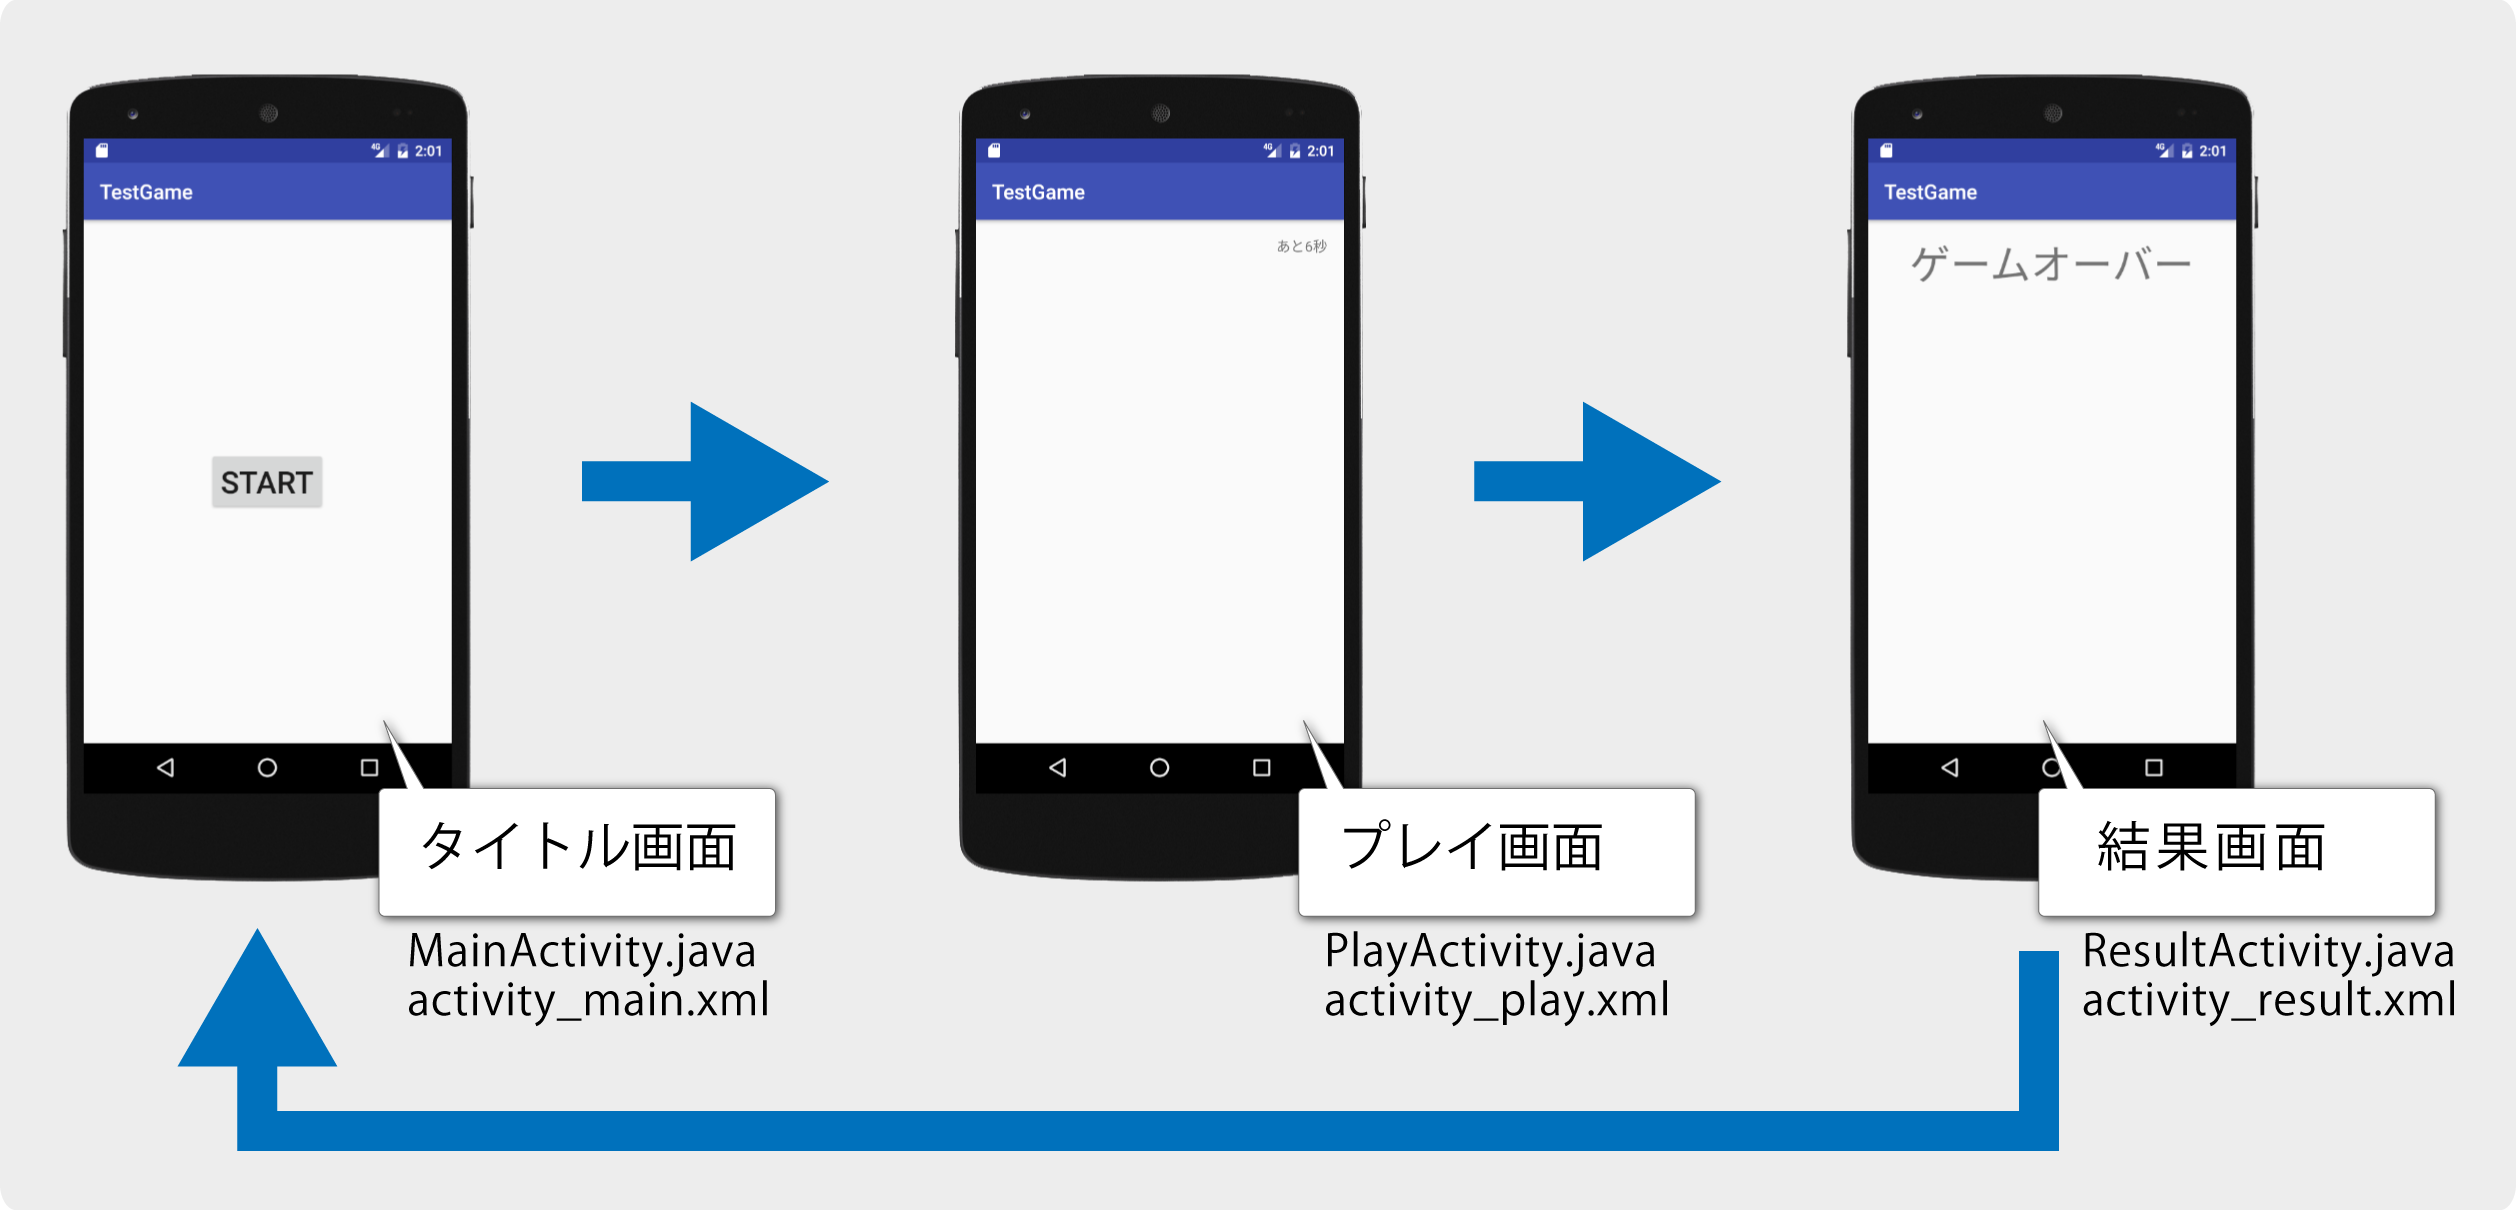
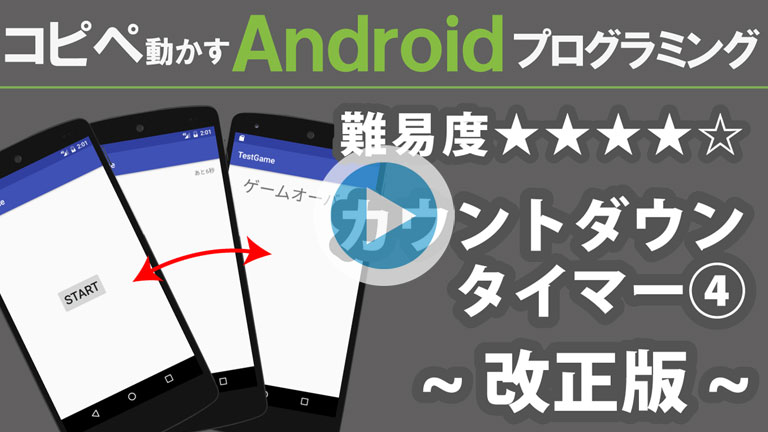
パズルや脳トレアプリをイメージして、タイトル画面→プレイ画面→終了画面 の流れを作成します。

【 注意事項 】
この動画にはシリーズ物です以下から順にご覧ください。

カウントダウンタイマー① 10秒で終了
カウントダウンタイマー② 画面切り替え
カウントダウンタイマー③ 画面再表示
カウントダウンタイマー④ 改正版

タイマーアプリ 画面の流れ

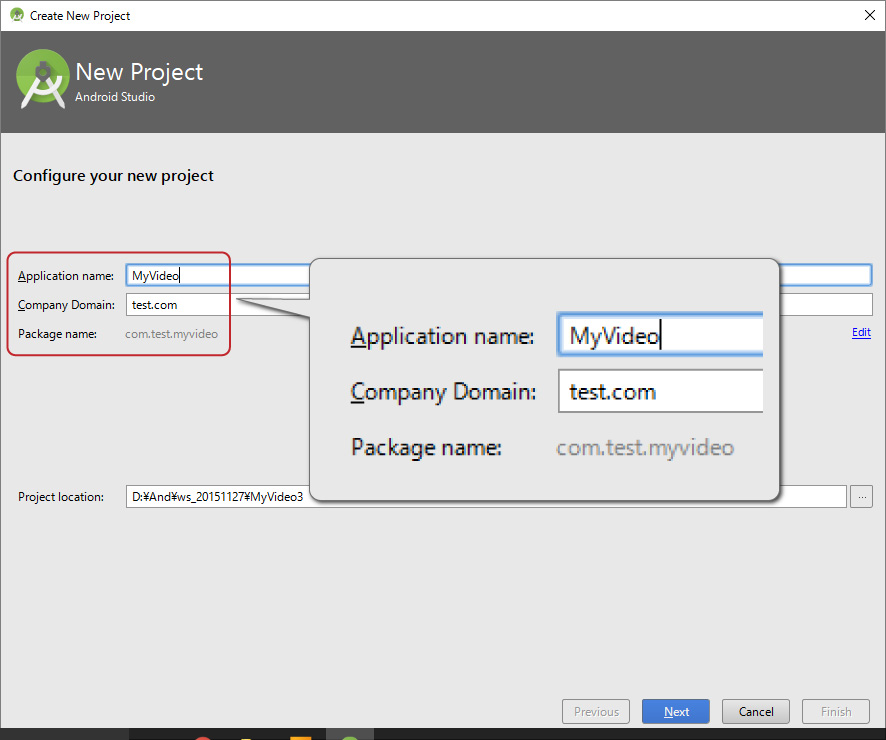
プロジェクト、カンパニードメイン、パッケージネームを同じにするとコピペエラーが減ります。

Application name TestGame
Company Domain test.com
Package name com.test.testgame
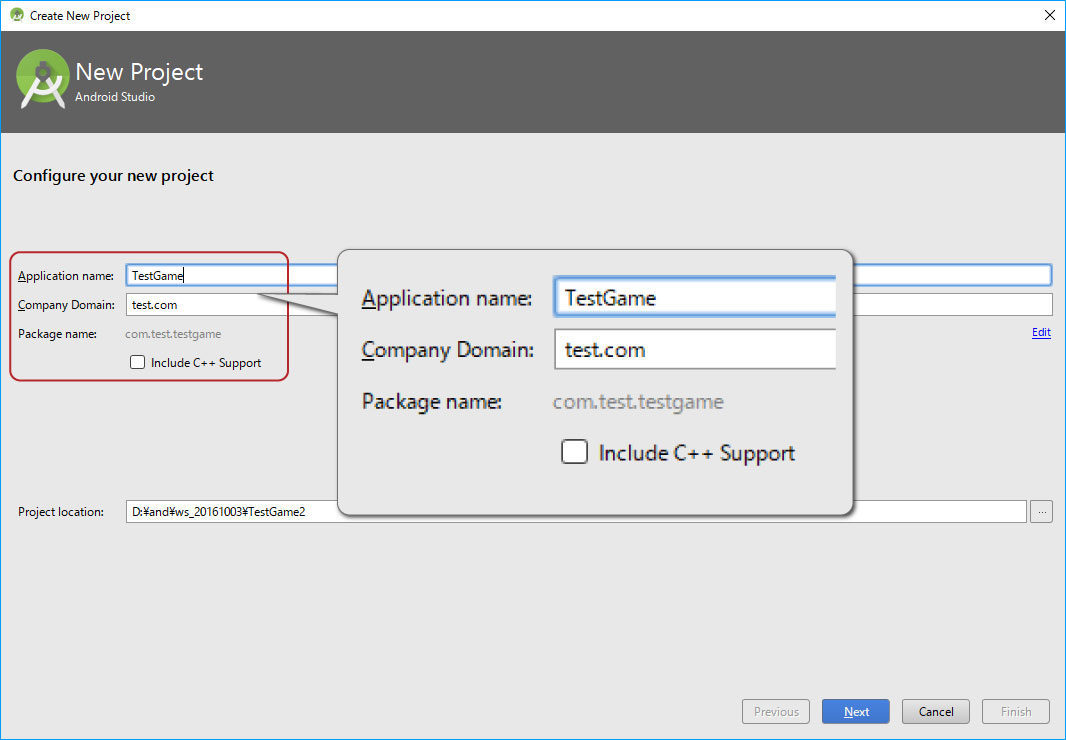
カウントダウンタイマー新規作成

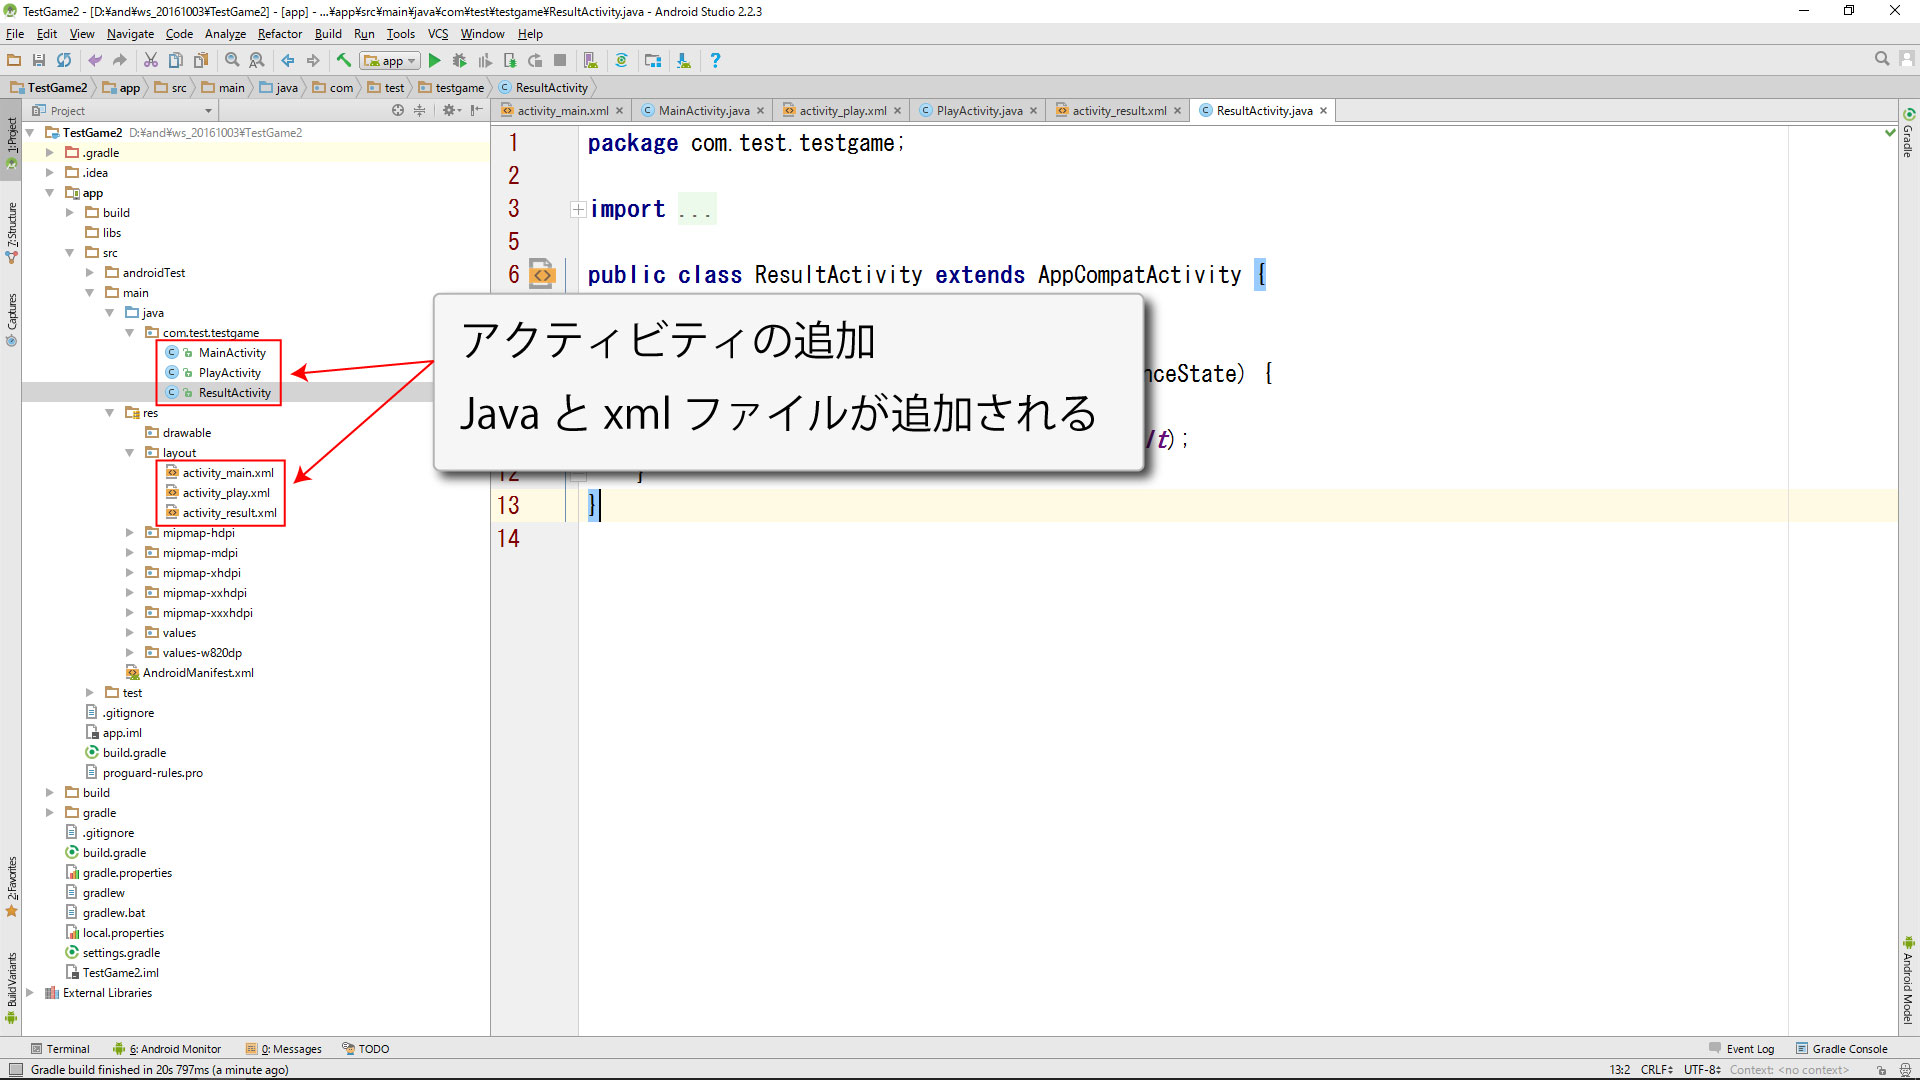
カウントダウンタイマー ファイル構成

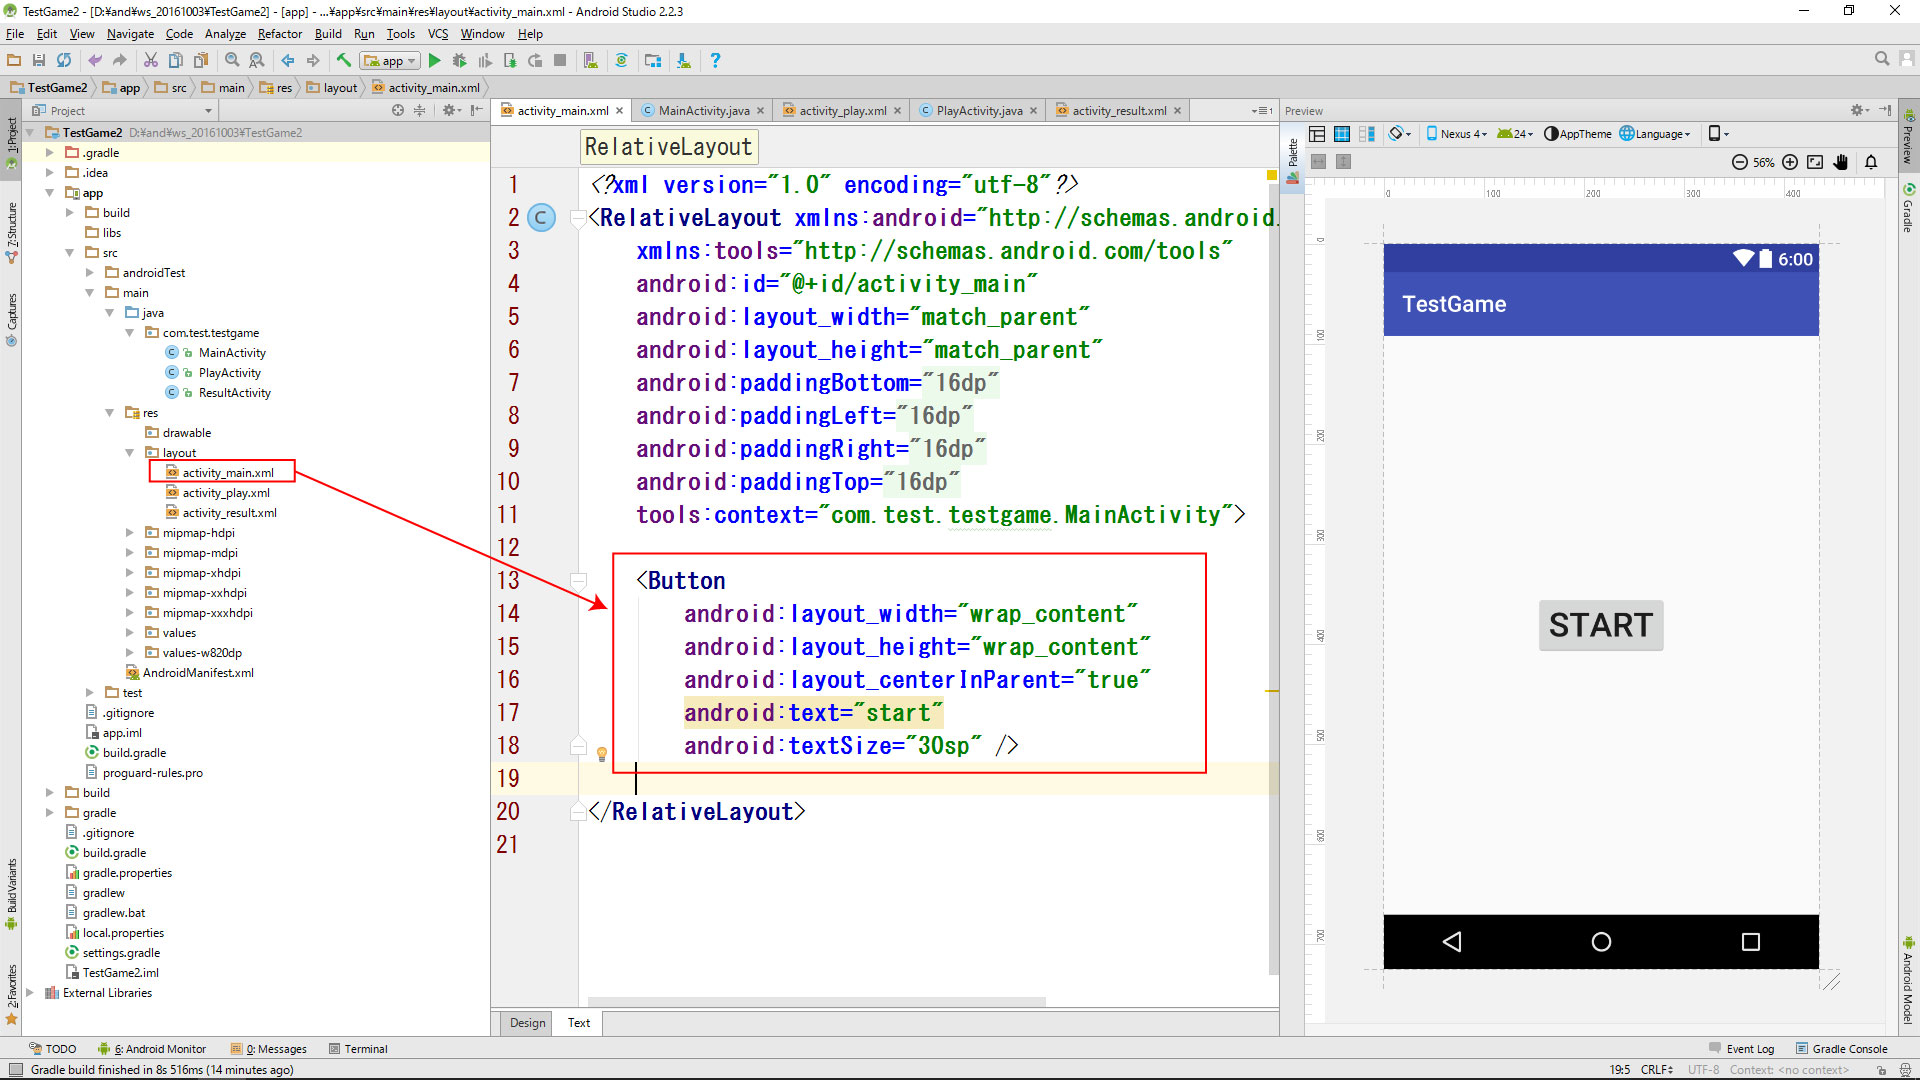
カウントダウンタイマー-タイトル画面

<?xml version="1.0" encoding="utf-8"?>
<RelativeLayout xmlns:android="http://schemas.android.com/apk/res/android"
    xmlns:tools="http://schemas.android.com/tools"
    android:id="@+id/activity_main"
    android:layout_width="match_parent"
    android:layout_height="match_parent"
    android:paddingBottom="@dimen/activity_vertical_margin"
    android:paddingLeft="@dimen/activity_horizontal_margin"
    android:paddingRight="@dimen/activity_horizontal_margin"
    android:paddingTop="@dimen/activity_vertical_margin"
    tools:context="com.test.testgame.MainActivity">

    <Button
        android:onClick="onStart"
        android:layout_width="wrap_content"
        android:layout_height="wrap_content"
        android:layout_centerInParent="true"
        android:text="start"
        android:textSize="30sp" />

</RelativeLayout>

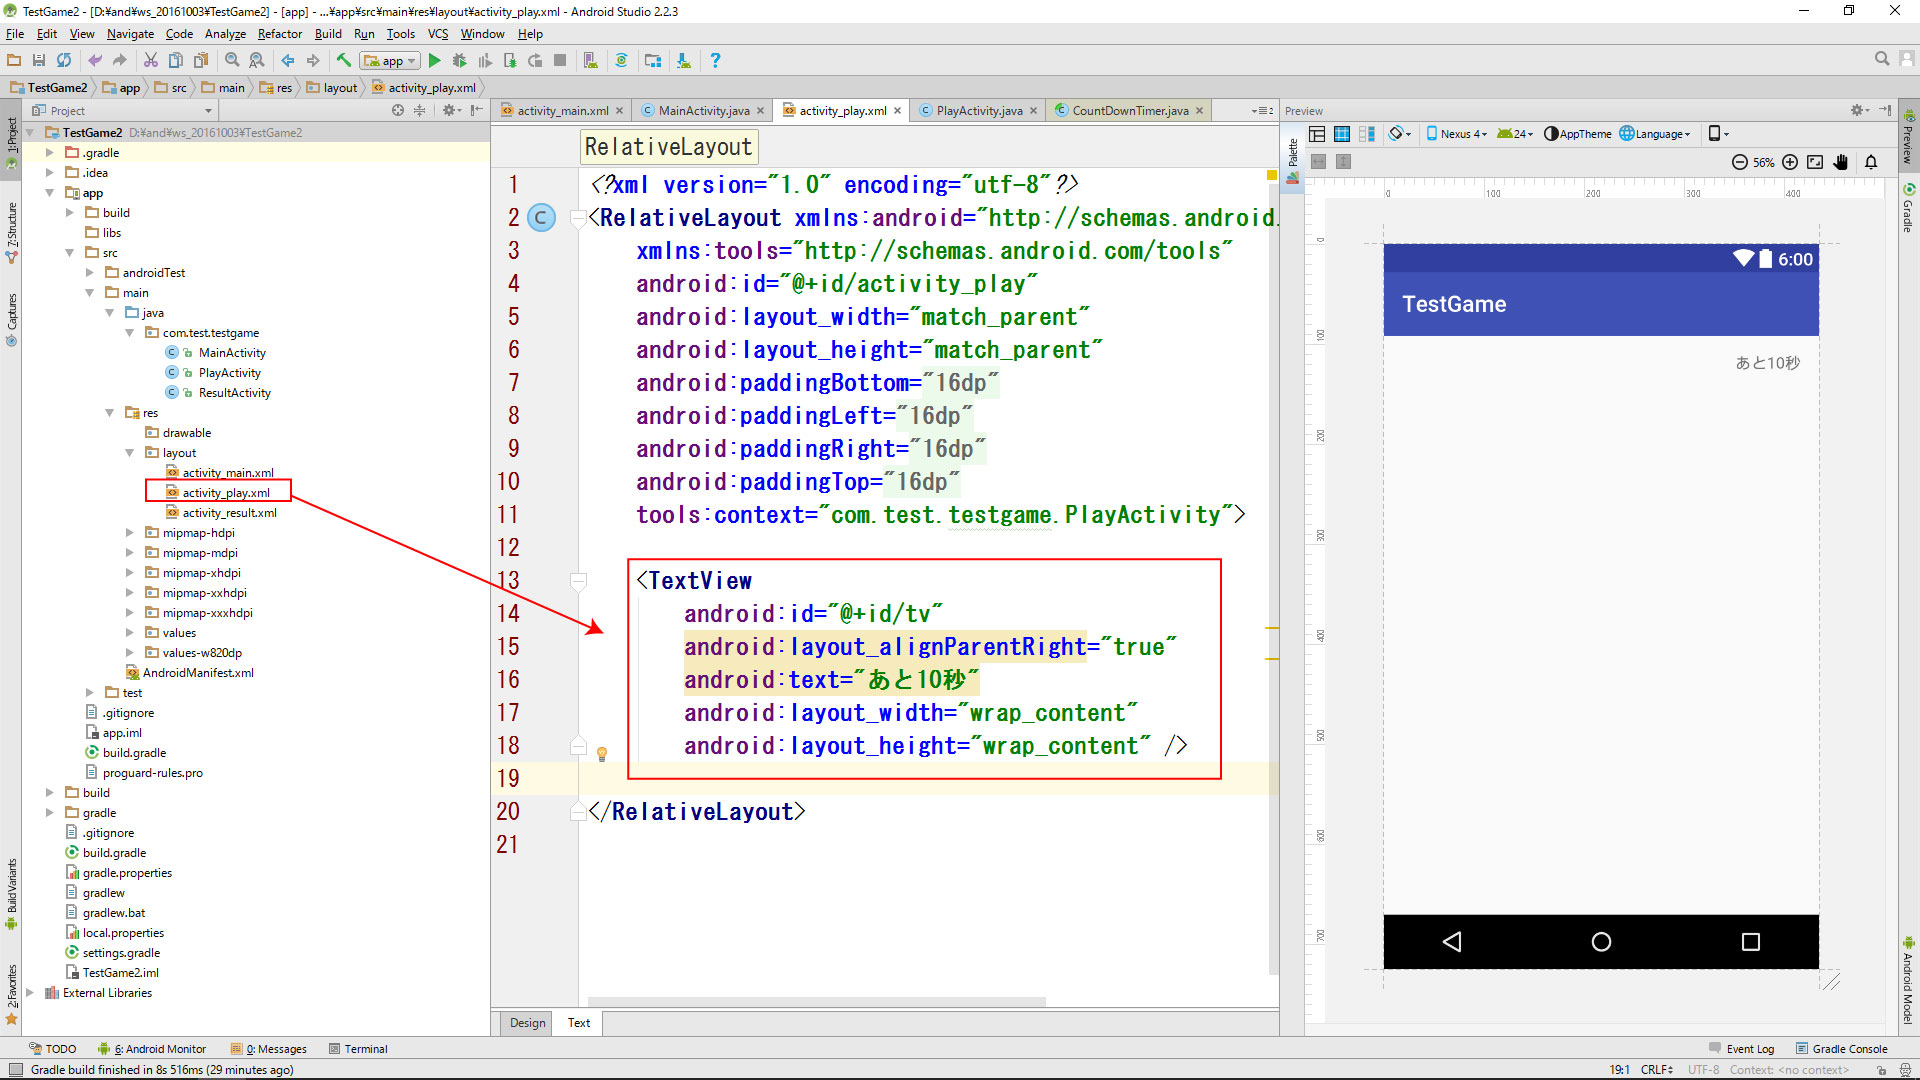
カウントダウンタイマー-プレイ画面

<?xml version="1.0" encoding="utf-8"?>
<RelativeLayout xmlns:android="http://schemas.android.com/apk/res/android"
    xmlns:tools="http://schemas.android.com/tools"
    android:id="@+id/activity_play"
    android:layout_width="match_parent"
    android:layout_height="match_parent"
    android:paddingBottom="@dimen/activity_vertical_margin"
    android:paddingLeft="@dimen/activity_horizontal_margin"
    android:paddingRight="@dimen/activity_horizontal_margin"
    android:paddingTop="@dimen/activity_vertical_margin"
    tools:context="com.test.testgame.PlayActivity">

    <TextView
        android:id="@+id/tv"
        android:layout_alignParentRight="true"
        android:text="あと10秒"
        android:layout_width="wrap_content"
        android:layout_height="wrap_content" />

</RelativeLayout>

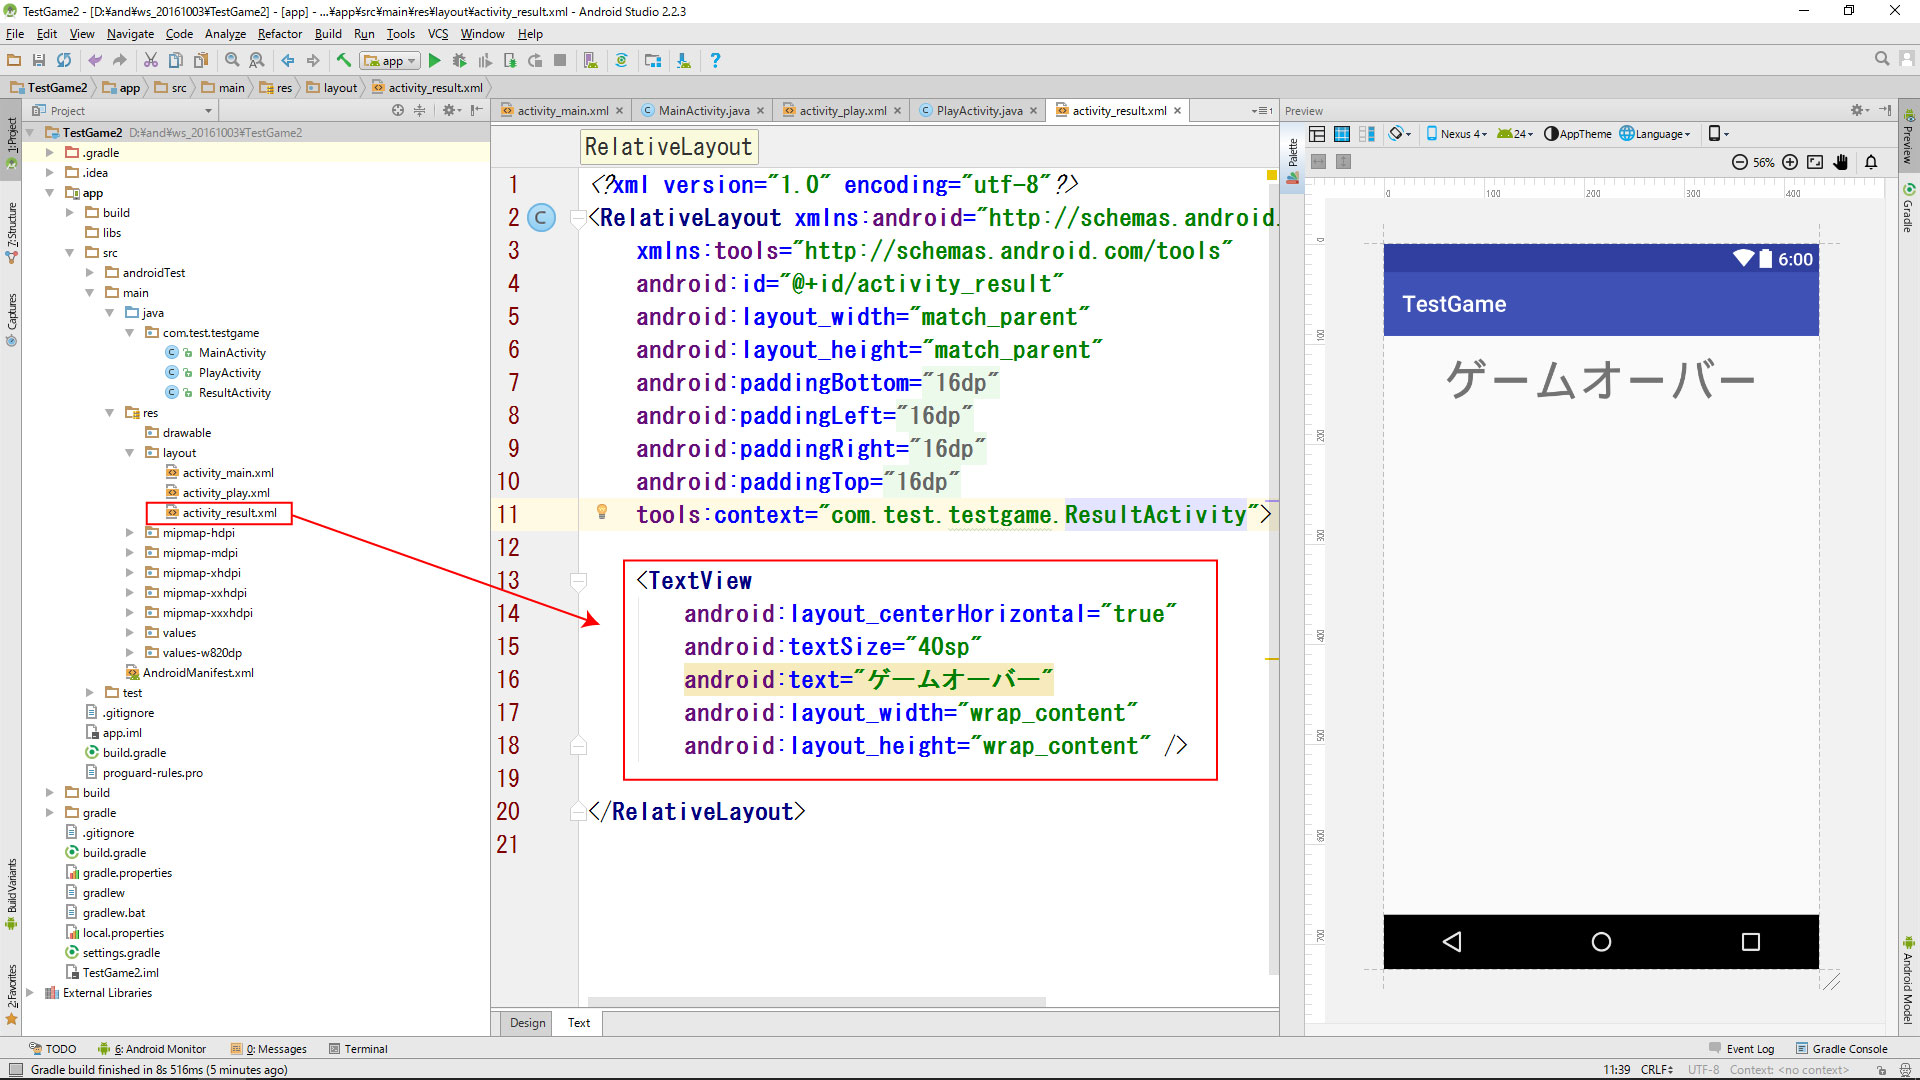
カウントダウンタイマー リザルト画面

<?xml version="1.0" encoding="utf-8"?>
<RelativeLayout xmlns:android="http://schemas.android.com/apk/res/android"
    xmlns:tools="http://schemas.android.com/tools"
    android:id="@+id/activity_result"
    android:layout_width="match_parent"
    android:layout_height="match_parent"
    android:paddingBottom="@dimen/activity_vertical_margin"
    android:paddingLeft="@dimen/activity_horizontal_margin"
    android:paddingRight="@dimen/activity_horizontal_margin"
    android:paddingTop="@dimen/activity_vertical_margin"
    tools:context="com.test.testgame.ResultActivity">

    <TextView
        android:layout_centerHorizontal="true"
        android:textSize="40sp"
        android:text="ゲームオーバー"
        android:layout_width="wrap_content"
        android:layout_height="wrap_content" />

</RelativeLayout>
package com.test.testgame;

import android.content.Intent;
import android.support.v7.app.AppCompatActivity;
import android.os.Bundle;
import android.view.View;

public class MainActivity extends AppCompatActivity {

    @Override
    protected void onCreate(Bundle savedInstanceState) {
        super.onCreate(savedInstanceState);
        setContentView(R.layout.activity_main);
    }
    

    // STRATボタンクリック
    public void onStart( View v){
        // 画面切り替え
        Intent intent = new Intent(this,PlayActivity.class); 
        startActivity(intent);
    }
}
package com.test.testgame;

import android.content.Intent;
import android.os.CountDownTimer;
import android.support.v7.app.AppCompatActivity;
import android.os.Bundle;
import android.widget.TextView;

public class PlayActivity extends AppCompatActivity {

    CountDownTimer countDownTimer;  // タイマー本体
    long time = 10000;              // タイマー終了時間

    @Override
    protected void onCreate(Bundle savedInstanceState) {
        super.onCreate(savedInstanceState);
        setContentView(R.layout.activity_play);
    }

    // 画面再表示に実行 //////////////////////////////////
    @Override
    protected void onResume() {
        super.onResume();
        countDownTimer = new CountDownTimer(time, 100) {
            @Override
            public void onTick(long millisUntilFinished) {
                // 0.1秒毎にTextView更新
                time = millisUntilFinished;
                int t = (int) millisUntilFinished / 1000;
                ((TextView) findViewById(R.id.tv)).setText("あと" + t + "秒");
            }

            @Override
            public void onFinish() {
                // 画面を切り替え
                Intent intent = new Intent(PlayActivity.this, ResultActivity.class);
                startActivity(intent);
                // PlayActivity終了
                finish();
            }
        }.start();
    }

    // 画面非表示に実行 ////////////////////////////////
    @Override
    protected void onPause() {
        super.onPause();
        countDownTimer.cancel();
        countDownTimer = null;
    }
}
package com.test.testgame;

import android.support.v7.app.AppCompatActivity;
import android.os.Bundle;

public class ResultActivity extends AppCompatActivity {

    @Override
    protected void onCreate(Bundle savedInstanceState) {
        super.onCreate(savedInstanceState);
        setContentView(R.layout.activity_result);
    }
}
Android プログラミング【 効果音 】~ ボタンで再生 ~

Android 開発 効果音 768

効果音(10秒以内の短い音)を鳴らす動画です。
途中難易度の高いところもありますが、結論「音を鳴らす」だけならコピペでけっこう行けます。

再生の流れ

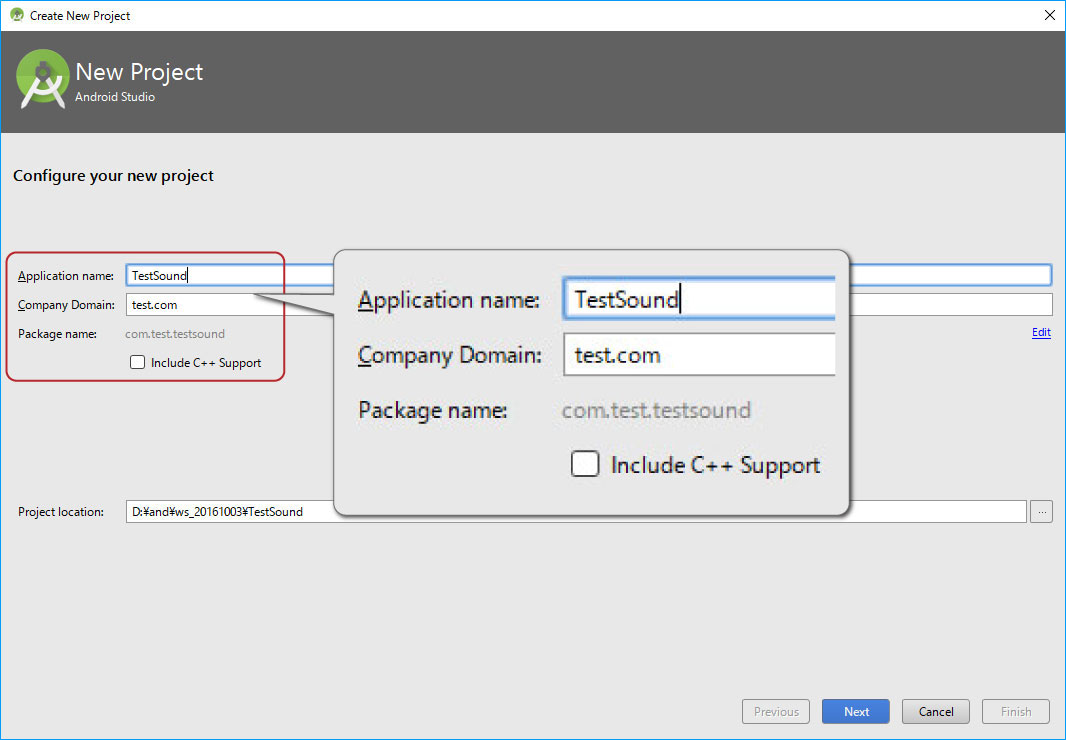
プロジェクト、カンパニードメイン、パッケージネームを同じにするとコピペエラーが減ります。

Application name TestSound
Company Domain test.com
Package name com.test.testsound

Android 開発 効果音 新規

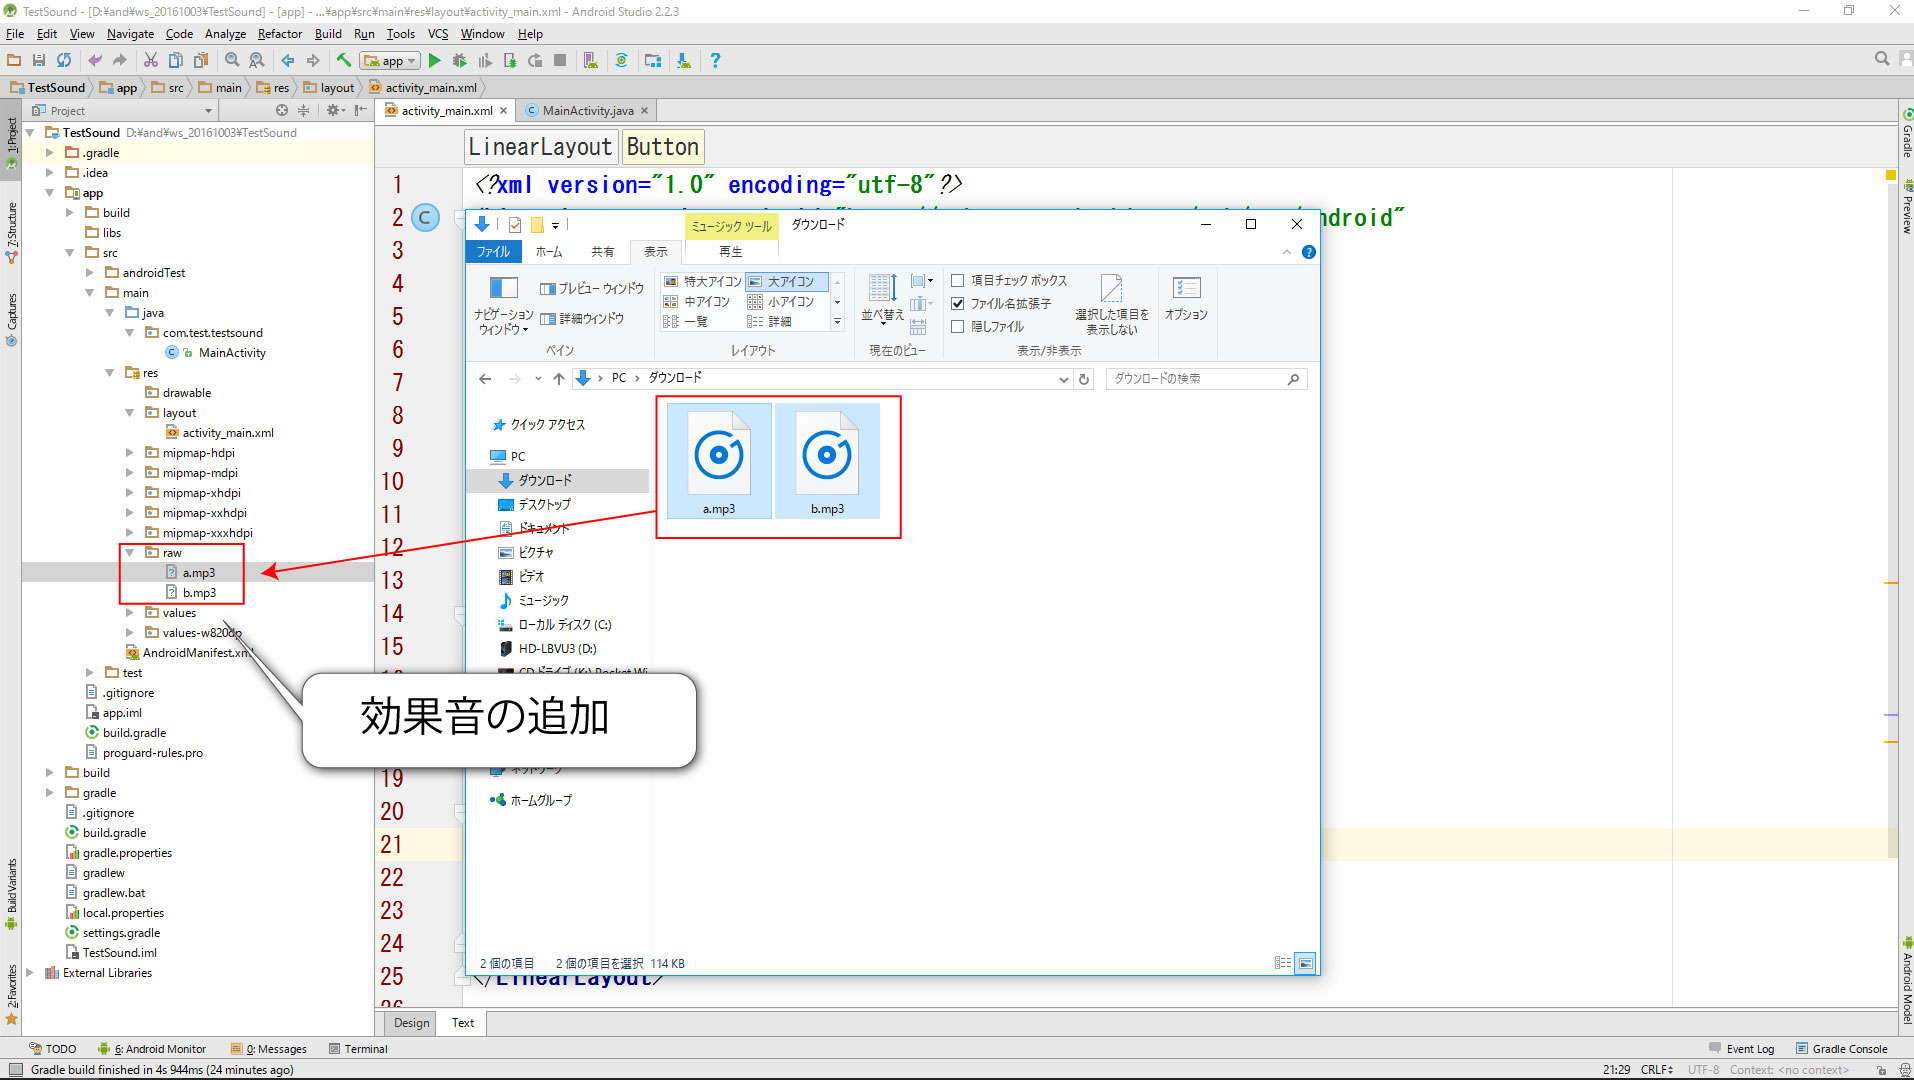
効果音を素材サイトからダウンロードします。
効果音ラボ

効果音をAndroid Studioに組み込みます。
Android 開発 効果音 効果音の保存2

<?xml version="1.0" encoding="utf-8"?>
<LinearLayout xmlns:android="http://schemas.android.com/apk/res/android"
    xmlns:tools="http://schemas.android.com/tools"
    android:id="@+id/activity_main"
    android:layout_width="match_parent"
    android:layout_height="match_parent"
    android:paddingBottom="@dimen/activity_vertical_margin"
    android:paddingLeft="@dimen/activity_horizontal_margin"
    android:paddingRight="@dimen/activity_horizontal_margin"
    android:paddingTop="@dimen/activity_vertical_margin"
    android:orientation="vertical"
    tools:context="com.test.testsound.MainActivity">

    <Button
        android:onClick="onA"
        android:text="a"
        android:layout_width="wrap_content"
        android:layout_height="wrap_content" />

    <Button
        android:onClick="onB"
        android:text="b"
        android:layout_width="wrap_content"
        android:layout_height="wrap_content" />
</LinearLayout>
package com.test.testsound;

import android.media.AudioAttributes;
import android.media.AudioManager;
import android.media.SoundPool;
import android.os.Build;
import android.support.v7.app.AppCompatActivity;
import android.os.Bundle;
import android.view.View;

public class MainActivity extends AppCompatActivity {

    // ① 準備(コンポを部屋に置く・コピペOK)
    SoundPool soundPool;    // 効果音を鳴らす本体(コンポ)
    int mp3a;          // 効果音データ(mp3)
    int mp3b;          // 効果音データ(mp3)


    @Override
    protected void onCreate(Bundle savedInstanceState) {
        super.onCreate(savedInstanceState);
        setContentView(R.layout.activity_main);

        // ② 初期化(電源を入れる・コピペOK)
        if (Build.VERSION.SDK_INT < Build.VERSION_CODES.LOLLIPOP) {
            soundPool = new SoundPool(5, AudioManager.STREAM_MUSIC, 0);
        } else {
            AudioAttributes attr = new AudioAttributes.Builder()
                    .setUsage(AudioAttributes.USAGE_MEDIA)
                    .setContentType(AudioAttributes.CONTENT_TYPE_MUSIC)
                    .build();
            soundPool = new SoundPool.Builder()
                    .setAudioAttributes(attr)
                    .setMaxStreams(5)
                    .build();
        }

        // ③ 読込処理(CDを入れる)
        mp3a = soundPool.load(this, R.raw.a, 1);
        mp3b = soundPool.load(this, R.raw.b, 1);
    }


    public void onA(View v){
        // ④ 再生処理(再生ボタン)
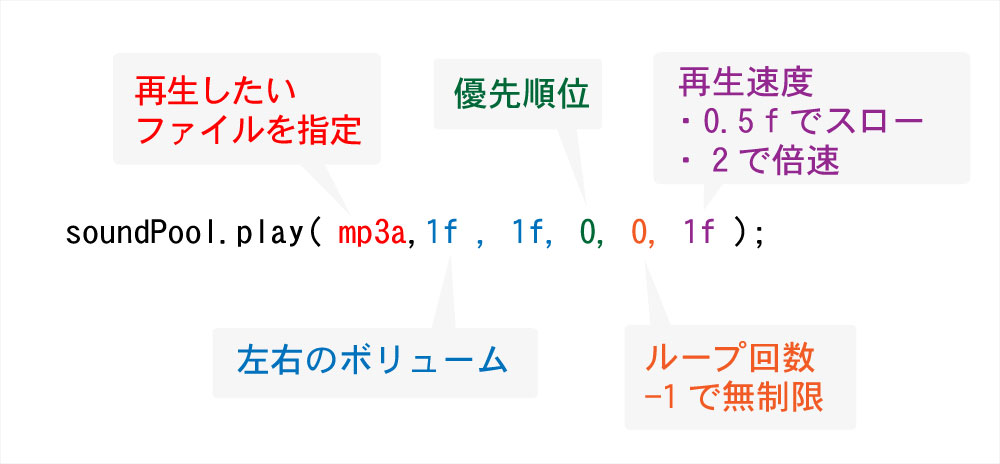
        soundPool.play(mp3a,1f , 1f, 0, 0, 1f);
    }

    public void onB(View v){
        // ④ 再生処理 (再生ボタン)
        soundPool.play(mp3b,1f , 1f, 0, 0, 1f);
    }
}

soundPool図解

Android プログラミング【 カウントダウンタイマー① 】~ 10秒で終了 ~

Android 開発 カウントダウンタイマー1

カウントダウンタイマーを学習します。
細かく理解するには「Java中級」程度の知識が必要ですが、再現だけならカンタンです。

【 注意事項 】
この動画には問題点もあります。
以下と組み合わせてご覧ください。

カウントダウンタイマー① 10秒で終了
カウントダウンタイマー② 画面切り替え
カウントダウンタイマー③ 画面再表示
カウントダウンタイマー④ 改正版

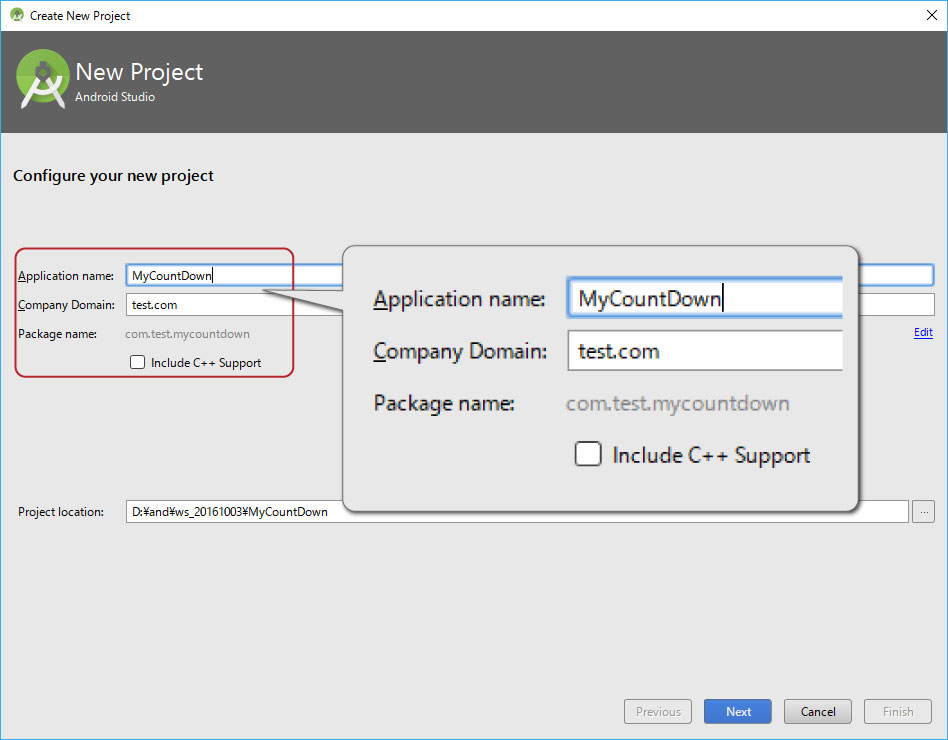
プロジェクト、カンパニードメイン、パッケージネームを同じにするとコピペエラーが減ります。

Application name MyCountDown
Company Domain test.com
Package name com.test.mycountdown

新規プロジェクト

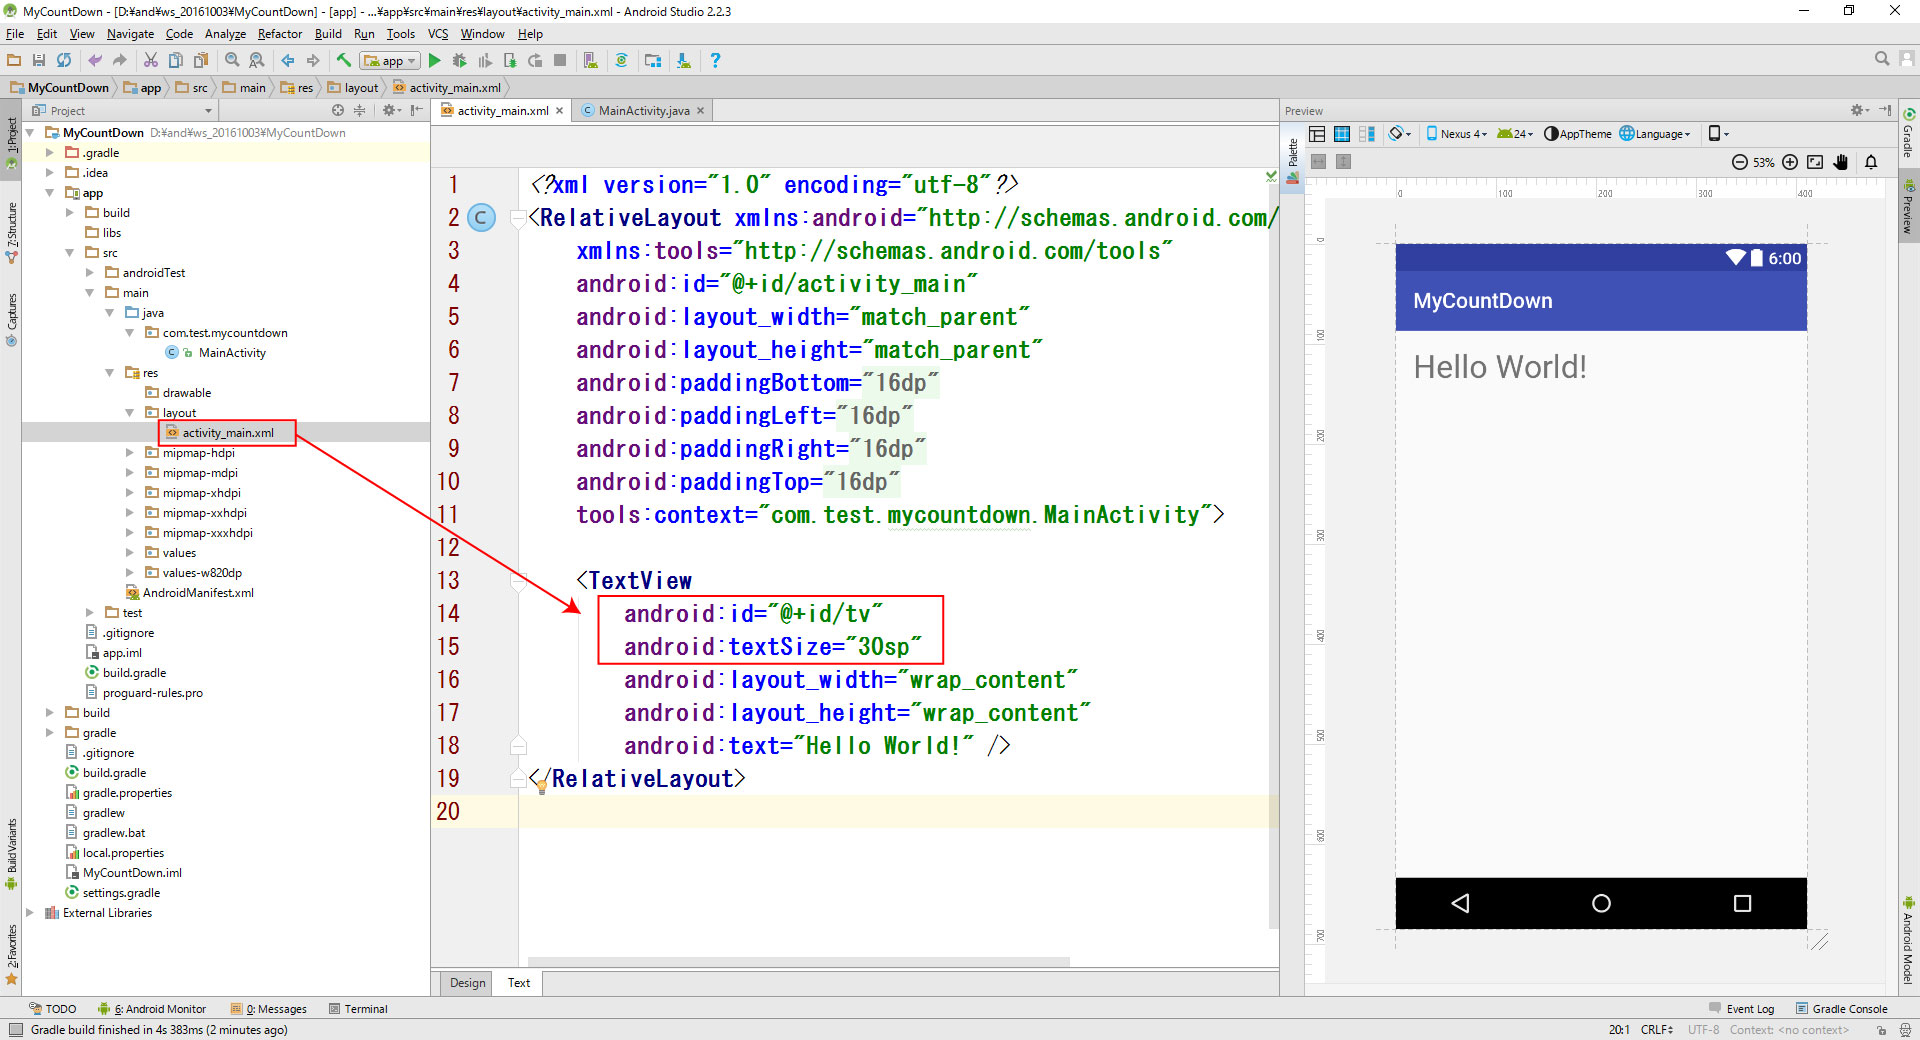
activity_main_xml

<?xml version="1.0" encoding="utf-8"?>
<RelativeLayout xmlns:android="http://schemas.android.com/apk/res/android"
    xmlns:tools="http://schemas.android.com/tools"
    android:id="@+id/activity_main"
    android:layout_width="match_parent"
    android:layout_height="match_parent"
    android:paddingBottom="@dimen/activity_vertical_margin"
    android:paddingLeft="@dimen/activity_horizontal_margin"
    android:paddingRight="@dimen/activity_horizontal_margin"
    android:paddingTop="@dimen/activity_vertical_margin"
    tools:context="com.test.mycountdown.MainActivity">

    <TextView
        android:id="@+id/tv"
        android:textSize="30sp"
        android:layout_width="wrap_content"
        android:layout_height="wrap_content"
        android:text="Hello World!" />
</RelativeLayout>

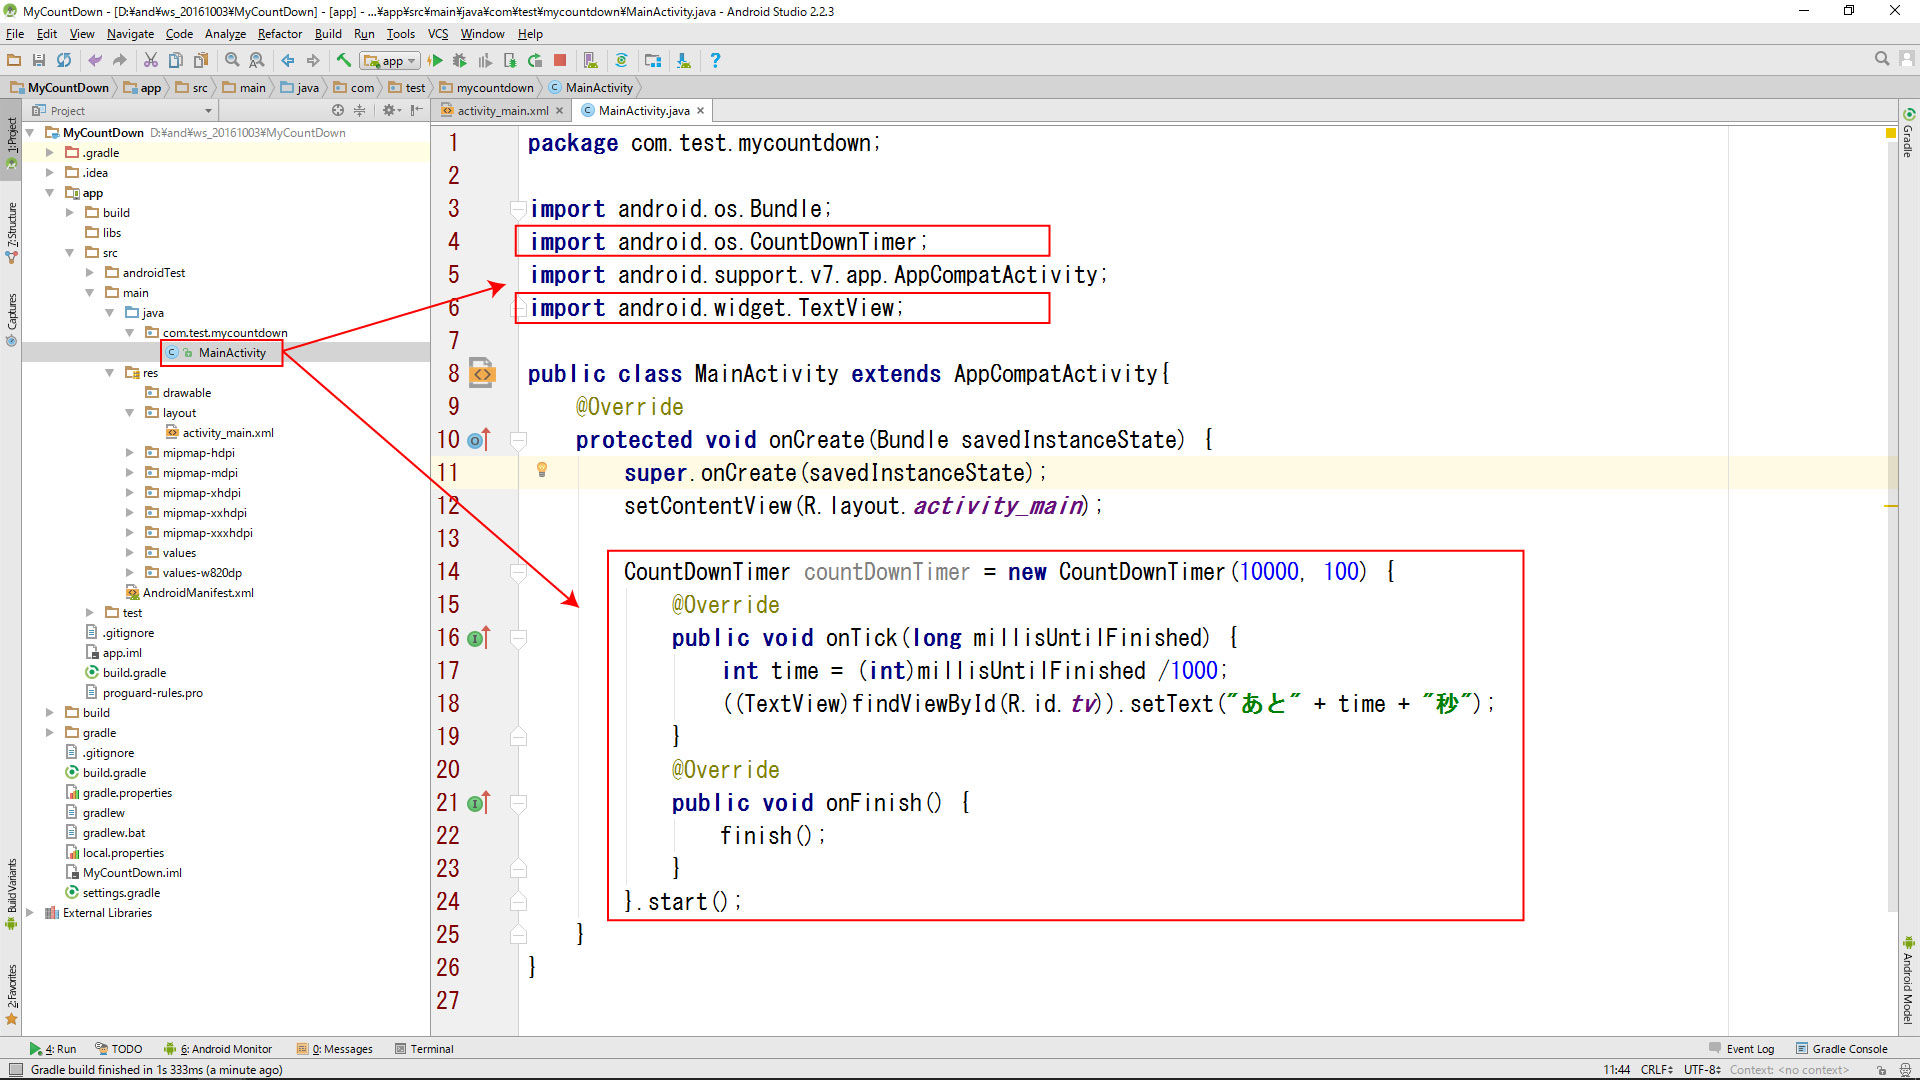
MainActivity_java

package com.test.mycountdown;

import android.os.Bundle;
import android.os.CountDownTimer;
import android.support.v7.app.AppCompatActivity;
import android.widget.TextView;

public class MainActivity extends AppCompatActivity{
    @Override
    protected void onCreate(Bundle savedInstanceState) {
        super.onCreate(savedInstanceState);
        setContentView(R.layout.activity_main);

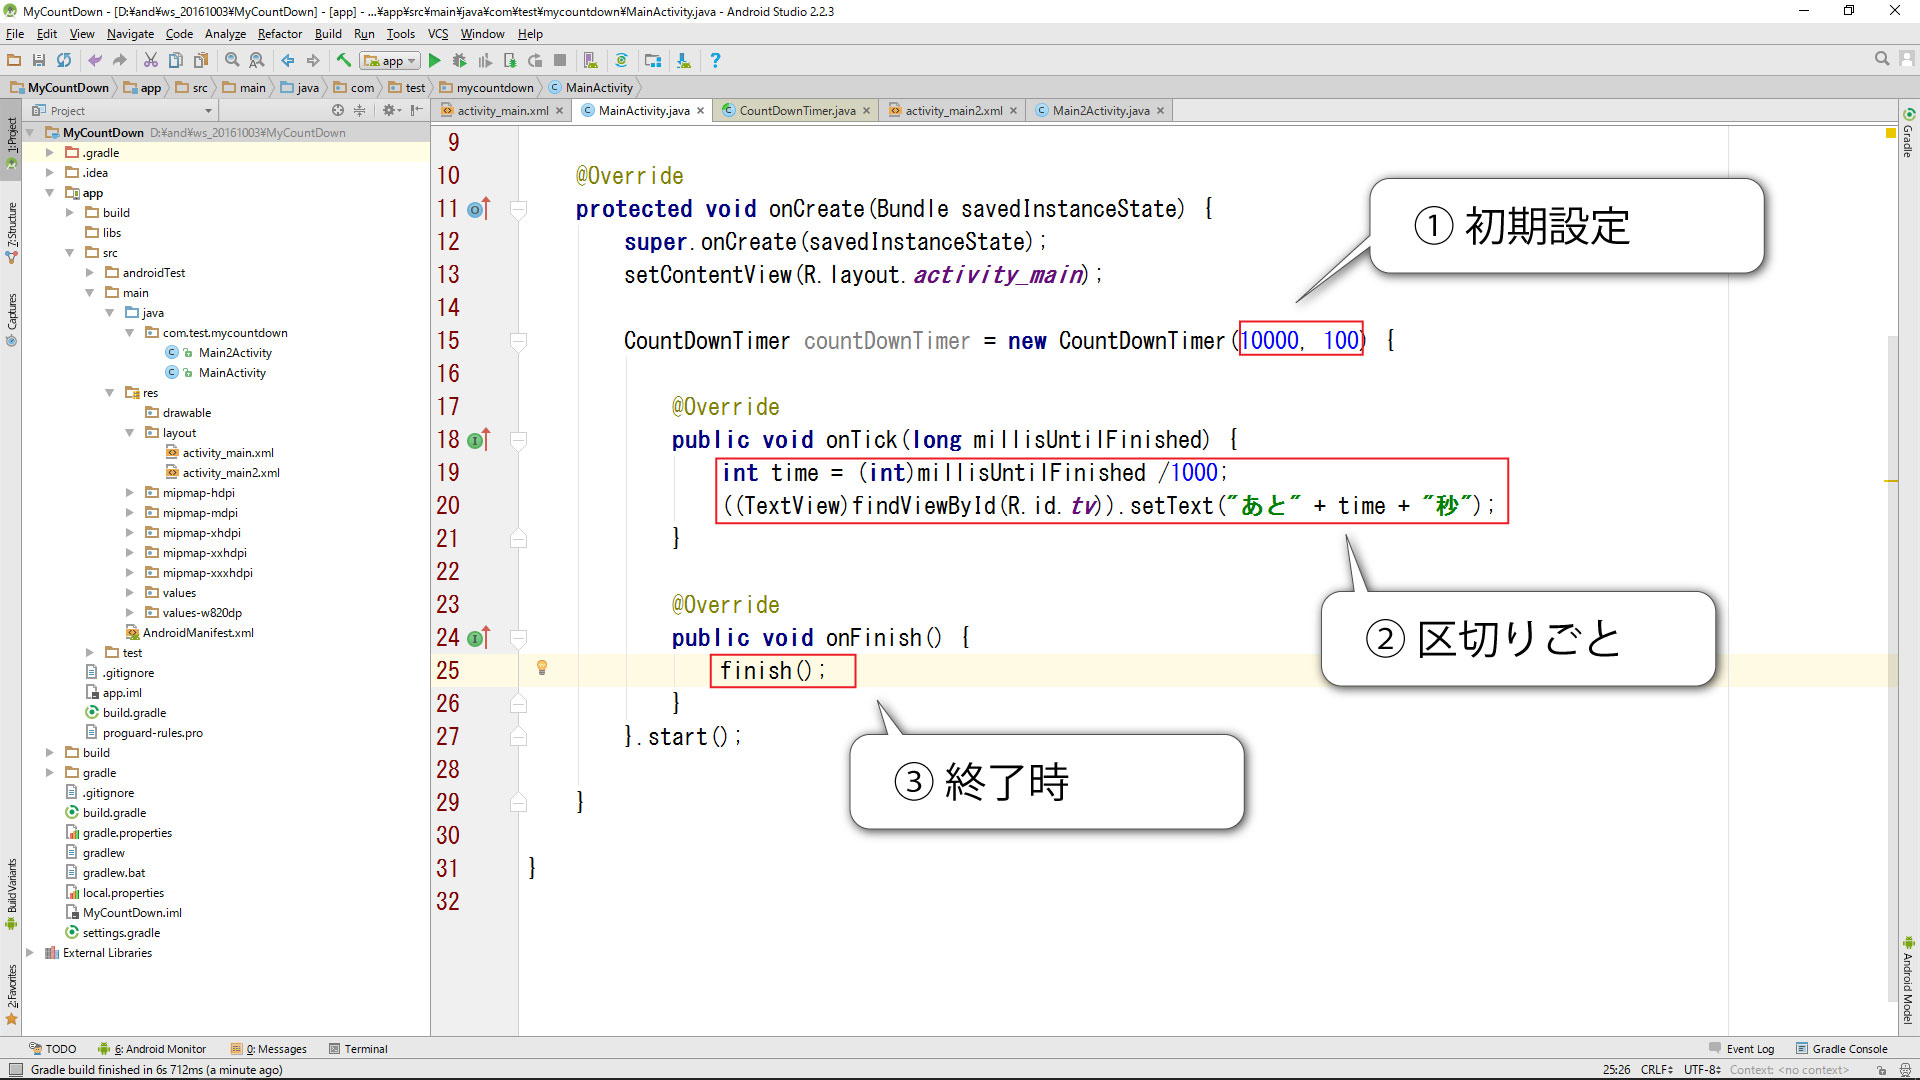
        CountDownTimer countDownTimer = new CountDownTimer(10000, 100) {
            @Override
            public void onTick(long millisUntilFinished) {
                int time = (int)millisUntilFinished /1000;
                ((TextView)findViewById(R.id.tv)).setText("あと" + time + "秒");
            }
            @Override
            public void onFinish() {
                finish();
            }
        }.start();
    }
}

CountDownTimer 図解①

Android プログラミング【 AlertDialog 】~ 「戻る」ボタンで表示 ~

Android プログラミング【 AlertDialog 】~ 「戻る」ボタンで表示 ~

プログラミング未経験者対象の【 Androidアプリ作成動画 】です。

この動画は「AlertDialog(アラートダイアログ)の利用」を行ってます。
戻るボタンを押したときにダイアログを表示し、YESを選択するとアプリを終了します。

プロジェクト、カンパニードメイン、パッケージネームを同じにするとコピペエラーが減ります。

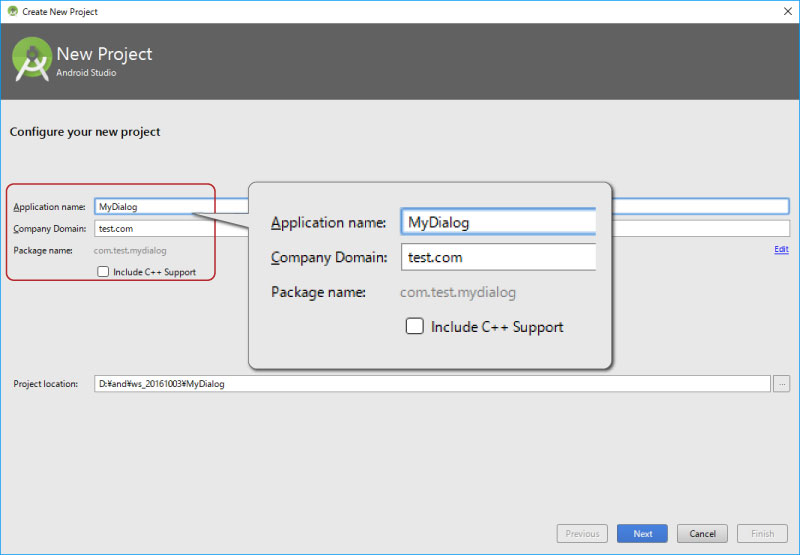
Application name MyDialog
Company Domain test.com
Package name com.test.mydialog

alertdialog プロジェクト名

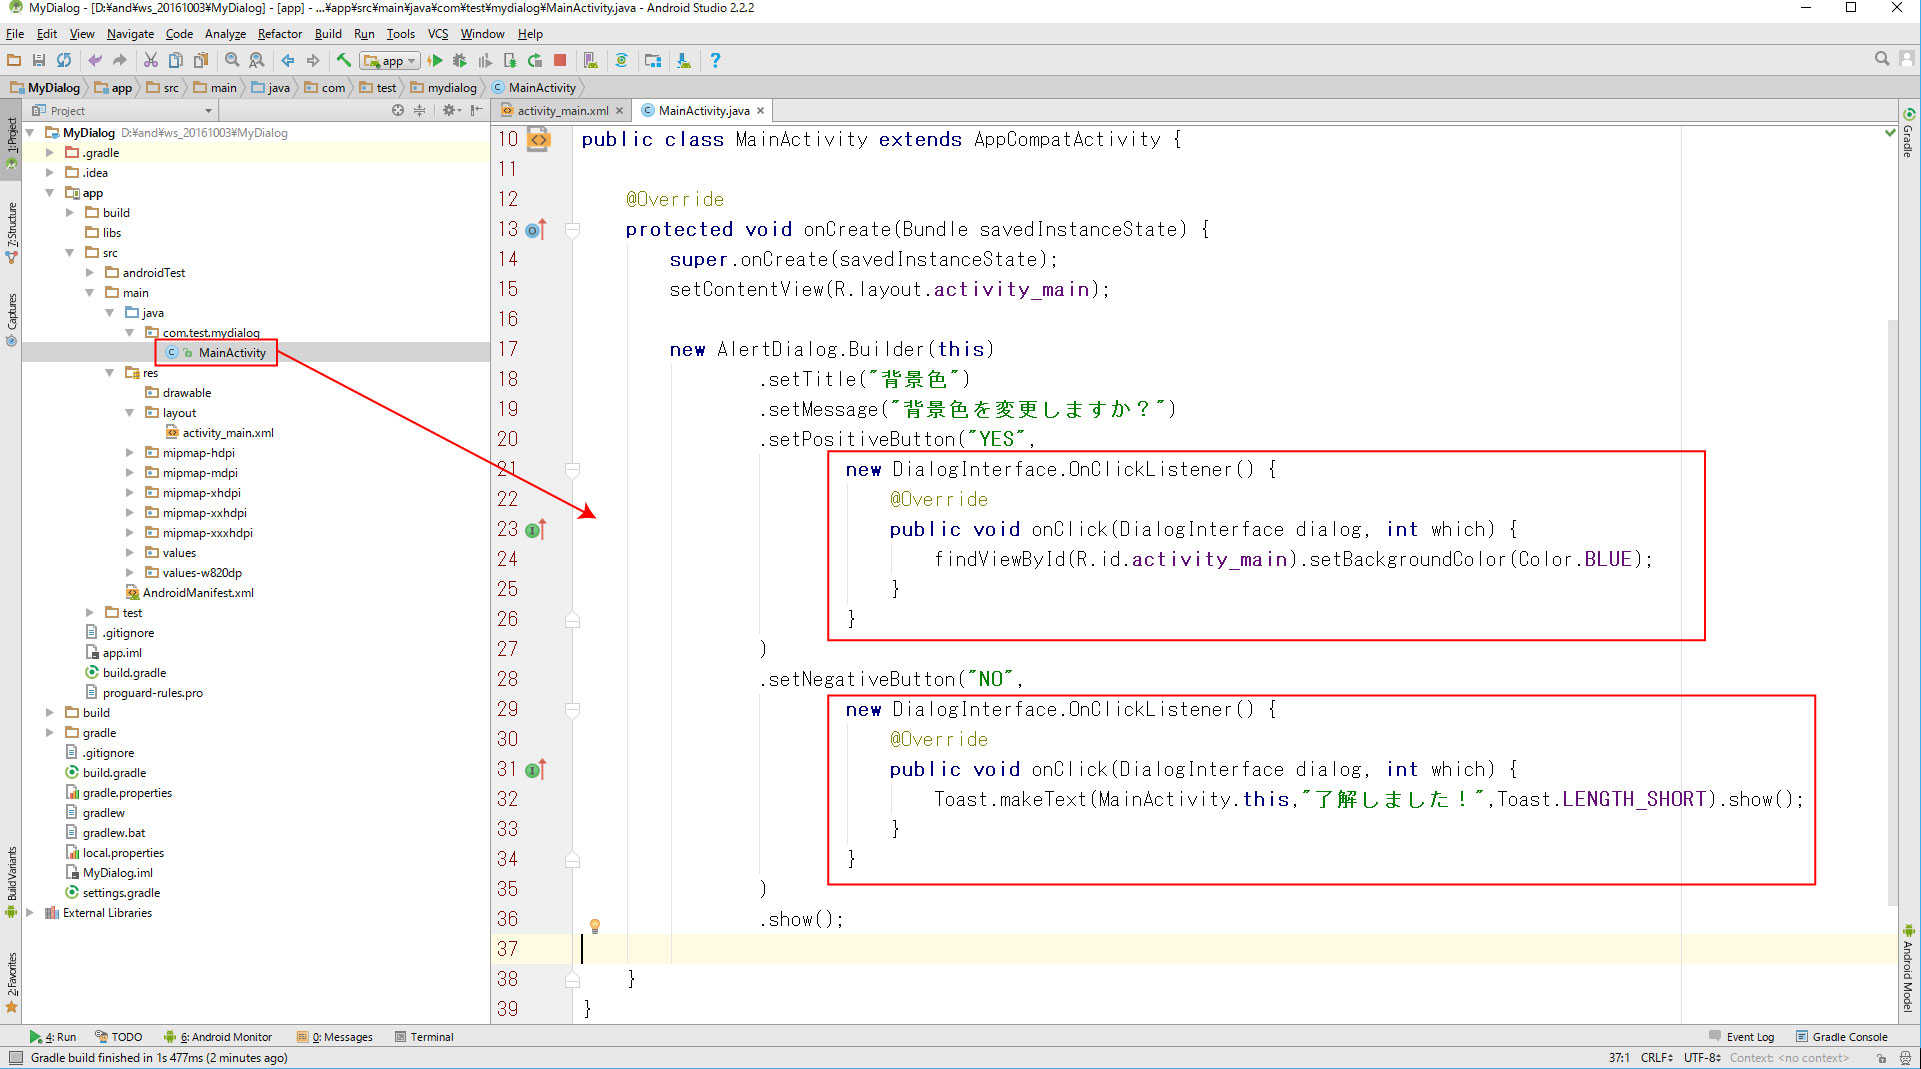
alertdialog-mainactivity2

package com.test.mydialog;

import android.content.DialogInterface;
import android.os.Bundle;
import android.support.v7.app.AlertDialog;
import android.support.v7.app.AppCompatActivity;
import android.view.KeyEvent;

public class MainActivity extends AppCompatActivity {

    @Override
    protected void onCreate(Bundle savedInstanceState) {
        super.onCreate(savedInstanceState);
        setContentView(R.layout.activity_main);
    }

    @Override
    public boolean onKeyDown(int keyCode, KeyEvent event) {
        switch (keyCode){
            case KeyEvent.KEYCODE_BACK:
                new AlertDialog.Builder(this)
                        .setTitle("終了確認")
                        .setMessage("アプリを終了しますか?")
                        .setNegativeButton("NO", null)
                        .setPositiveButton("YES",

                                new DialogInterface.OnClickListener() {
                                    @Override
                                    public void onClick(DialogInterface dialog, int which) {
                                        finish();
                                    }
                                }

                        )
                        .show();
        }
        return super.onKeyDown(keyCode, event);
    }
}
Android Studio入門

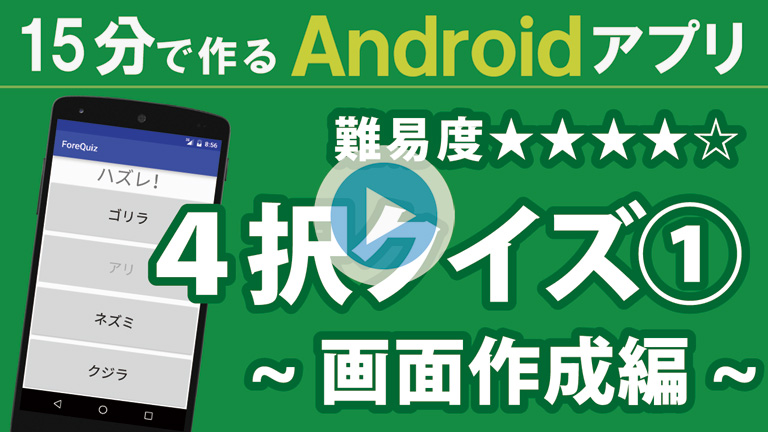
15分で作る? 【4択クイズ 】~ 小さい順にタップ ~

Android 開発【 4択クイズ① 】画面作成編 768

簡易4択クイズです。
少ない順にタップし、全てタップするとゲームクリアーです。

学習用のサンプルアプリです。
ゲームオーバーやリトライはありませんし、説明も簡略しています。

以下の知識が無いと理解不能です。
初心者のかたは「ご自身のPCで再現」を目指してください。

  • 配列
  • IF
  • キャスト
  • ジェネリクス
  1. 【4択クイズ① 】~ 画面作成編 ~
  2. 【4択クイズ② 】~ ランダム出題編 ~
  3. 【4択クイズ③ 】~ 正解判定編 ~
  4. 【4択クイズ④ 】~ ゲームオーバー ~
  5. 【4択クイズ⑤ 】~ 完成編 ~

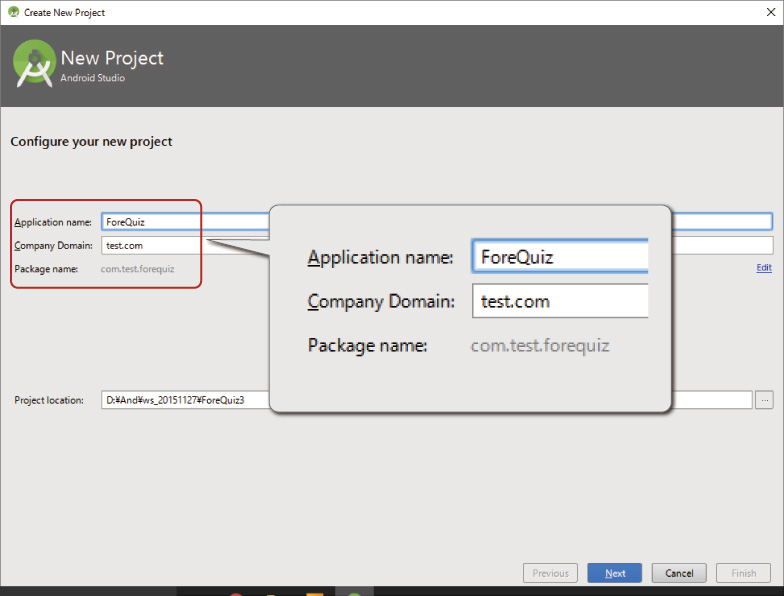
プロジェクト、カンパニードメイン、パッケージネームを同じにするとコピペエラーが減ります。

Application name ForeQuiz
Company Domain test.com
Package name com.test.forequiz

クイズの作り方【プロジェクト名】

<?xml version="1.0" encoding="utf-8"?>
<LinearLayout xmlns:android="http://schemas.android.com/apk/res/android"
    xmlns:tools="http://schemas.android.com/tools"
    android:layout_width="match_parent"
    android:layout_height="match_parent"
    android:orientation="vertical"
    tools:context=".MainActivity">

    <TextView
        android:id="@+id/tv"
        android:layout_width="wrap_content"
        android:layout_height="wrap_content"
        android:layout_gravity="center_horizontal"
        android:text="小さい順にタップ"
        android:textSize="40sp" />

    <Button
        android:id="@+id/b0"
        android:layout_width="match_parent"
        android:layout_height="match_parent"
        android:layout_weight="1"
        android:onClick="onButton"
        android:text="○"
        android:textSize="30sp" />

    <Button
        android:id="@+id/b1"
        android:layout_width="match_parent"
        android:layout_height="match_parent"
        android:layout_weight="1"
        android:onClick="onButton"
        android:text="○"
        android:textSize="30sp" />

    <Button
        android:id="@+id/b2"
        android:layout_width="match_parent"
        android:layout_height="match_parent"
        android:layout_weight="1"
        android:onClick="onButton"
        android:text="○"
        android:textSize="30sp" />

    <Button
        android:id="@+id/b3"
        android:layout_width="match_parent"
        android:layout_height="match_parent"
        android:layout_weight="1"
        android:onClick="onButton"
        android:text="○"
        android:textSize="30sp" />
</LinearLayout>
package com.test.forequiz;

import android.support.v7.app.AppCompatActivity;
import android.os.Bundle;
import android.widget.Button;

import java.util.Arrays;
import java.util.Collections;
import java.util.List;

public class MainActivity extends AppCompatActivity {

    String[] QUIZ = {"アリ","ネズミ","ゴリラ","クジラ"};  // 問題

    @Override
    protected void onCreate(Bundle savedInstanceState) {
        super.onCreate(savedInstanceState);
        setContentView(R.layout.activity_main);

        // 出題(シャッフル)//////////////////////////
        List<String> list = Arrays.asList(QUIZ.clone());
        Collections.shuffle(list);
        ((Button)findViewById(R.id.b0)).setText(list.get(0));
        ((Button)findViewById(R.id.b1)).setText(list.get(1));
        ((Button)findViewById(R.id.b2)).setText(list.get(2));
        ((Button)findViewById(R.id.b3)).setText(list.get(3));
    }
    
}
package com.test.forequiz;

import android.support.v7.app.AppCompatActivity;
import android.os.Bundle;
import android.view.View;
import android.widget.Button;
import android.widget.TextView;

import java.util.Arrays;
import java.util.Collections;
import java.util.List;

public class MainActivity extends AppCompatActivity {

    String[] QUIZ = {"アリ","ネズミ","ゴリラ","クジラ"};  // 問題
    int tap = 0;                             // 現在の正解数

    @Override
    protected void onCreate(Bundle savedInstanceState) {
        super.onCreate(savedInstanceState);
        setContentView(R.layout.activity_main);

        // 出題(シャッフル)//////////////////////////
        List<String> list = Arrays.asList(QUIZ.clone());
        Collections.shuffle(list);
        ((Button)findViewById(R.id.b0)).setText(list.get(0));
        ((Button)findViewById(R.id.b1)).setText(list.get(1));
        ((Button)findViewById(R.id.b2)).setText(list.get(2));
        ((Button)findViewById(R.id.b3)).setText(list.get(3));
    }

    // ボタンチェック  /////////////////////////
    public void onButton( View v){
        // タップされたボタンの文字を取得
        String text =  ((Button)v).getText().toString();

        // 正解処理 ( 問題と比較 )
        if( text.equals(QUIZ[tap])){

            v.setEnabled(false);    // ボタンをクリック不可
            tap++;                  // 正解数UP
            ((TextView)findViewById(R.id.tv)).setText( tap+"問正解!!");  // 正解表示
            
        }
    }
}
package com.test.forequiz;

import android.support.v7.app.AppCompatActivity;
import android.os.Bundle;
import android.view.View;
import android.widget.Button;
import android.widget.TextView;

import java.util.Arrays;
import java.util.Collections;
import java.util.List;

public class MainActivity extends AppCompatActivity {

    String[] QUIZ = {"アリ","ネズミ","ゴリラ","クジラ"};  // 問題
    int tap = 0;                             // 現在の正解数

    @Override
    protected void onCreate(Bundle savedInstanceState) {
        super.onCreate(savedInstanceState);
        setContentView(R.layout.activity_main);

        // 出題(シャッフル)//////////////////////////
        List<String> list = Arrays.asList(QUIZ.clone());
        Collections.shuffle(list);
        ((Button)findViewById(R.id.b0)).setText(list.get(0));
        ((Button)findViewById(R.id.b1)).setText(list.get(1));
        ((Button)findViewById(R.id.b2)).setText(list.get(2));
        ((Button)findViewById(R.id.b3)).setText(list.get(3));
    }

    // ボタンチェック  /////////////////////////
    public void onButton( View v){
        // タップされたボタンの文字を取得
        String text =  ((Button)v).getText().toString();

        // 正解処理 ( 問題と比較 )
        if( text.equals(QUIZ[tap])){

            v.setEnabled(false);    // ボタンをクリック不可
            tap++;                  // 正解数UP
            ((TextView)findViewById(R.id.tv)).setText( tap+"問正解!!");  // 正解表示
            
        }
        // 不正解処理
        else {
            ((TextView)findViewById(R.id.tv)).setText("ゲームオーバー");
            ((Button)findViewById(R.id.b0)).setEnabled(false);
            ((Button)findViewById(R.id.b1)).setEnabled(false);
            ((Button)findViewById(R.id.b2)).setEnabled(false);
            ((Button)findViewById(R.id.b3)).setEnabled(false);
        }
    }
}

package com.test.forequiz;

import android.support.v7.app.AppCompatActivity;
import android.os.Bundle;
import android.view.View;
import android.widget.Button;
import android.widget.TextView;

import java.util.Arrays;
import java.util.Collections;
import java.util.List;

public class MainActivity extends AppCompatActivity {

    String[] QUIZ = {"アリ","ネズミ","ゴリラ","クジラ"};  // 問題
    int tap = 0;                             // 現在の正解数

    @Override
    protected void onCreate(Bundle savedInstanceState) {
        super.onCreate(savedInstanceState);
        setContentView(R.layout.activity_main);

        // 出題(シャッフル)//////////////////////////
        List<String> list = Arrays.asList(QUIZ.clone());
        Collections.shuffle(list);
        ((Button)findViewById(R.id.b0)).setText(list.get(0));
        ((Button)findViewById(R.id.b1)).setText(list.get(1));
        ((Button)findViewById(R.id.b2)).setText(list.get(2));
        ((Button)findViewById(R.id.b3)).setText(list.get(3));
    }

    // ボタンチェック  /////////////////////////
    public void onButton( View v){
        // タップされたボタンの文字を取得
        String text =  ((Button)v).getText().toString();

        // 正解処理 ( 問題と比較 )
        if( text.equals(QUIZ[tap])){

            v.setEnabled(false);    // ボタンをクリック不可
            tap++;                  // 正解数UP
            ((TextView)findViewById(R.id.tv)).setText( tap+"問正解!!");  // 正解表示

            // 全問正解の処理
            if(tap >= 4){
                ((TextView)findViewById(R.id.tv)).setText("ゲームクリア");
            }
        }
        // 不正解処理
        else {
            ((TextView)findViewById(R.id.tv)).setText("ゲームオーバー");
            ((Button)findViewById(R.id.b0)).setEnabled(false);
            ((Button)findViewById(R.id.b1)).setEnabled(false);
            ((Button)findViewById(R.id.b2)).setEnabled(false);
            ((Button)findViewById(R.id.b3)).setEnabled(false);
        }
    }
}
Android Studio入門

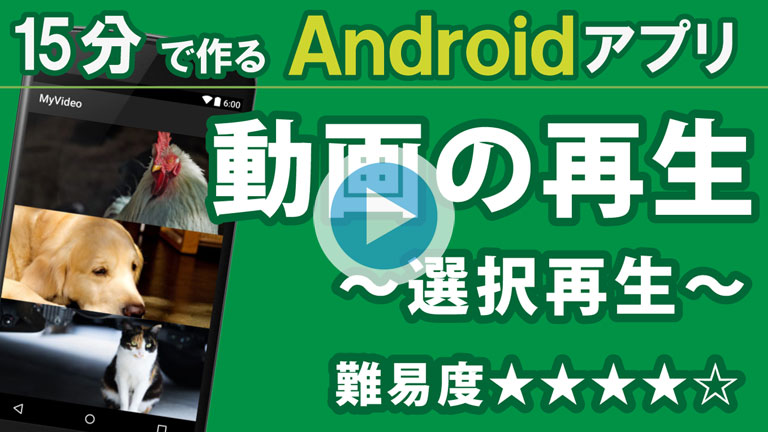
15分で作る?【 動画の再生 】~選択再生~

Android 開発【動画の再生】 選択再生768

一覧から選んで動画を再生します。

今回は「画面の切り替え」を行います。
ActivityとIntentを理解していると簡単な動画ですが、初心者の方はほぼ理解不可能な動画です。
「ご自身のPCで再現」「ActivityとIntentの予習」として御覧ください。

初心者 :ご自身のPCで再現できるが、詳細は意味不明、アレンジも厳しい。
中級者 :再現と「なんとなく」理解可能。アレンジは厳しい。
経験者 :ActivityとIntentを理解してれば、ソースを見るだけで理解可能。

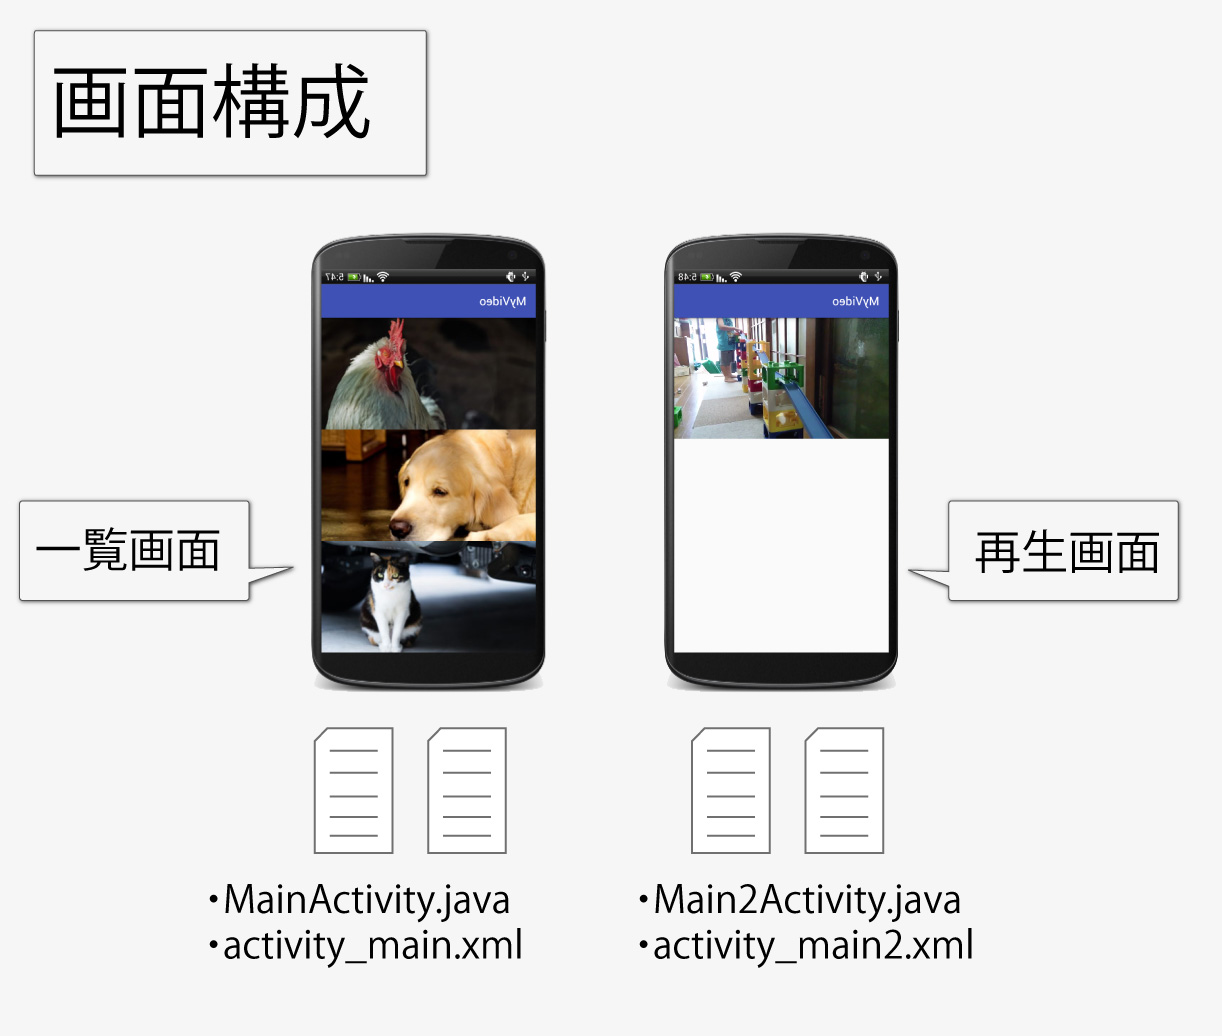
動画の再生【画面構成】

学習に使用する素材です。
ご自身で用意する場合はファイル名や拡張し、ファイルサイズにご注意ください。
初心者の方はサンプルを使用することを強くおすすめします。

ImageButton ニワトリ
iv0
ImageButton 犬
iv1
ImageButton 猫
iv2

※ 写真素材は【 写真素材ぱくたそ 】様からお借りしています。

サンプル動画 【ミニカー】

サンプル動画 【シャカシャカ】

サンプル動画 【ひよこ】

* 注意点:動画の形式によって再生できないものがありました。

プロジェクト、カンパニードメイン、パッケージネームを同じにするとコピペエラーが減ります。

Application name MyVideo
Company Domain test.com
Package name com.test.myvideo

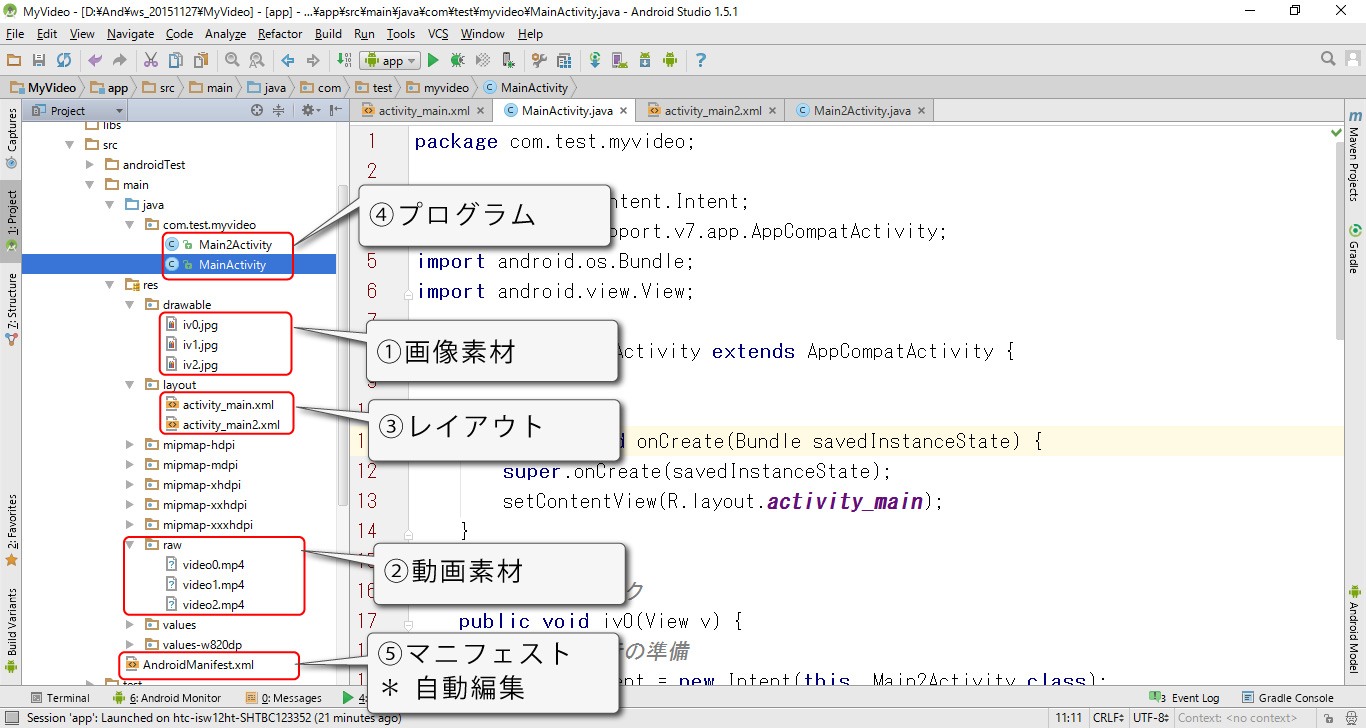
Android 開発【動画プレーヤー】プロジェクト名

以下のファイル構成になります。
フォルダ名やファイル名を変更するとエラーになります。

ファイル構成2

一覧画面を完成させます。

<?xml version="1.0" encoding="utf-8"?>
<LinearLayout xmlns:android="http://schemas.android.com/apk/res/android"
    xmlns:tools="http://schemas.android.com/tools"
    android:layout_width="match_parent"
    android:layout_height="match_parent"
    android:orientation="vertical"
    tools:context=".MainActivity">

    <ImageView
        android:src="@drawable/iv0"
        android:onClick="iv0"
        android:layout_weight="1"
        android:scaleType="centerCrop"
        android:layout_width="match_parent"
        android:layout_height="match_parent" />
    <ImageView
        android:src="@drawable/iv1"
        android:onClick="iv1"
        android:layout_weight="1"
        android:scaleType="centerCrop"
        android:layout_width="match_parent"
        android:layout_height="match_parent" />
    <ImageView
        android:src="@drawable/iv2"
        android:onClick="iv2"
        android:layout_weight="1"
        android:scaleType="centerCrop"
        android:layout_width="match_parent"
        android:layout_height="match_parent" />

</LinearLayout>

一覧画面のプログラムを作成します。

package com.test.myvideo;

import android.content.Intent;
import android.support.v7.app.AppCompatActivity;
import android.os.Bundle;
import android.view.View;

public class MainActivity extends AppCompatActivity {

    @Override
    protected void onCreate(Bundle savedInstanceState) {
        super.onCreate(savedInstanceState);
        setContentView(R.layout.activity_main);
    }

    // ボタンクリック
    public void iv0(View v) {

        // 画面移行の準備
        Intent intent = new Intent(this, Main2Activity.class);
        // 移行後に再生する動画を指定
        intent.putExtra("mp4", R.raw.video0);
        // 画面移行スタート
        startActivity(intent);
    }

    public void iv1(View v) {
        Intent intent = new Intent(this, Main2Activity.class);
        intent.putExtra("mp4", R.raw.video1);
        startActivity(intent);
    }

    public void iv2(View v) {
        Intent intent = new Intent(this, Main2Activity.class);
        intent.putExtra("mp4", R.raw.video2);
        startActivity(intent);
    }

}
<?xml version="1.0" encoding="utf-8"?>
<RelativeLayout xmlns:android="http://schemas.android.com/apk/res/android"
    xmlns:tools="http://schemas.android.com/tools"
    android:layout_width="match_parent"
    android:layout_height="match_parent"
    tools:context=".MainActivity">

    <VideoView
        android:id="@+id/v"
        android:layout_width="match_parent"
        android:layout_height="match_parent" />

</RelativeLayout>
package com.test.myvideo;

import android.content.Intent;
import android.net.Uri;
import android.support.v7.app.AppCompatActivity;
import android.os.Bundle;
import android.widget.MediaController;
import android.widget.VideoView;

public class Main2Activity extends AppCompatActivity {

    @Override
    protected void onCreate(Bundle savedInstanceState) {
        super.onCreate(savedInstanceState);
        setContentView(R.layout.activity_main2);

        // 元の画面で指定した動画を取得
        Intent intent = getIntent();
        int mp4 = intent.getIntExtra("mp4",R.raw.video1);

        // ID取得
        VideoView v = (VideoView)findViewById(R.id.v);

        // 動画の指定
        v.setVideoURI(Uri.parse("android.resource://" + this.getPackageName() + "/" + mp4));

        // 再生スタート
        v.start();

        // コントローラNO(動画をタップするとメニュー表示)
        v.setMediaController(new MediaController(this));
    }
}


<?xml version="1.0" encoding="utf-8"?>
<manifest xmlns:android="http://schemas.android.com/apk/res/android"
    package="com.test.myvideo" >

    <application
        android:allowBackup="true"
        android:icon="@mipmap/ic_launcher"
        android:label="@string/app_name"
        android:supportsRtl="true"
        android:theme="@style/AppTheme" >
        <activity android:name=".MainActivity" >
            <intent-filter>
                <action android:name="android.intent.action.MAIN" />

                <category android:name="android.intent.category.LAUNCHER" />
            </intent-filter>
        </activity>
        <activity android:name=".Main2Activity" >
        </activity>
    </application>

</manifest>

Android Studio入門

15分で作る? 【バイブレーション④】~ チェック版 ~

Android-Studio-入門【チェック版】タイトル768

バイブレーションの最終回です。
本体のバイブレーション機能をチェックし、有ればバイブを鳴らし、無ければトーストを表示します。

この動画はシリーズ物です。以下の順にご覧ください。

  1. 【バイブレーション①】~ 基礎編 ~
  2. 【バイブレーション②】~ 停止処理 ~
  3. 【バイブレーション③】~ リズム版 ~
  4. 【バイブレーション④】~ チェック版 ~

前回と全く一緒ですので変更は不要です。

<?xml version="1.0" encoding="utf-8"?>
<manifest xmlns:android="http://schemas.android.com/apk/res/android"
    package="com.test.vibration">

    <uses-permission android:name="android.permission.VIBRATE" />
    <application
        android:allowBackup="true"
        android:icon="@mipmap/ic_launcher"
        android:label="@string/app_name"
        android:supportsRtl="true"
        android:theme="@style/AppTheme">
        <activity android:name=".MainActivity">
            <intent-filter>
                <action android:name="android.intent.action.MAIN" />

                <category android:name="android.intent.category.LAUNCHER" />
            </intent-filter>
        </activity>
    </application>

</manifest>

前回と全く一緒ですので変更は不要です。

<?xml version="1.0" encoding="utf-8"?>
<LinearLayout xmlns:android="http://schemas.android.com/apk/res/android"
    xmlns:tools="http://schemas.android.com/tools"
    android:layout_width="match_parent"
    android:layout_height="match_parent"
    android:orientation="vertical"
    android:paddingBottom="@dimen/activity_vertical_margin"
    android:paddingLeft="@dimen/activity_horizontal_margin"
    android:paddingRight="@dimen/activity_horizontal_margin"
    android:paddingTop="@dimen/activity_vertical_margin"
    tools:context=".MainActivity">

    <Button
        android:layout_width="match_parent"
        android:layout_height="wrap_content"
        android:onClick="onStart"
        android:text="START"
        android:textSize="50dp" />

    <Button
        android:layout_width="match_parent"
        android:layout_height="wrap_content"
        android:onClick="onStop"
        android:text="STOP"
        android:textSize="50dp" />
    
</LinearLayout>

本体にバイブレーション機能がある場合はバイブレーションが鳴り、無い場合はトーストを表示します。
※ エミュレーターではトーストが表示される様子

package com.test.vibration;

import android.content.Context;
import android.os.Vibrator;
import android.support.v7.app.AppCompatActivity;
import android.os.Bundle;
import android.view.View;
import android.widget.Toast;

public class MainActivity extends AppCompatActivity {

    @Override
    protected void onCreate(Bundle savedInstanceState) {
        super.onCreate(savedInstanceState);
        setContentView(R.layout.activity_main);
    }

    // STARTボタン    //////////////////////////////////
    public void onStart(View v) {
       // バイブレーターが存在するか?
       if(((Vibrator) getSystemService(Context.VIBRATOR_SERVICE)).hasVibrator()) {
           // バイブレーションスタート(1秒:1000ミリ秒)
           ((Vibrator) getSystemService(Context.VIBRATOR_SERVICE))
                   .vibrate(new long[]{500, 200, 500, 2000}, 0);
       } else {
           Toast.makeText(this, "起動出来ません", Toast.LENGTH_SHORT).show();
       }
    }
    // STOPボタン    //////////////////////////////////
    public void onStop(View v) {
        // キャンセル
        ((Vibrator) getSystemService(Context.VIBRATOR_SERVICE)).cancel();
    }

    // 強制停止処理   //////////////////////////////////
    @Override
    protected void onPause() {
        super.onPause();
        // キャンセル処理
        ((Vibrator) getSystemService(Context.VIBRATOR_SERVICE)).cancel();
    }
}

15分で作る? 【バイブレーション③】~ リズム版 ~

Android-Studio-入門【リズム版】タイトル768

バイブレーションをアレンジします。
複雑なリズムを付けたり、繰り返しを指定することが出来ます。

この動画はシリーズ物です。以下の順にご覧ください。

  1. 【バイブレーション①】~ 基礎編 ~
  2. 【バイブレーション②】~ 停止処理 ~
  3. 【バイブレーション③】~ リズム版 ~
  4. 【バイブレーション④】~ チェック版 ~

前回と全く一緒ですので変更は不要です。

<?xml version="1.0" encoding="utf-8"?>
<manifest xmlns:android="http://schemas.android.com/apk/res/android"
    package="com.test.vibration">

    <uses-permission android:name="android.permission.VIBRATE" />
    <application
        android:allowBackup="true"
        android:icon="@mipmap/ic_launcher"
        android:label="@string/app_name"
        android:supportsRtl="true"
        android:theme="@style/AppTheme">
        <activity android:name=".MainActivity">
            <intent-filter>
                <action android:name="android.intent.action.MAIN" />

                <category android:name="android.intent.category.LAUNCHER" />
            </intent-filter>
        </activity>
    </application>

</manifest>

前回と全く一緒ですので変更は不要です。

<?xml version="1.0" encoding="utf-8"?>
<LinearLayout xmlns:android="http://schemas.android.com/apk/res/android"
    xmlns:tools="http://schemas.android.com/tools"
    android:layout_width="match_parent"
    android:layout_height="match_parent"
    android:orientation="vertical"
    android:paddingBottom="@dimen/activity_vertical_margin"
    android:paddingLeft="@dimen/activity_horizontal_margin"
    android:paddingRight="@dimen/activity_horizontal_margin"
    android:paddingTop="@dimen/activity_vertical_margin"
    tools:context=".MainActivity">

    <Button
        android:layout_width="match_parent"
        android:layout_height="wrap_content"
        android:onClick="onStart"
        android:text="START"
        android:textSize="50dp" />

    <Button
        android:layout_width="match_parent"
        android:layout_height="wrap_content"
        android:onClick="onStop"
        android:text="STOP"
        android:textSize="50dp" />
    
</LinearLayout>

バイブレーションにリズムをつけます。

package com.test.vibration;

import android.content.Context;
import android.os.Vibrator;
import android.support.v7.app.AppCompatActivity;
import android.os.Bundle;
import android.view.View;

public class MainActivity extends AppCompatActivity {

    @Override
    protected void onCreate(Bundle savedInstanceState) {
        super.onCreate(savedInstanceState);
        setContentView(R.layout.activity_main);
    }

    // STARTボタン    //////////////////////////////////
    public void onStart(View v) {
        // バイブスタート(0.5秒停止、0.2秒鳴る、0.5秒停止、2秒鳴る、を繰り返す)
        ((Vibrator) getSystemService(Context.VIBRATOR_SERVICE))
                .vibrate( new long[]{500,200, 500,2000}, 0 );
    }

    // STOPボタン    //////////////////////////////////
    public void onStop(View v) {
        // キャンセル処理
        ((Vibrator) getSystemService(Context.VIBRATOR_SERVICE)).cancel();
    }

    // 強制停止処理   //////////////////////////////////
    @Override
    protected void onPause() {
        super.onPause();
        // キャンセル処理
        ((Vibrator) getSystemService(Context.VIBRATOR_SERVICE)).cancel();
    }
}

バイブレーションにリズムをつけます。

package com.test.vibration;

import android.content.Context;
import android.os.Vibrator;
import android.support.v7.app.AppCompatActivity;
import android.os.Bundle;
import android.view.View;

public class MainActivity extends AppCompatActivity {

    @Override
    protected void onCreate(Bundle savedInstanceState) {
        super.onCreate(savedInstanceState);
        setContentView(R.layout.activity_main);
    }

    // STARTボタン    //////////////////////////////////
    public void onStart(View v) {
        // バイブスタート(0.1秒停止、0.1秒鳴る、を3回繰り返し、5秒鳴って終了する)
        ((Vibrator) getSystemService(Context.VIBRATOR_SERVICE))
            .vibrate( new long[]{100,100, 100,100, 100,100, 100,5000}, -1 );
    }

    // STOPボタン    //////////////////////////////////
    public void onStop(View v) {
        // キャンセル処理
        ((Vibrator) getSystemService(Context.VIBRATOR_SERVICE)).cancel();
    }

    // 強制停止処理   //////////////////////////////////
    @Override
    protected void onPause() {
        super.onPause();
        // キャンセル処理
        ((Vibrator) getSystemService(Context.VIBRATOR_SERVICE)).cancel();
    }
}
Android Studio入門

15分で作る? 【バイブレーション②】~ 停止処理 ~

Android Studio 入門【停止処理】タイトル768

バイブレーションの停止処理を追加します。
通常の停止処理だけでなく、トラブル時の対応も追加しています。

この動画はシリーズ物です。以下の順にご覧ください。

  1. 【バイブレーション①】~ 基礎編 ~
  2. 【バイブレーション②】~ 停止処理 ~
  3. 【バイブレーション③】~ リズム版 ~
  4. 【バイブレーション④】~ チェック版 ~

バイブレーションの停止もとても簡単です。
以下の1行を適切な場所に張付けるだけで停止することが出来ます。

((Vibrator) getSystemService(Context.VIBRATOR_SERVICE)).cancel();

前回と全く一緒ですので変更は不要です。

<?xml version="1.0" encoding="utf-8"?>
<manifest xmlns:android="http://schemas.android.com/apk/res/android"
    package="com.test.vibration">

    <uses-permission android:name="android.permission.VIBRATE" />
    <application
        android:allowBackup="true"
        android:icon="@mipmap/ic_launcher"
        android:label="@string/app_name"
        android:supportsRtl="true"
        android:theme="@style/AppTheme">
        <activity android:name=".MainActivity">
            <intent-filter>
                <action android:name="android.intent.action.MAIN" />

                <category android:name="android.intent.category.LAUNCHER" />
            </intent-filter>
        </activity>
    </application>

</manifest>

画面中央にボタンを配置します。
バイブレーションのスタートボタンになります。

<?xml version="1.0" encoding="utf-8"?>
<LinearLayout xmlns:android="http://schemas.android.com/apk/res/android"
    xmlns:tools="http://schemas.android.com/tools"
    android:layout_width="match_parent"
    android:layout_height="match_parent"
    android:orientation="vertical"
    android:paddingBottom="@dimen/activity_vertical_margin"
    android:paddingLeft="@dimen/activity_horizontal_margin"
    android:paddingRight="@dimen/activity_horizontal_margin"
    android:paddingTop="@dimen/activity_vertical_margin"
    tools:context=".MainActivity">

    <Button
        android:layout_width="match_parent"
        android:layout_height="wrap_content"
        android:onClick="onStart"
        android:text="START"
        android:textSize="50dp" />

    <Button
        android:layout_width="match_parent"
        android:layout_height="wrap_content"
        android:onClick="onStop"
        android:text="STOP"
        android:textSize="50dp" />
    
</LinearLayout>

ボタンクリック時にバイブレーションが鳴ります。
本体の「バイブレーション有無」はチェックしていません。

package com.test.vibration;

import android.content.Context;
import android.os.Vibrator;
import android.support.v7.app.AppCompatActivity;
import android.os.Bundle;
import android.view.View;

public class MainActivity extends AppCompatActivity {

    @Override
    protected void onCreate(Bundle savedInstanceState) {
        super.onCreate(savedInstanceState);
        setContentView(R.layout.activity_main);
    }

    // STARTボタン    //////////////////////////////////
    public void onStart(View v) {
        // バイブレーションスタート(1秒:1000ミリ秒)
        ((Vibrator) getSystemService(Context.VIBRATOR_SERVICE)).vibrate(10000);
    }

    // STOPボタン    //////////////////////////////////
    public void onStop(View v) {
        // キャンセル処理
        ((Vibrator) getSystemService(Context.VIBRATOR_SERVICE)).cancel();
    }


    // 強制停止処理   //////////////////////////////////
    @Override
    protected void onPause() {
        super.onPause();
        // キャンセル処理
        ((Vibrator) getSystemService(Context.VIBRATOR_SERVICE)).cancel();
    }
}

Android Studio入門

15分で作る? 【バイブレーション①】~ 基礎編 ~

Android-Studio-入門【簡易版】タイトル768C

「15分で作る」シリーズはある程度知識のある方向けの動画です。
未経験の方でもコピペで再現出来るように目指していますが、理解には「RPGで学ぶ」「3分で学ぶ」を先にご覧ください。

バイブレーション(振動)を起動します。
限りなくシンプルに「とにかく起動すればOK」を目指した動画です。

難易度:★★☆☆☆ 未経験でも再現は簡単、アレンジは難しい

※ エミュレーターでは起動しません。
※ バイブ機能の有る実機のみテスト出来ます。

この動画はシリーズ物です。以下の順にご覧ください。

  1. 【バイブレーション①】~ 基礎編 ~
  2. 【バイブレーション②】~ 停止処理 ~
  3. 【バイブレーション③】~ リズム版 ~
  4. 【バイブレーション④】~ チェック版 ~

バイブレーションの起動はとても簡単です。
最短2行の入力とインポートだけで起動する事ができます。

バイブレーションの使用許可を記載します。

<uses-permission android:name="android.permission.VIBRATE" />

バイブレーションの実行を記載します。

((Vibrator) getSystemService(Context.VIBRATOR_SERVICE)).vibrate(1000);

AndroidManifest.xmlにパーミッション(使用許可)を1行追加します。
サンプルソースの5行目になります。

<?xml version="1.0" encoding="utf-8"?>
<manifest xmlns:android="http://schemas.android.com/apk/res/android"
    package="com.test.vibration">

    <uses-permission android:name="android.permission.VIBRATE" />
    <application
        android:allowBackup="true"
        android:icon="@mipmap/ic_launcher"
        android:label="@string/app_name"
        android:supportsRtl="true"
        android:theme="@style/AppTheme">
        <activity android:name=".MainActivity">
            <intent-filter>
                <action android:name="android.intent.action.MAIN" />

                <category android:name="android.intent.category.LAUNCHER" />
            </intent-filter>
        </activity>
    </application>

</manifest>

画面中央にボタンを配置します。
バイブレーションのスタートボタンになります。

<?xml version="1.0" encoding="utf-8"?>
<LinearLayout xmlns:android="http://schemas.android.com/apk/res/android"
    xmlns:tools="http://schemas.android.com/tools"
    android:layout_width="match_parent"
    android:layout_height="match_parent"
    android:orientation="vertical"
    android:paddingBottom="@dimen/activity_vertical_margin"
    android:paddingLeft="@dimen/activity_horizontal_margin"
    android:paddingRight="@dimen/activity_horizontal_margin"
    android:paddingTop="@dimen/activity_vertical_margin"
    tools:context=".MainActivity">

    <Button
        android:layout_width="match_parent"
        android:layout_height="wrap_content"
        android:onClick="onStart"
        android:text="START"
        android:textSize="50dp" />
    
</LinearLayout>

ボタンクリック時にバイブレーションが鳴ります。
本体の「バイブレーション有無」はチェックしていません。

package com.test.vibration;

import android.content.Context;
import android.os.Vibrator;
import android.support.v7.app.AppCompatActivity;
import android.os.Bundle;
import android.view.View;

public class MainActivity extends AppCompatActivity {

    @Override
    protected void onCreate(Bundle savedInstanceState) {
        super.onCreate(savedInstanceState);
        setContentView(R.layout.activity_main);
    }

    // STARTボタン    //////////////////////////////////
    public void onStart( View v){

        // バイブレーションスタート(1秒:1000ミリ秒)
        ((Vibrator) getSystemService(Context.VIBRATOR_SERVICE)).vibrate(1000);

    }
}