Android Studio入門

Android プログラミング【 ボタンで文字変更 】

5分で学ぶ Android プログラミング 【 ボタンで文字の変更 】768

前回の「ボタンで画像変更」「文字の変更」を追加します。

画面のボタンクリックで背景画像と説明文が変更します。

前回の動画に以下を追加すると可能です。( コピペでOK )

activity_main.xml

    <TextView
        android:id="@+id/t0"
        android:layout_width="wrap_content"
        android:layout_height="wrap_content"
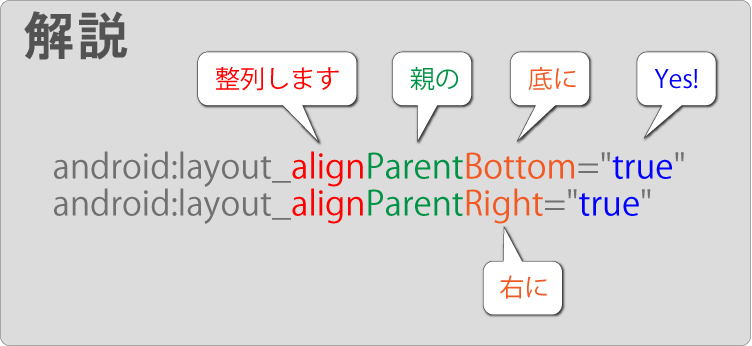
        android:layout_alignParentBottom="true"
        android:layout_centerHorizontal="true"
        android:text="aaaaaaaaaa"
        android:textSize="30dp" />

MainActivity.java

import android.widget.TextView;
((TextView)findViewById(R.id.t0)).setText("0mだよー");

画面作りは簡略化します。コピペでOKです。


<RelativeLayout xmlns:android="http://schemas.android.com/apk/res/android"
    xmlns:tools="http://schemas.android.com/tools"
    android:layout_width="match_parent"
    android:layout_height="match_parent"
    android:orientation="vertical"
    tools:context=".MainActivity">

    <ImageView
        android:id="@+id/back"
        android:layout_width="match_parent"
        android:layout_height="match_parent"
        android:scaleType="centerCrop"
        android:src="@drawable/b0" />

    <Button
        android:id="@+id/b0"
        android:layout_width="wrap_content"
        android:layout_height="wrap_content"
        android:onClick="b0"
        android:text="0m" />

    <Button
        android:id="@+id/b1"
        android:layout_width="wrap_content"
        android:layout_height="wrap_content"
        android:layout_below="@+id/b0"
        android:onClick="b1"
        android:text="10m" />

    <Button
        android:id="@+id/b2"
        android:layout_width="wrap_content"
        android:layout_height="wrap_content"
        android:layout_below="@+id/b1"
        android:onClick="b2"
        android:text="20m" />

    <TextView
        android:id="@+id/t0"
        android:layout_width="wrap_content"
        android:layout_height="wrap_content"
        android:layout_alignParentBottom="true"
        android:layout_centerHorizontal="true"
        android:text="あああああ"
        android:textSize="30sp" />

</RelativeLayout>

プログラミング(動的な変化)です。赤文字を適切な場所にコピペすると動くはずです。

package com.test.test0811;

import android.support.v7.app.AppCompatActivity;
import android.os.Bundle;
import android.view.Menu;
import android.view.MenuItem;
import android.view.View;
import android.widget.ImageView;
import android.widget.TextView;

public class MainActivity extends AppCompatActivity {

    // 0mのボタン
    public void b0(View v) {
        // 画像の変更 (b0画像を設定)
        ((ImageView) findViewById(R.id.back)).setImageResource(R.drawable.b0);
        ((TextView) findViewById(R.id.t0)).setText("浮上したよ");
    }

    // 10mのボタン
    public void b1(View v) {
        // 画像の変更 (b1画像を設定)
        ((ImageView) findViewById(R.id.back)).setImageResource(R.drawable.b1);
        ((TextView) findViewById(R.id.t0)).setText("10mです");
    }

    // 20mのボタン
    public void b2(View v) {
        // 画像の変更 (b2画像を設定)
        ((ImageView) findViewById(R.id.back)).setImageResource(R.drawable.b2);
        ((TextView) findViewById(R.id.t0)).setText("20mまで潜ったよ!");
    }

    @Override
    protected void onCreate(Bundle savedInstanceState) {
        super.onCreate(savedInstanceState);
        setContentView(R.layout.activity_main);
    }

    @Override
    public boolean onCreateOptionsMenu(Menu menu) {
        // Inflate the menu; this adds items to the action bar if it is present.
        getMenuInflater().inflate(R.menu.menu_main, menu);
        return true;
    }

    @Override
    public boolean onOptionsItemSelected(MenuItem item) {
        // Handle action bar item clicks here. The action bar will
        // automatically handle clicks on the Home/Up button, so long
        // as you specify a parent activity in AndroidManifest.xml.
        int id = item.getItemId();

        //noinspection SimplifiableIfStatement
        if (id == R.id.action_settings) {
            return true;
        }

        return super.onOptionsItemSelected(item);
    }
}


【解説】文字変更

Android Studio入門

Android プログラミング【 ボタンで画像変更 】

5分で学ぶ Android プログラミング 【 ボタンで背景変更 】768

前編 → YouTube
後編 → YouTube

画面上にボタンを配置して「ボタンを押すと背景画像が変わる」を学習します。
もちろん、背景画像だけで無く、キャラクター自信や表情も変更できます。

画像全般に対応

今回は「新規作成から完成」までを動画に納めたいので、細かい解説は省かせてもらいます。(m_m)
詳細は以下リンク先をご覧ください。

以下、背景画像をパソコン内に保存し、アプリ内のdrawableフォルダーに保存してください。

5分で学ぶ Androidアプリ【背景画像】b0
b0
5分で学ぶ Androidアプリ【背景画像】b1
b1
5分で学ぶ Androidアプリ【背景画像】b2
b2
5分で学ぶ Androidアプリ【背景画像】b3
b3
5分で学ぶ Androidアプリ【背景画像】b4
b4
5分で学ぶ Androidアプリ【背景画像】b5
b5

画面作りは簡略化します。コピペでOKです。

<RelativeLayout xmlns:android="http://schemas.android.com/apk/res/android"
    xmlns:tools="http://schemas.android.com/tools"
    android:layout_width="match_parent"
    android:layout_height="match_parent"
    android:orientation="vertical"
    tools:context=".MainActivity">

    <ImageView
        android:id="@+id/back"
        android:layout_width="match_parent"
        android:layout_height="match_parent"
        android:scaleType="centerCrop"
        android:src="@drawable/b0" />

    <Button
        android:id="@+id/b0"
        android:layout_width="wrap_content"
        android:layout_height="wrap_content"
        android:onClick="b0"
        android:text="0m" />

    <Button
        android:id="@+id/b1"
        android:layout_width="wrap_content"
        android:layout_height="wrap_content"
        android:layout_below="@+id/b0"
        android:onClick="b1"
        android:text="10m" />

    <Button
        android:id="@+id/b2"
        android:layout_width="wrap_content"
        android:layout_height="wrap_content"
        android:layout_below="@+id/b1"
        android:onClick="b2"
        android:text="20m" />

</RelativeLayout>


プログラミング(動的な変化)です。赤文字を適切な場所にコピペすると動くはずです。

package com.test.testf;

import android.support.v7.app.AppCompatActivity;
import android.os.Bundle;
import android.view.Menu;
import android.view.MenuItem;
import android.view.View;
import android.widget.ImageView;

public class MainActivity extends AppCompatActivity {

    // 0mのボタン
    public void b0(View v) {
        // 画像の変更 (b0画像を設定)
        ((ImageView) findViewById(R.id.back)).setImageResource(R.drawable.b0);
    }

    // 10mのボタン
    public void b1(View v) {
        // 画像の変更 (b1画像を設定)
        ((ImageView) findViewById(R.id.back)).setImageResource(R.drawable.b1);
    }

    // 20mのボタン
    public void b2(View v) {
        // 画像の変更 (b2画像を設定)
        ((ImageView) findViewById(R.id.back)).setImageResource(R.drawable.b2);
    }

    @Override
    protected void onCreate(Bundle savedInstanceState) {
        super.onCreate(savedInstanceState);
        setContentView(R.layout.activity_main);
    }

    @Override
    public boolean onCreateOptionsMenu(Menu menu) {
        // Inflate the menu; this adds items to the action bar if it is present.
        getMenuInflater().inflate(R.menu.menu_main, menu);
        return true;
    }

    @Override
    public boolean onOptionsItemSelected(MenuItem item) {
        // Handle action bar item clicks here. The action bar will
        // automatically handle clicks on the Home/Up button, so long
        // as you specify a parent activity in AndroidManifest.xml.
        int id = item.getItemId();

        //noinspection SimplifiableIfStatement
        if (id == R.id.action_settings) {
            return true;
        }

        return super.onOptionsItemSelected(item);
    }
}

プログラムの流れ

画像が変更!!

Android Studio入門

Android Studio 開発【 プロパティウインドウ 】

3分で学ぶ Android Studio【 プロパティウインドウ 】768B

Component Tree(コンポーネント ツリー)とpropertys(プロパティズ)の解説動画で、操作ミスしやすい部分を解説したいと思います。

この動画は「アプリ新規作成」を済ませた状態でご覧ください。
3分で学ぶ Android Studio【 画面解説 】
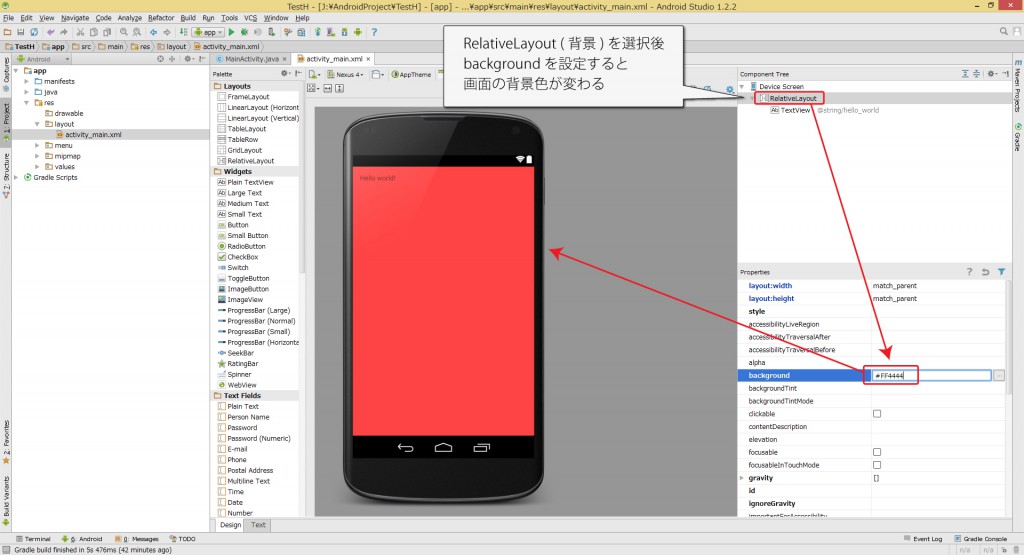
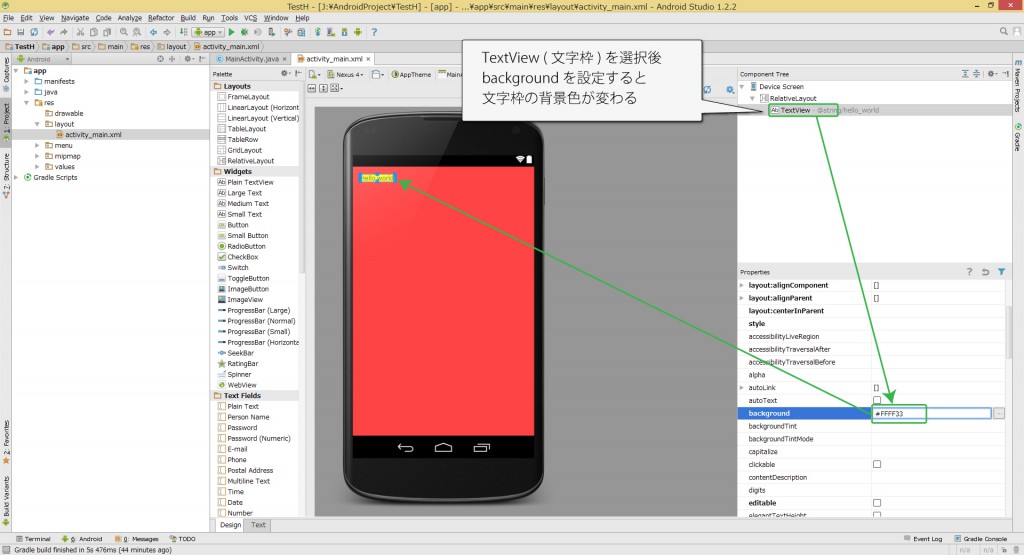
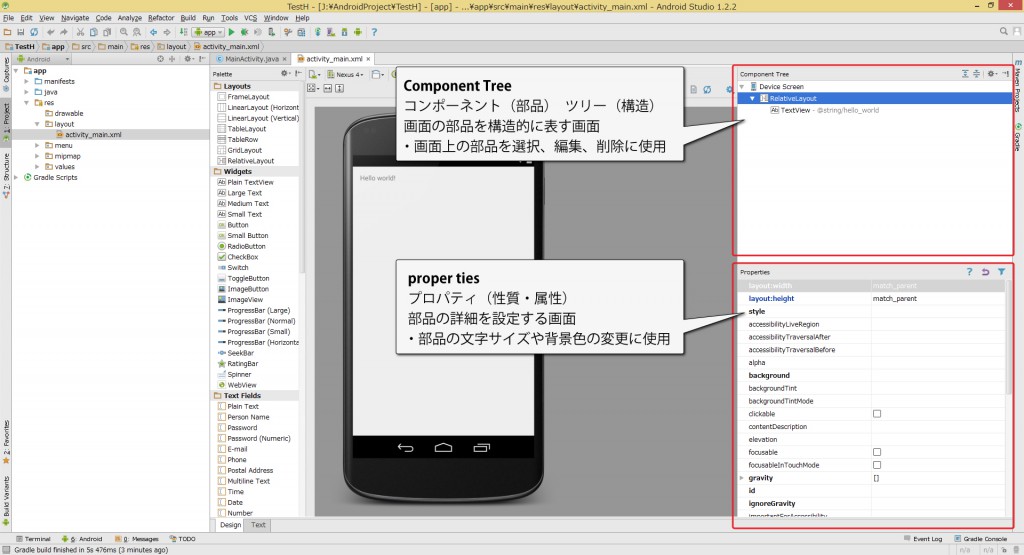
Component Treeとproper ties
  • コンポーネント(部品) ツリー(構造)
  • 画面の部品を構造的に表示する画面

※ 画面上の部品を選択、編集、削除等に使用

  • プロパティ(性質・属性) 
  • 部品の詳細を設定する画面

※ 部品の文字サイズや背景色の変更に使用

3分で学ぶ Android Studio【 RelativeLayout 】
RelativeLayout を選択
3分で学ぶ Android Studio【 TextView 】
TextViewを選択

簡単な操作ですが、簡単な操作ほど操作ミスしやすいので気をつけてください☆

Android Studio入門

Android Studio 開発【 レイアウトの変更 】

3分で学ぶ Android Studio【 レイアウトの変更 】768

Android Studioでのレイアウト学習する動画です。
GUIで作成せずTextタブ(XML)でレイアウトの変更をすることでXMLの理解を深めます。

この動画は「アプリ新規作成」を済ませた状態でご覧ください。
レイアウト比較
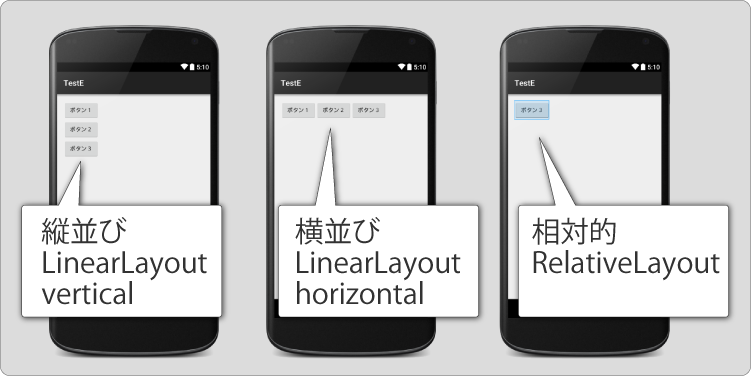
レイアウト比較

・Linear :リニア 、直線上の
・Layout :レイアウト、配置
・vertical:バーチカル、垂直
 → 垂直に並べる

・Linear :リニア 、直線上の
・Layout :レイアウト、配置
・horizontal :ホリゾンタル、水平
 → 水平に並べる

・Relative :リラティブ 、相対的
・Layout :レイアウト、配置
 → 相対的に並べる( 他を基準にして・画面の真ん中 )
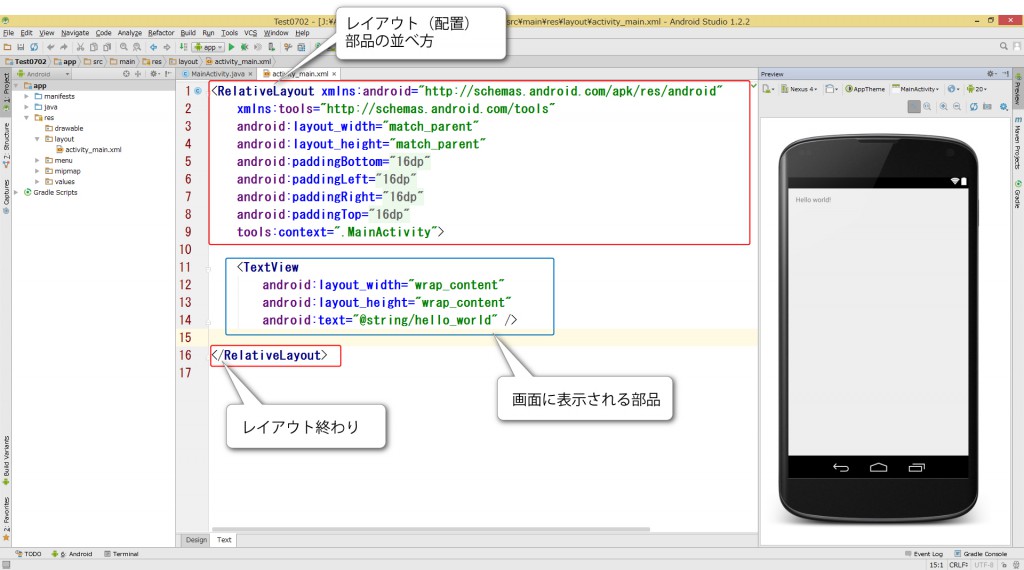
レイアウトの変更【XML解説】
レイアウトの変更【XML解説】
<LinearLayout xmlns:android="http://schemas.android.com/apk/res/android"
    xmlns:tools="http://schemas.android.com/tools"
    android:layout_width="match_parent"
    android:layout_height="match_parent"
    android:paddingBottom="@dimen/activity_vertical_margin"
    android:paddingLeft="@dimen/activity_horizontal_margin"
    android:paddingRight="@dimen/activity_horizontal_margin"
    android:paddingTop="@dimen/activity_vertical_margin"
    android:orientation="vertical"
    tools:context=".MainActivity">

    <Button
        android:layout_width="wrap_content"
        android:layout_height="wrap_content"
        android:text="ボタン1"/>
    <Button
        android:layout_width="wrap_content"
        android:layout_height="wrap_content"
        android:text="ボタン2"/>
    <Button
        android:layout_width="wrap_content"
        android:layout_height="wrap_content"
        android:text="ボタン3"/>


</LinearLayout>
Android Studio入門

Android Studio 開発【 XMLでボタンの配置 】

3分で学ぶ Android Studio【  ボタンの配置 】768

Android Studioでのレイアウト学習する動画です。
GUIで作成せずTextタブ(XML)でボタンを配置することでXMLの理解を深めます。

この動画は「アプリ新規作成」を済ませた状態でご覧ください。
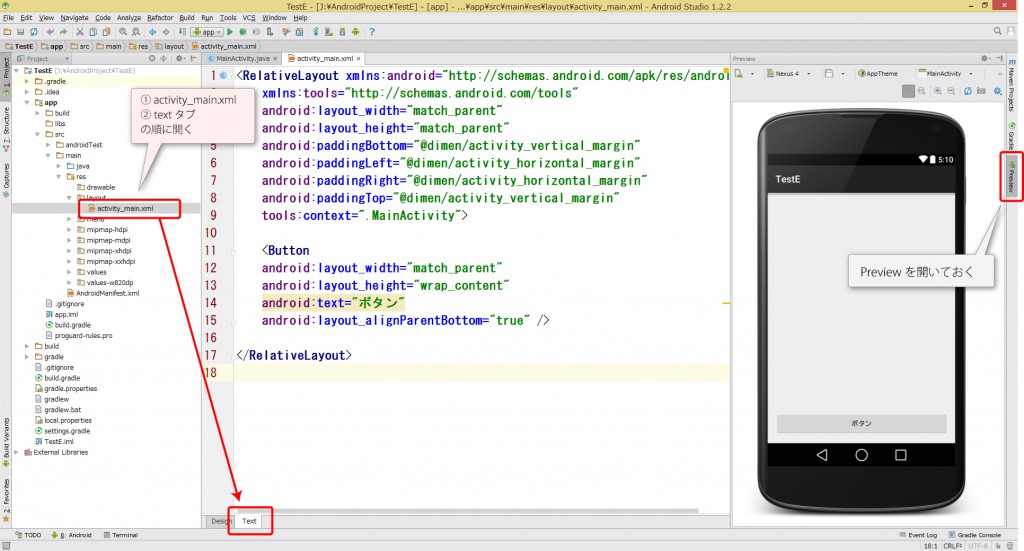
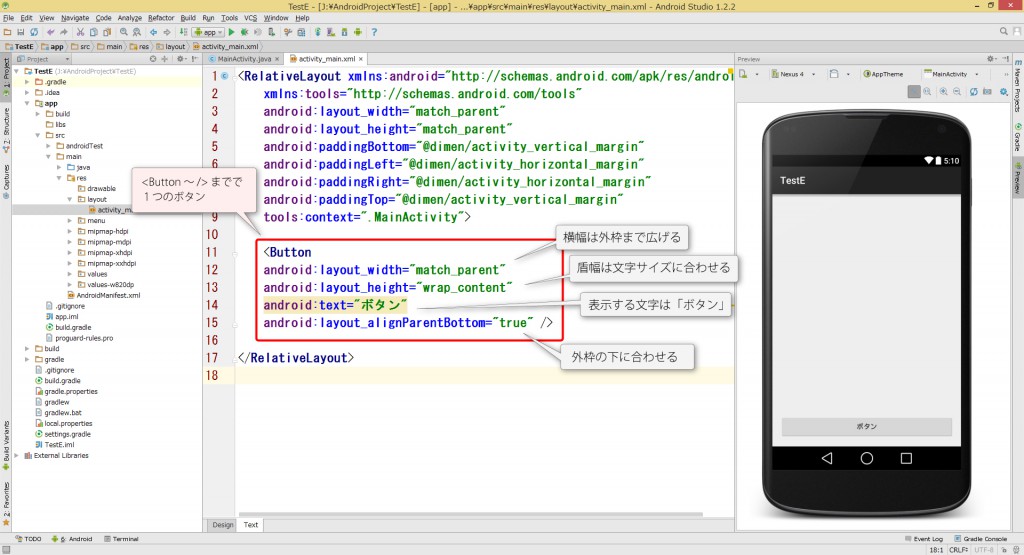
3分で学ぶ Android Studio【 ボタンの配置 】 Textタブを開く
Textタブを開く
3分で学ぶ Android Studio【 ボタンの配置 】 XML解説
XML解説
3分で学ぶ Android Studio【 ボタンの配置 】 XML解説2
3分で学ぶ Android Studio【 ボタンの配置 】 XML解説
<RelativeLayout xmlns:android="http://schemas.android.com/apk/res/android"
    xmlns:tools="http://schemas.android.com/tools"
    android:layout_width="match_parent"
    android:layout_height="match_parent"
    android:paddingBottom="@dimen/activity_vertical_margin"
    android:paddingLeft="@dimen/activity_horizontal_margin"
    android:paddingRight="@dimen/activity_horizontal_margin"
    android:paddingTop="@dimen/activity_vertical_margin"
    tools:context=".MainActivity">

<Button
    android:layout_width="match_parent"
    android:layout_height="wrap_content"
    android:text="ぼたん"
    android:layout_alignParentBottom="true"
    />

</RelativeLayout>
Android Studio入門

Android Studio 開発【 パレットウインドウ 】

3分で学ぶ Android Studio【 パレットウインドウ 】768

Paletteウインドウの解説動画で、主要な部品を解説しています。
この動画は「アプリ新規作成」を済ませた状態でご覧ください。
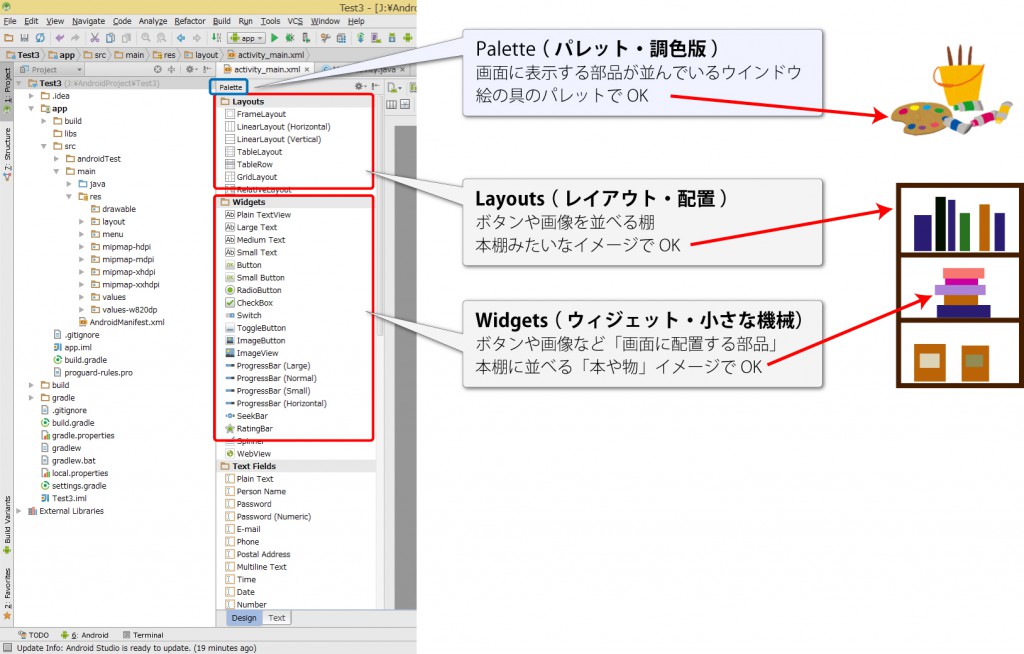
3分で学ぶ Android Studio【 layoutとwidget 】2
Android Studioのlayoutとwidget

パレットのイメージ
パレットイメージ

画面に表示する部品が並んでいるウインドウ
絵の具のパレットでOK

layoutイメージ
layoutイメージ

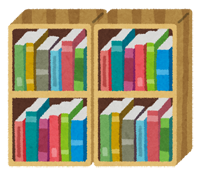
ボタンや画像を並べる棚
本棚みたいなイメージでOK

Widgetイメージ
Widgetイメージ

ボタンや画像など「画面に配置する部品」
本棚に並べる「本や物」イメージでOK

Android Studio入門

Android Studio 開発【 フォルダ構成 】

3分で学ぶ Android Studio【 フォルダ構成 】768

Projectウインドウの解説動画で、主要なフォルダを解説しています。

この動画は「アプリ新規作成」を済ませた状態でご覧ください。

3分で学ぶAndroid Studio【 フォルダ構成 】リソースフォルダ2
Android Studioのフォルダ構成

アプリで使用する素材は以下階層に保存
※ 画像、音楽、文字などを保存

画像を保存するフォルダ
※ 背景画像やアプリのアイコンを保存
※ drawableが旧規格で低スペックでもOK、mipmap新規格で綺麗に表示できる模様。
※ 最初はdrawableを利用し、慣れてくるとmipmapも使用するでOK

メニューの表示内容を保存
※ オプションメニューの表示内容などを記載

文字や定数を保存
※ ボタンに表示する文字や外国語表示の文字を記載

Android Studio 開発【 ファイル構成 】

3分で学ぶAndroid Studio【 ファイル構成 】

Projectウインドウの解説動画です。
主要なファイルを解説しています。

この動画は「アプリ新規作成」を済ませた状態でご覧ください。

3分で学ぶAndroid Studio【 ファイル構成 】 ファイル解説2

Project

表示をProjectにしておく
※ 他でも編集可能です。

MainActivity

プログラム(動的な命令)を記載するファイル
※「ボタンを押したら背景色を変えなさい」などを記載

activity_main.xml

レイアウト(画面の見た目)を記載するファイル
※「ボタンを右上に表示」などを記載

AndroidManifest.xml

アプリの設定などを記載するファイル
※「アプリアイコン」や「対応バージョン」などを記載

Android Studio入門

Android Studio 開発【 画面構成 】

3分で学ぶAndroid Studio【 画面構成 】768

Android Studioの画面構成の解説動画です。
アプリ作成の前の基礎知識としてとらえてください。

この動画は「アプリ新規作成」を済ませた状態でご覧ください。
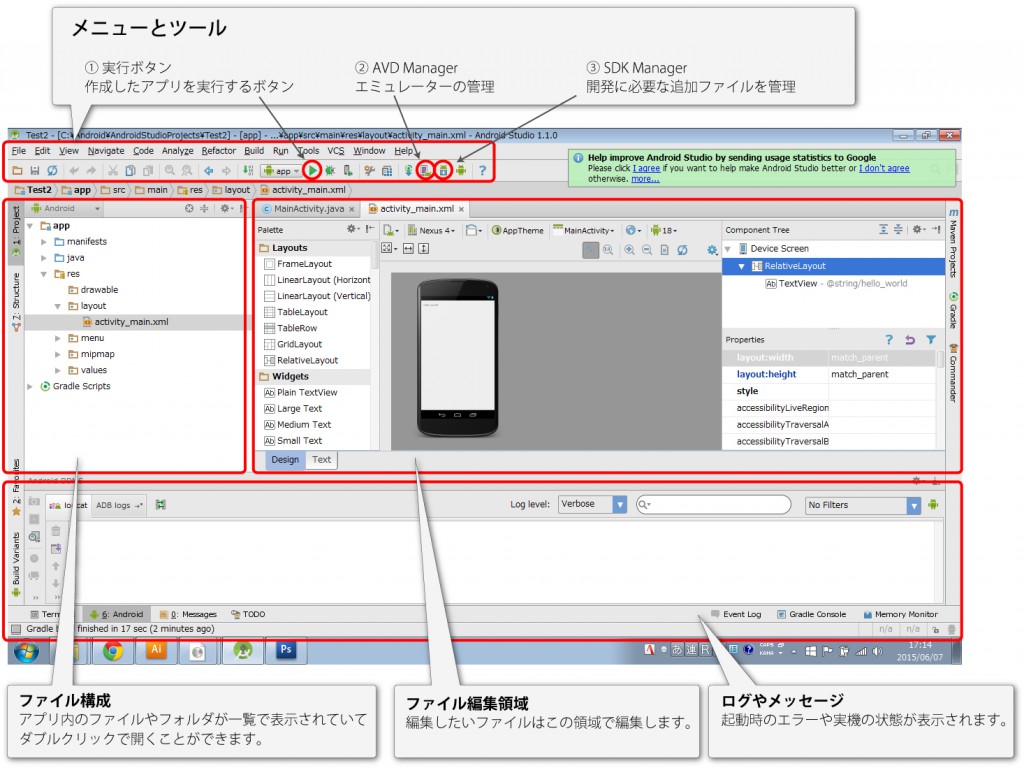
Android Studio 画面構成
Android Studio 画面構成

メニューとツール

  1. 実行ボタン :作成したアプリを実行するボタン
  2. AVD Manager :エミュレーターの管理
  3. SDK Manager :開発に必要な追加ファイルを管理

ファイル構成

アプリ内のファイルやフォルダが一覧で表示されていてダブルクリックで開くことができます。

ファイル編集領域

編集したいファイルはこの領域で編集します。

ログやメッセージ

起動時のエラーや実機の状態が表示されます。